Leaderboard


Popular Content
Showing content with the highest reputation on 06/18/2022 in Posts
-
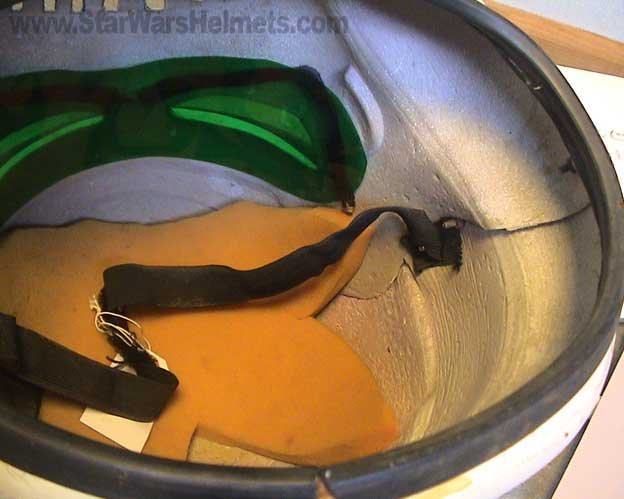
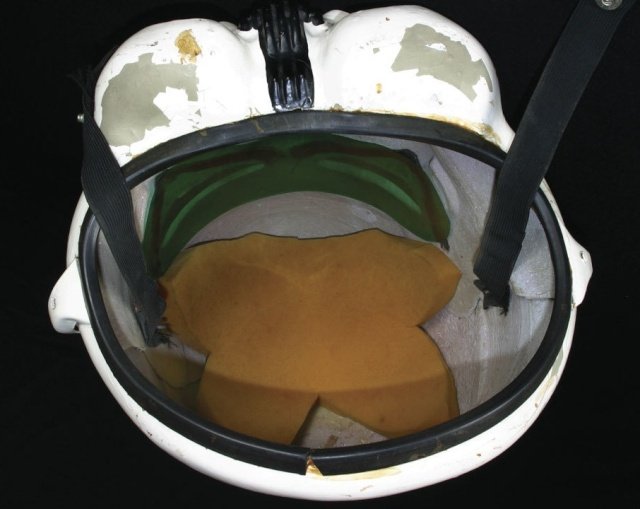
What they look like on the inside For anyone looking for more information on this version Purge Trooper head to FB Purge Trooper 2.0 Builders
 2 points
 -
This interesting guy2 points
-
Hello, I am a cadet in the south Texas Garrison and I am beginning my TK build from Walt’s. BBB was yesterday and now it’s time to start trimming. Any advice or suggestions are always welcome here and I do have a mentor that is helping me. I also want this thread as a visual record of my journey to becoming a TK. Again thank you in advance for any help you may be able to give me along the way. TK ( cadet )1 point
-
First/last name: Matthew Landes Forum Name: TK Monkus TK ID# 66007 Garrison: Southern California Garrison Armor maker: RS Propmasters Helmet maker: RS Propmasters Cloth belt maker: RS Propmasters Neck seal maker: RS Propmasters Boot maker: Imperial Boots Blaster maker: Hellhounds Props Height: 5'9" Weight: 130 lbs TK type: ANH Stunt Front Back Left Side Left Detail Right Side Right Detail Action Shot Ab Buttons Cod Interior Strapping Wrist Helmet Front Left Right Back Hovi Tips Lens Accessories Neck Seal TD Holster Belt Boots Gloves Blaster Left Right D-Ring Additional Sniper Plate Thigh Ammo Belt Thanks for the inspection! M1 point
-
Hello everyone A mass update is underway that covers all our CRL's. We are introducing some text that covers 3D printed Blasters, weapons and accessories. This has been added to the template at the opening section of all our CRL's as of today, but I will also be adding it specifically to the EIB section of each CRL. The detachment staff all agree this is a common sense addition for anyone considering not only using a 3D printed weapon or approvable accessory based on the costume, but also that at our higher levels the expectation is that is should resemble one of the several high quality resin or metal versions available. This does not affect basic level as blasters and weapons are not required. The following text is now viewable at the top section of all our CRL For higher levels of approval EIB and Centurion: For costumes with only blasters. 3D printed blasters can not contain visible print lines and must be sanded smooth for a more realistic appearance. For costumes with both blasters and accessories. 3D printed blasters and any approvable accessories can not contain visible print lines and must be sanded smooth for a more realistic appearance. The ANH Stunt already has similar wording in the Level 2 section which will be duplicated across all in the coming week. UPDATE: CRL's have now been updated . I believe most will agree that maintaining our standard is important and that acknowledging 3D printed items are a viable source of additions to your costume that the standard of finish should be as good as, if not better than other available products. There is also a new post in the Expert infantry section with some example of correctly finished 3D printed blaster and images of incomplete prints and the work needed to bring them in line. With unquestioned loyalty Sly11 TK114691 point
-
Great job on the ears. It really is a tedious task and not having a deemed would make it even tougher. Keep up the good work. It seems things are starting to get better for you and you are getting more comfortable with the build. ‘’also love the cat tree? Helmet stand”1 point
-
Thank you for the encouragement sir!!1 point
-
You got it! Are these helpful?1 point
-
Awesome, thanks! I'll check them out. I spent a bunch of time over the years painting Warhammer models, but my only weak spot is freehand painting, so those tube stripes are gonna give me a bit of a pause, but I'm sure they'll come out great once I figure out the angle.1 point
-
Welcome to the forum, Chris. I’ve been following your post on Facebook and it’s great to now have you here, too. Feel free to share photos of your kit, questions, anything we can help with. Best wishes Dan1 point
-
1 point
-
Is this the right way to put the neck seal on or is it upside down (I tend to like to put things on upside down apparently).1 point
-
Thank you all for the warm welcome.1 point
-
You can pretty much do what ever you want on the inside. I have two fans on separate switches, thin foam on the inside top and 2" blocks either side which sit just in front of the ears, keeps the helmet from wobbling around. Here's just a few threads When in doubt you can also use the references in the Gallery Sections https://www.whitearmor.net/forum/gallery/category/24-anh-tk-reference/ Some great outside references from starwarshelmets.com http://www.starwarshelmets.com/original-ANH-Stunt-Stormtrooper-armor-helmets.htm1 point
-
Hey Mark, Welcome aboard! Sounds like you have your hands full in life. As with many of us, you’ll be juggling TK stuff in amongst the daily grind. Regarding the paints, all of mine for TKs are Enamel. I find that these give a very authentic finish. If you’d like any tips on hand painting an ANH Stunt helmet, please feel free to check out my recent video series: Regarding Snaps (commonly referred to as “poppers” in the UK), I found this video very useful. This maker uses single snaps, but there is no reason why you couldn’t double up if you need to. (I’ve never felt it necessary, but, many choose double snaps). Great to have you join the forum and great to see you’re asking lots of questions. You’re on the path to the dark side, for sure. Best wishes, CableGuy1 point
-
Okay. Here's my first attempt at figuring out what's going on with these scraggly wires. I don't think I quite have it right, but think I'm on the right track. I tried a few things to get it even this far. I first thought it may be a braided wire. A roll of 1/8" braided wire was something like $30, so I braided up some of my own by hand and was instantly happy I didn't spend that money. The braiding was far too wide and large. The original blaster behind Leah definitely just had some fraying on the end, making it poof out. The original blaster also has a wire helping secure the power cylinders around the clip receiver. I don't have that on mine and don't intend to replicate that detail, but it's pretty interesting and only something I noticed when mine was in hand and I noticed that a "step" was missing behind that receiver. Same thin wire they used to hold the counter in place. Also also, the gun behind Leah is missing the right hand far bottom T-track. That's the only way that light would show through the bottom row from this angle - if that T-track wasn't there. But I digress. Back to the wires. Mine isn't quite right compared to the screen one. It's too long, making the wire go down and across in a rather square shape instead of down at a diagonal angle. But I think this is what was going on - black tape or something similar holding the wire in place on the counter. My theory is that the wires got PAINTED black just like the rest of the blaster. I don't think it was insulated wire due to the fraying you can see in the screen capture. The foreground wire takes an immediate U turn coming out of the counter and the goes toward the power cylinder. The wires seem to go straight underneath the power cylinder and connect near the resistors. Connecting wires to the backs of the power cylinder centers gave a different look than what was present in that original screen capture. Mine are just floating in place so I can move them all about and reposition as I notice new things. The original was apparently a functional gun shooting blanks, so the clip release button would have needed to function. And in order to get to that clip release, the wires need to move out of the way. In the act of pressing that clip release, moving the wires out of the way exactly as seen in the screen capture is the most natural way to do it. The one nearest the barrel gets a bit closer to the barrel and tends to go straight down. The other wire in the foreground gets shoved and does this U turn thing to give thumb room for the prop person to change the clip. And here it is from behind. Not such a strange routing due to the need to press that release button downward. I need to fiddle with this more and think about it more, but I feel like I'm nearly there.1 point