
Leaderboard


Popular Content
Showing content with the highest reputation on 09/10/2021 in Posts
-
Nice work Jacob, I see your power outlets are amazed as well!4 points
-
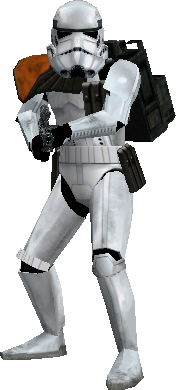
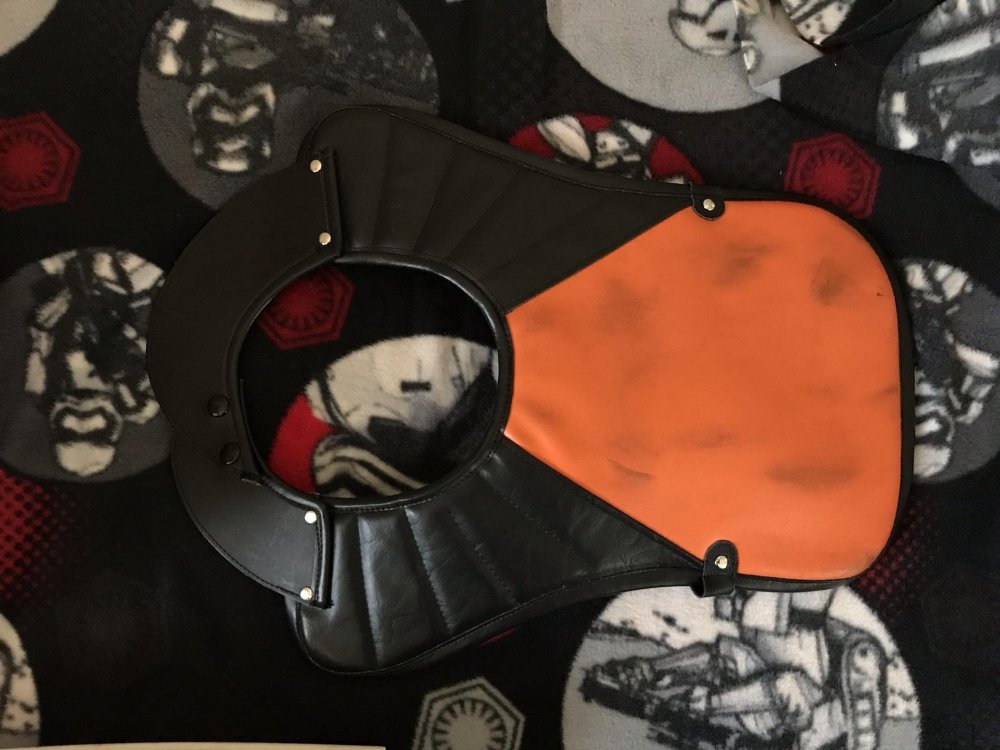
Name: Jacob Gonzales Username: Pistolsheets TK-86267 Southern California Garrison Inland Empire Squad Armor Maker = Anovos Helmet Maker = Anovos Blaster Type = E-11 by Hyperfirm, T-21 by Inland Empire Armory Height = 5'10 Weight = 170lbs Weapon Pack = Custom Built UKSwrath tutorial Pauldron = TrooperBay Pouches = TrooperBay / Imperial Boots Accessories = Macrobinoculars by justjoseph63 Boot Maker = Imperial Boots Canvas Belt = Kittle Belt Hand Plates = TrooperBay rubber latex plates Electronics = Icomm, UKSWrath fans, Microphone, Aker speaker Neck Seal Type = Anovos *After reviewing my submission photos I will be tightening the closure of the pauldron to minimize the loop around the neck and pull up the MP-40 pouch in the front. **I’ve also painted the 4 silver rivets on the pauldron black to minimize visibility. Front Back: Left Body: Action: Helmet: Front: Back: Left: Right: Detail: Belt: Neckseal: Pouches: Pauldron: Boots: Gloves: Blaster: T-21: E-11: Macrobinocs: Backpack: Strapping:3 points
-
Thank you sir, they’re just as shocked as I am.3 points
-
It wasn't the alignment, lol, I was pointing out the lack of return edges.2 points
-
1 point
-
Yes, exactly! After I submitted photos I plan to add more snaps to close up the neck loop. The intended result would be the rivets coming in and pulling up the shoulder pouch. Thanks for the advice, I have some paint on stand by if all else fails.1 point
-
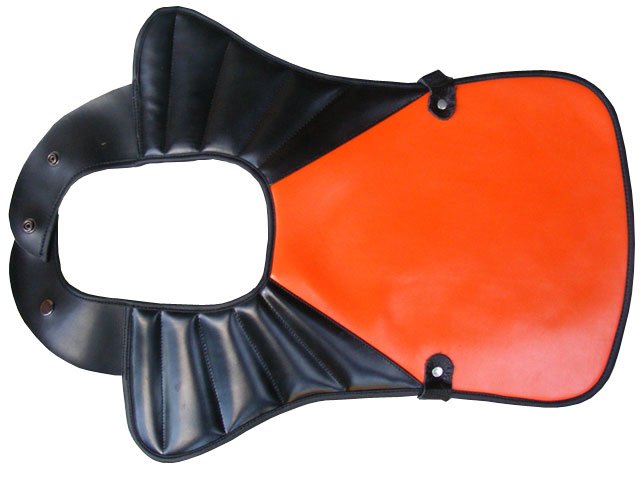
I only mention the rivets as it came up in Richard's build thread the rivets shouldn't be seen when worn, so as long as they are not seen you should be ok, entirely up to the DO's in the end, I've seen both approved previously You may be able to adjust your pauldron for photos, you have some room there, you could also add a little black paint to the rivets, make them less noticeable . Example given References
 1 point
 -
Thanks!1 point
-
Thats awesome brother! Love to see more HWT out in the world! Good luck in your build and future submissions!1 point
-
Nice work trooper, you may want to add a close up of the front of your sniper plate, I know the DO's like to see that. You may also want to check the CRL image for the pauldron, doesn't have the 4 silver rivets on the neck closure
 1 point
 -
Very nice Jacob. I'm at the end stages of my HWT pouches and pack, so hopefully won't be far behind you. Thanks for the inspiration!1 point
-
Thank you, gmrhodes13. I’ve got my heating iron and this sink has some great curves on it that I’ve already started to make use of as a buck to work against. Kind of like a 3D french curve set.1 point
-
Thanks, Joseph. Good list of stuff to keep me busy. I appreciate the suggestion to look into EIB/Centurion while I wait. Might as well dig in and fully understand the what and the how now.1 point
-
A couple of threads you may find useful about forming return edges, using a plug/mold can be quite helpful too Example1 point
-
Great decision. ATA is a little thicker than most, I find a dremel really handy for trimming. Here is a great helmet tutorial to study for when it arrives. Last I heard ATA was waiting for a shipment of ABS so hopefully the wait isn't too long. Looking forward to seeing some BBB photos in the not too distant future1 point
-
2 of my concerns when applying any type of coating is one any color bleed as this has happened to some in the past and the other is build up of sweat, it's amazing how much liquid you can find in armor pieces after a really hot troop. Nice work getting that coating off. What ever you fix on one side best to do the same on the other. I find RS also suffers from a lot of stress cracking, going over the armor and slightly bending in places that you would normally move is a good way of testing for any pre cracking.1 point
-
Yep, decided to take everyone’s advice and got on the ATA bucket waitlist instead.1 point
-
Welcome, Bobby, and GREAT to hear that you pulled the trigger on ordering your RS armor! While you "hurry up and wait" for BBB to arrive, I would suggest a few things: 1. Get all your build supplies lined up and on hand. Nothing worse that having to stop in the middle to order or buy something. Link here. 2. Once your kit arrives, start a build thread. Trust me on this one. Does it take extra time? Yep, but there you can ask all the questions you like (no matter how small), and add photos. Lots of them. Adding pics is especially important when you have an issue. 3. Hopefully you will be aiming for Expert Infantry and then Centurion levels after Basic 501st approval, and this is MUCH easier to do during your build rather than after, and not as difficult as you may think! I have a thread here which will answer a lot of questions as well as show you what we look for when approving those. 4. Most importantly.. take....... your....... time. I 'm sure you want to get it done so you can get out and troop, but rushing leads to mistakes. Consider it a marathon, not a sprint, and you will have one awesome looking set of armor when you are done. We are here to help every step of the way, all you you have to do is ask.1 point


.thumb.png.a6ed6181c5fa602617131001cb8f5718.png)