Leaderboard


Popular Content
Showing content with the highest reputation on 03/17/2021 in Posts
-
I'm switching over to ESB because I like the look more and I have two other costumes that could use an ESB E11. It's going to be a slow process, because I'm also sizing down my kit as I lost weight. Can wait to document the process!2 points
-
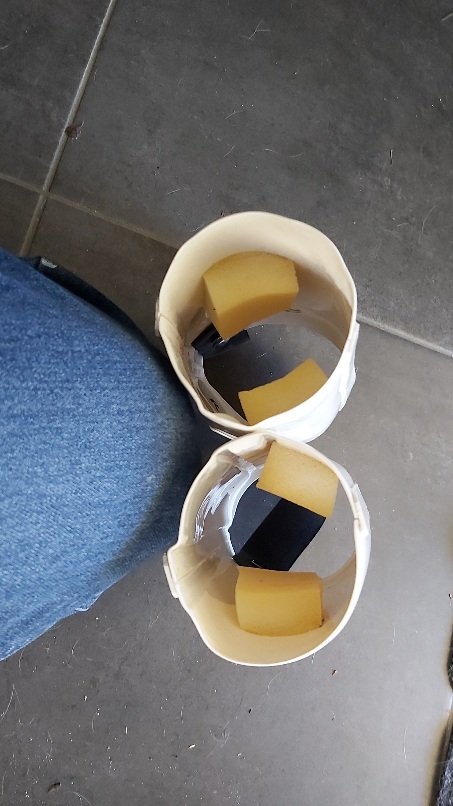
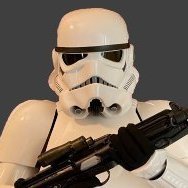
Normally with armor with the raised areas we try to keep to the minimum sizing, cover strips for biceps and forearms is 16mm, so you would trim 8mm each side from the start of the raised section. But larger covers strips are acceptable if you need it. I find once glued you can't force apart when flexing your bicep, although it's pretty rare I do that. For thinner arms you will need to add some foam to the insides to keep them central and stop them flopping around. Here's an image of my forearms (don't have a bicep handy) 16mm coverstrips
 2 points
 -
Update: It was recommended that TrooperMaster on FB uses a similar color plastic and could supply me with scrap for shims. I’m in contact with him to try and get some and will let you know how it turns out.1 point
-
Been so busy with Tax prep and other stuff, but I did find time to start gluing some of the black painted parts to the white shell. decided to make a few small divots in the glue surfaces. I masked of areas where I wanted glue as well, to give the E6000 direct surface to surface grab, and the divots maybe helped just a bit more. As I was fitting the Flash hider, I discovered an OOPS with my masking on the front. I masked off to much! I forgot it had flutes on the sides, and the resin print is visible... I was going to fill it in with back but decided it should be white under there... time to mask better and paint again.1 point
-
You are very close, Cory! For Basic they should pass, but we would ask that you tighten them up a bit since you are aiming for EI and then Centurion. Not sure if it's the photos, but there seems to be specks of something in many places on the button plates and other parts of the ab plate. To clean up the areas shown below, this is what I would suggest: Use some cotton swabs lightly dipped in mineral spirits (I use the odorless type) to carefully remove any residual paint. Once the paint is removed, use dry swabs to remove any spirits from the surfaces and dry them thoroughly with paper towels. Don't let the spirits dry on the ABS or keep them on too long or it may damage the surface As Glen mentioned, the paint looks really thick in some areas. It would be a pain in the butt-plate, but removing it all and starting from scratch using a template like this or making your own may be the way to go. If you do, here is a tip: After pressing the template(s) firmly down, them hit them with a VERY light coat of white paint. Let that dry and then hit them with a medium coat of the blue (not too heavy).. just enough to be opaque. Doing it that way, the white paint seals the edges so the blue won't bleed underneath, giving you clean, crisp lines. I have a tutorial here if it helps.1 point
-
Deleted Nice work on the fixes1 point
-
I wish I could delete posts as I guess I had a connection issue and my same post was posted several times..... Anyways! I have a few things to do to prep for centurion. First thing is my blaster. Repainted the grip. I think it looks better: Hengslter counter was noted in being in the incorrect position . This is how it came from RS and it looks to be fused to the gun. I am going to try and remove it and reposition it. Just need to go to the hardware store and try and find the best tool. Next issue: My right shoulder tab is not resting nicely on my back tab So I had both shoulder straps shaped to the exact same curvature so I was curious as to why it didnt look right on one side. It looks like it is a combination of the armor not being perfectly symmetrical and the biggest factor....my shoulders are not even! one shoulder is higher than the other. I was aware of this but did not know it was enough to affect my shoulder straps. As you can see the curvature for the right side had to be made more drastic than the other side: Left side: Right side: Though I thought this looks funky......the end result seems to make the straps sit evenly. This is also without the aid of the white elastic straps: *(elastic straps are resting underneath the plastic straps) Next task I am working on is my shoulder bells hovering on top of my shoulders: I really dont know why this is happening......I spent a great amount of time making sure the armor was sized to me pretty well. I think I am going to tighten the strapping system on my chest plate to bring it down a little. I will see if that works first. Any ideas would be appreciated.1 point
-
Mario, as always, thank you beyond words for all of the help and encouragement. Means a lot brother.1 point
-
WOW.. excellent idea, Jonathan!! I have added this item to my "Supply List" thread. Thanks!!!1 point
-
Many of us use mesh on the teeth area, no issues with approval all the way to L3 I use a quick dry acrylic paint for the inside of the helmet, hasn't reacted with the ABS. I've seen some use a water based acrylic and brush on, dries with a matt finish and is pretty durable once dry. I tried a balaclava at first but it just increases the heat so I don't use one now.1 point
-
Inside of the helmet looks good, nice tidy job Rod.1 point
-
I used these tiny sponge tips from testors to paint my buttons on my Walt's ab buttons. If your still having trouble, might wanna give these a try. With these I kinda just drew them on. Also, I had the habit of not mixing my paints very well before use. Really mixing the paint for a few minutes really helps with getting a nice coat. Sent from my SM-N970U using Tapatalk1 point
-
Walking around or being near a breeze can certainly help stop fogging, but yes standing still you can really heat up and fog, I use one fan at a time, it's great for long troops in case your batteries run down, then you can hit the other fan button.1 point
-
Hi Ardeshir, Great to know, as expected , you're working on the L3 requirements. About your question, for the review we consider both, CRL and as much reference images as we can see. This TD seam was posted as a suggestion only according to the screen captures and reference images. Yours is, indeed, a great armor build and it's all about your preference to leave the TD as it, this won't be a L3 blocker in no way brother. keep on doing a great work Ardeshir and looking forward for your Centurion submission soon , keep it up !!1 point
-
I am very happy my armor was approved for EIB. Mainly due to the massive help from those of you who have followed me. This weekend I will make the recommended adjustments to have a chance at centurion.1 point
-
Submitted to GML for basic.1 point