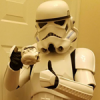
vettereddie[TK] Posted March 12, 2017 Report Posted March 12, 2017 (edited) Basic InformationName: Brian VetterLegion ID: 75053Garrison: Old Line Garrison Mandatory InformationArmor Maker = AnovosHelmet Maker = AnovosBlaster Type = Hyperfirm E-11 (standard) Optional InformationHeight = 6' 0"Weight = 172 lbsBoots Maker = Imperial BootsCanvas belt = TKittelHand Plates = Anovos ABSElectronics = Aker/iComm/Steren wirelessNeck Seal = Cloth / AnovosHolster = AnovosLenses = Trooperbay dark green lensHovi Mic Tip screens - Ukswrath D-Ring = Lowes Armor Photos Full Body Front Full Body Back Full Right Full Left Right Side Detail Left Side Detail Helmet Detail Photos Front Right Side Left Side Back Hovi Tip Detail Lens Color Accessory Photos Ammo Belt Front Ammo Belt Rear Neck Seal Blaster Left Side Blaster Right Side Blaster D-Ring Thermal Detonator Back Action Shot Optional Internal Strapping Ab Detail Cod and Butt Plate Attachment Helmet Interior Helmet Electronics Front (fans & mic) Helmet Electronics Rear (battery & transmitter) *** UPDATES *** Calf Closure Right Shoulder Strap Left Shoulder Strap *** UPDATES #2*** Helmet (Left Eye Cleaned Up) Shoulder Bell Strap Shortened Shoulder Bell Left Shoulder Bell Right Shoulder Bells Rolled Forward (on body-fitted duct tape mannequin) Sniper Knee Left Sniper Knee Right Thigh Ammo Pack Rivet Left Thigh Ammo Pack Rivet Right Edited March 24, 2017 by vettereddie 1 Quote
Haribon72[TK] Posted March 14, 2017 Report Posted March 14, 2017 Hello Brian, I have some items for help improve your application (especially when going to Centurion): 1. The left eye on your helmet needs to trimmed more. Its showing a sleepy eye look. Opening it up a bit will wake it up! 2. Bring the shoulder bells in a tad more. 3. On your next round of pics, have someone help close the lower legs to hide all the velcro. 4. Thermal Detonator: Remove your existing phillip head screws and install slotted round head machine screws. Looking great and good luck with your application trooper! Quote
vettereddie[TK] Posted March 14, 2017 Author Report Posted March 14, 2017 (edited) Thanks for the feedback. I've been nervous about trimming the eye, may try with a tape or ruler score to guide. Shoulders can shorten the straps a bit. Will add additional detail shots of the calf closures, help had gone out when I did the photo shoot. Not decided yet on Centurion submittal, I'm partial to the look of the forearm return edges and material/color matched hand plates. Will take a look if any fellow TKs have the newer silicone plates and maybe reconsider. Would also need to update the helmet screws. Edited March 15, 2017 by vettereddie 1 Quote
Sly11[Admin] Posted March 17, 2017 Report Posted March 17, 2017 Have had a brief look at your application and Joseph is steering you in the right direction. There is no reason why you should not apply for Centurion down the track. Your armour looks great, you just need to fix a few minor things. Hopefully you will reconsider the Centurion application later on as I believe you have what it takes to do it. 1 Quote
Haribon72[TK] Posted March 17, 2017 Report Posted March 17, 2017 You have our support Brian! You can do it trooper! Quote
vettereddie[TK] Posted March 19, 2017 Author Report Posted March 19, 2017 Thanks for the support. Updated w/ the aligned calf closures and detail on the shoulder straps showing the white elastic tie-down. One question for Centurion; for the forearm return edges, would I need to trim flush the raised area where the cover strip goes over, or can I trim a simple circle leaving the bump filled in? Based on the CRL, I'm assuming rear return edge is OK. 1 Quote
Sly11[Admin] Posted March 21, 2017 Report Posted March 21, 2017 Thanks for the support. Updated w/ the aligned calf closures and detail on the shoulder straps showing the white elastic tie-down. One question for Centurion; for the forearm return edges, would I need to trim flush the raised area where the cover strip goes over, or can I trim a simple circle leaving the bump filled in? Based on the CRL, I'm assuming rear return edge is OK. All the return edge must be removed, so yes trimming out the bump is needed for Centurion Quote
vettereddie[TK] Posted March 24, 2017 Author Report Posted March 24, 2017 (edited) Update #2 added. - Trimmed the left eye, droop gone - Shortened the shoulder bell straps, rolled them forward - Added detail shots of the sniper knee alignment - Added detail shots of the thigh ammo pack painted split rivets, came w/ the Anovos kit Gave centurion some more thought and decided to pull the trigger. Ordered hand plates and screws yesterday, will be waiting on parts (and EIB approval) for the next round of submission. Edited March 24, 2017 by vettereddie Quote
Sly11[Admin] Posted March 25, 2017 Report Posted March 25, 2017 Hi Brian, thank you for your EI application time to review your armour. CRL and EIB Application Requirements: All the required submission photos have been posted. Your armor displays all the necessary elements to qualify for Expert Infantry. Welcome and congratulations from Tony and myself Other-Armor Fit/Assembly: In this section we review observations made by your fellow troopers and ourselves. Some observations may lead to suggestions to improve the overall look of your armor. If any suggestion affects any application, it will be listed separately in the above or below sections.We would like to say great work on your armour and for taking on some of the suggestions made by Joseph, those calf closures look much better. Just a few more things to tweak so you look your best, so here we go. You still have an excessive gap between the top of the shoulder bell and the plastic shoulder bridges. This should be a very quick fix by simplel shortening those black elastic straps that connect them to the shoulder bridge strapping. These two armour pieces should be virtually touching each other. I have used one of your close up photos so you can see the gap we are talking about. Thjis adjustment is recomended on both the left and right shoulder reference image Ear screws on helmet: Anovos unfortunately supple the wrong type of screw for the ears. Theirs is a domed head flat blade, where a counter sunk V shape flat head, flat blade is what s seen on originals. Yes its a fine detail, but when you build a kit as well as you have, we are always going to recommend those little things be changed. reference image Kidney to back plate alignment. Now we are sure that these sit a little lop sided due to two things. The weight of the blaster on your hip, and probably the fact the strapping is Velcro. You can either replace those straps with a wide black elastic, or really tighten up the strapping on that side, as it places your Butt plate as well as the kidney plate off level. Centurion Suggestions: In this section we prepare you the best we can for a Centurion application, some elements may become more apparent to us in the extra images needed in a Centurion application, so follow the level 3 CRL and photo reference guide closely. Ultimately the final accuracy is up to the trooper. Drop box alignment: as per the Level 3 CRL For level three certification (if applicable): Drop boxes are vertically aligned with the end of the ammo belt with minimal gap between belt and box.If you can either dab a small amount of glue, or use adhesive Velcro between the drop box strap and the canvas belt, these will always stay in the perfect possition aligned at the ends of the plastic ammo belt. Reference image Thermal Det screws: On the originals, these screws were flat blade type and painted black. Its one of those things we really like to see at Centurion level, again as a fine detail. Reference Image Brian, please consider trimming the return edge out of the end of your fore arms, and making the suggested and required mods. You are worthy of Centurion and we would love to see you achieve it. Well done mate, would be proud to march along side you Quote
LuckySox[TK] Posted March 25, 2017 Report Posted March 25, 2017 Congrats Brian! Way to represent for the OLG! Quote
vettereddie[TK] Posted March 25, 2017 Author Report Posted March 25, 2017 Excellent, thank you for the consideration. I appreciate the thorough review and individualized recommendations. - shoulder straps have been shortened, will make sure they're aligned for the next round of pics. - sourcing ear screws, may need to go w/ 1/8 countersunk machine vs. M3.5, metric are hard to find here - Excellent suggestion on the kidney to back. Current connection is black webbing glued on both ends, will look at replacing with elastic or partial no-strap style brackets. I didn't even consider the weight of the holster dragging it down. - will tack the drop box straps w/ e600 to ensure proper edge alignment - TD screws on order, planning on standard testors gloss black, unless satin/matte is needed, can spray if so. Will submit once parts are in and all updates have been made. 1 Quote

Recommended Posts
Join the conversation
You can post now and register later. If you have an account, sign in now to post with your account.