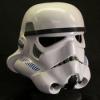
TK-4510[501st] Posted June 1, 2008 Report Posted June 1, 2008 (edited) I have been asked to build an AP helmet for someone and make it an ESB version. In the following weeks I will be posting detailed pics of the build. SHOULD BE FUN!!!! Below are some reference shots of a screen used ESB helmet. We are going to be shooting for a clean version of this. The interior will be up to the owner, but I posted the pics here for fun Mike Edited March 13, 2010 by TK-4510 Quote
Amish Trooper Posted June 1, 2008 Report Posted June 1, 2008 This should be good if it is going to be like your Hero thread you did for Paul. look forward to it. Mike you are an artist when it comes to stuff like this. Quote
darklordtripple9 Posted June 9, 2008 Report Posted June 9, 2008 I'm thinking od getting me a AP flawed helmet kit to make an ESB lid too. Hope to see some progress soon Quote
TK-4510[501st] Posted June 18, 2008 Author Report Posted June 18, 2008 Well here we go. I received the helmet kit today. I quickly found the blems. Not too bad. Never liked the mic tips. Lets "get it on!!!" Quote
TK-4510[501st] Posted June 18, 2008 Author Report Posted June 18, 2008 First I take a pencil and mark a line on the eyes and teeth about where I think I should cut. Quote
TK-4510[501st] Posted June 18, 2008 Author Report Posted June 18, 2008 Next I trim the cap n back. I am going to just trim along the lines. At the corner I am going to use a hole punch so that it does not split easily. I will just trim the extra to smooth it out. Quote
TK-4510[501st] Posted June 18, 2008 Author Report Posted June 18, 2008 Now I am going to trim out the eyes. I start with a larger blade from behind and finish up with a larger exacto knife. Quote
TK-4510[501st] Posted June 18, 2008 Author Report Posted June 18, 2008 After that its on to the teeth. I like to cut off the bumps from behind and then trim the teeth out with an exacto knife. A slower more precise way would be to drill out the teeth with a 1/8th inch drill and the use jewelers files to finish the teeth up. I have been doing this a while so its a little easier for me to just do it quickly like a so. Quote
TK-4510[501st] Posted June 18, 2008 Author Report Posted June 18, 2008 Now its time to trim the "flash off the faceplate and fit the rubber trim to the brow. Quote
TK-4510[501st] Posted June 18, 2008 Author Report Posted June 18, 2008 I am going to use the pre drilled holes for faceplate placement. I drill them out with a 1/8 inch drill bit...Using the provided screws I mount the faceplate to the cap n back... Quote
Smitty Posted June 18, 2008 Report Posted June 18, 2008 I like that hole punch on the brow edges to prevent splits. Never thought of that before. Quote
TK-4510[501st] Posted June 18, 2008 Author Report Posted June 18, 2008 Next comes the fun!!!! EARS!!!! Here is how I do it. I score a line about an 1/8 inch away from the cap then follow around at the front of the ear tracing the guide line. Pretty much the same in back too except I do a sweep from the cap of the ear to the guide line. The ears always fit better that way. Once I get the ears to fit properly, I sand them down a bit with 80 grit and then use a blade to lightly scrape off the extra material thats left from sanding. That way they are nice and smooth. On the AP mounting the eras is a snap. Just use the pre marked holes and drill them out. Then put the screws in. Quote
TK-4510[501st] Posted June 18, 2008 Author Report Posted June 18, 2008 So all thats left here is to trim the edges to meet properly underneath. See you soon!! Quote
firebladejedi[TK] Posted June 18, 2008 Report Posted June 18, 2008 Another great helmet put-together thread, cheers Quote
Ghost Posted June 18, 2008 Report Posted June 18, 2008 It's already been said before, but you make it look so easy!!!! Quote
Guest TK-2416 Posted June 18, 2008 Report Posted June 18, 2008 Wow! Great looking - Cant wait till its finished and lands here in Denmark All the best!! Quote
TK-4510[501st] Posted June 19, 2008 Author Report Posted June 19, 2008 Tonight I am doing the paint. I start out by using the picture that I posted in the beginning as a reference. I want this helmet to have that same look, so I use a pencil to mark areas that need more attention and to draw out the guide lines I will follow when painting. I need to cut a bit more of the eyes out. I also want to minimize the bump a little... Quote
TK-4510[501st] Posted June 19, 2008 Author Report Posted June 19, 2008 Here is the brush I am going to use for the ears. The paint is ad gray 5 Humbrol. Mix the Humbrol well or it will not be a consistent color when it dries. I am just going to stay within my lines as I paint.. Quote
TK-4510[501st] Posted June 19, 2008 Author Report Posted June 19, 2008 Next comes the frown. I am using model masters semi gloss black paint for the frown and the vocoder. I find it easier to paint the frown if I lay the bucket in my lap. Also, I use two different brushes for the frown. Pretty much a standard brush for the most part, and a 0 liner for the 4th and 5th tooth areas... Quote
TK-4510[501st] Posted June 19, 2008 Author Report Posted June 19, 2008 The vocoder gets painted with a special flat rounded brush that is perfect for this. I just load up the brush and start at my marks. Gently push down and lightly pull the brush along. I do the top of the vocoder first. Then flip the bucket around and tie in the bottom. Quote

Recommended Posts
Join the conversation
You can post now and register later. If you have an account, sign in now to post with your account.