Haso[TK] Posted April 13, 2016 Author Report Posted April 13, 2016 Ha ha! Too carried away doing the build to keep this updated. Just need to fit ammo plate, shoulder bell connections and ab /kidney snap, get the fit right and I'm done! Sent from my HUAWEI G510-0251 using Tapatalk 2 Quote
Haso[TK] Posted April 20, 2016 Author Report Posted April 20, 2016 (edited) Ok I realise I've still got to get some progress pics up here, but basically what I need to do now is: Attach should bell connections - snaps to the shoulder bells and shoulder straps Glue the plastic shoulder straps to the chest Fit the shin elastics (first choice) or velcro ('Plan B') Fit the shin rear cover strips Get the whole suit properly fitting - I know I need to pad my shins or anchor them to the boots to stop them rotating. Touch up painting of screws, helmet etc and I'm pretty much done! My only hangup is that I've only got 20mm cover strips on my rear shins (just an oversight when I made all the cover strips) and don't have enough ABS to make 25mm ones. I've emailed Mark @ AP a couple of days ago but haven't yet had a response - I just bumped that email today and hopefully he does have some. I'm going to fit the 20mm's in the meantime as I don't really have a choice. Nothing wrong with the look of it, I just know that the accurate way is closer to 25mm. Ultimately I'd just rip of the 20's and replace when I can get the ABS. Edited April 20, 2016 by Haso 1 Quote
Pyrates[TK] Posted April 20, 2016 Report Posted April 20, 2016 I will see if I can track down some thermoplastics in your area of the woods/outback Quote
Haso[TK] Posted April 20, 2016 Author Report Posted April 20, 2016 Here's my shins, with the 20mm cover strip laid on top of the back of the shin (not yet glued down). It looks as though the bottom of the shins don't align but that's only because one curves inside the other - I've still got to do a hot water treatment to get them to contour the same. When they are butted up together, the bottom of the shins align perfectly. Anyway, what do you guys think of my shin cover strip? You're looking at a 20mm one, I'm trying to source some matching ABS to make 25mm ones, but am I just being too fussy here? I'm leaning towards putting the 20's on anyway, and ripping them off when I can put together some 25's. BTW, I've got skinny legs so maybe they're proportional anyway. Still to round all the corners off the cover strip too. Also, here's some WIP pics of my pipe build E-11. I've sanded back the blaster in some areas to redo the painting / weathering, and I'll end up going over all of it with a final coat of black, so there won't be the large silver/grey patches you can see on it in these pics. I've also since glued the power cylinders to it. The weathering result I'm going for is if I'd just picked this blaster off the smoking battlefield ruins of Sullust! 3 Quote
Haso[TK] Posted April 20, 2016 Author Report Posted April 20, 2016 I will see if I can track down some thermoplastics in your area of the woods/outback Hey thanks mate, appreciate it! 1 Quote
Sentry71[TK] Posted April 20, 2016 Report Posted April 20, 2016 It may be up to the GML for your garrison whether they will accept the 20mm strips for basic approval until you can obtain 25mm. I have one extra strip of ABS, if needed. Mark will probably hook you up. If not, let me know. 1 Quote
Haso[TK] Posted April 20, 2016 Author Report Posted April 20, 2016 It may be up to the GML for your garrison whether they will accept the 20mm strips for basic approval until you can obtain 25mm. I have one extra strip of ABS, if needed. Mark will probably hook you up. If not, let me know. Thanks for that, appreciate it. I've PM'd my GML for his opinion, so I'm now waiting on him and Mark. 1 Quote
Haso[TK] Posted April 20, 2016 Author Report Posted April 20, 2016 And in other news.... My thermal det. It's about 190mm long, so as it's an AP one, I had to trim the panel down a bit to shorten it across. This was actually the very first part I put together, thinking it was going to be easy. Yeah right.... My gloves. I got the hand guards from Trooperbay. I ordered the plain rubber handguards because I wanted to get a real rough finish on these. Added some weathering on them as well, by accident actually, the black scuffing comes from the newspaper they were laid on while the paint dried. I glued them to stock black heavy duty kitchen gloves using the two part Loctite super glue (the one that comes with the activator pen). It worked great. I was trying to emulate the way they were made back in '77, with paint bits cracking and chipping off. Thigh ammo plate - I've just cut the curve in each corner, and haven't fixed this yet. There is a slight curve on it already but it should just bend around the thigh pretty easy I'm hoping. I was also hoping to acquire some cap rivets but I haven't found any yet, so I'm leaning towards split rivets/washer to fix it. Belt: I've gone with the snap connection for the plastic ammo belt to canvas belt, so that I can interchange the belt between an ANH and ESB in future. Also, it makes it easy to disassemble if I need to. The holster came from Mark / AP, but I had to trim it down in order for the blaster to fit further down and allow the strap to reach over the blaster handle and into its snap stud. I did this with a snap/scoring knife, with a fresh blade fitted. It was pretty easy to do, but needed to be done carefully. I used the Trooper Man holster plan and followed that for the shape of the holster. Next few days I'll start posting up arms, legs, torso and bucket pics. 2 Quote
Pyrates[TK] Posted April 20, 2016 Report Posted April 20, 2016 Awesome work my friend - Git'r'done! 1 Quote
Sentry71[TK] Posted April 20, 2016 Report Posted April 20, 2016 I have a few extra cap rivets, I'll PM you later about it. ☺ 1 Quote
Haso[TK] Posted April 20, 2016 Author Report Posted April 20, 2016 I have a few extra cap rivets, I'll PM you later about it. ☺ That's great mate, thanks for that. I'll be in touch when I'm home from work today. Troopers helping Troopers. Quote
Haso[TK] Posted April 20, 2016 Author Report Posted April 20, 2016 Some good news, Mark at AP says he can send some more ABS to get those 25mm cover strips. Yeah! 1 Quote
Pyrates[TK] Posted April 20, 2016 Report Posted April 20, 2016 Lol - http://www.australiansheettraders.com.au/products/abs Quote
Haso[TK] Posted April 21, 2016 Author Report Posted April 21, 2016 Lol - http://www.australiansheettraders.com.au/products/absLol alright! Takes someone in Canada to find a place about an hour away from me in Melbourne! Gonna check it out when I'm home tonight. Thanks. Sent from my HUAWEI G510-0251 using Tapatalk 2 Quote
Pyrates[TK] Posted April 21, 2016 Report Posted April 21, 2016 Lol alright! Takes someone in Canada to find a place about an hour away from me in Melbourne! Gonna check it out when I'm home tonight. Thanks. Sent from my HUAWEI G510-0251 using Tapatalk Got your six mate! Hope it works out as a backup source. Quote
Haso[TK] Posted April 21, 2016 Author Report Posted April 21, 2016 Bucket lenses Just wanted to share how I fitted my lenses so that they are nice and tight in the bucket with next to no gaps between lenses and the bucket. I think of it as a hybrid method: 1) Use Trooperbay's dark green lens strip, here: https://trooperbay.com/costuming-accessories/dark-green-lens-material 2) Use TK 1636's helmet clip method, here: Because the Trooperbay lens is a thicker one piece plastic strip, I found that I needed to cut two separate lenses* from it, then I could use the helmet clip method using superglue. If you've painted/plastidipped your bucket already, peel/clean the paint off the areas where you'll fix the clips, so that they glue to the plastic directly. I shaped the individual lenses by getting a hot iron and pressing it on top of the lenses till I could slightly bend them - a little at a time till they follow the bucket's curve. Place a towel between the lens and iron, and do one lens at a time. *Trooperbay has a video showing how to mount these lenses, but I tried it, and much prefer the result I've gotten from cutting lenses and fitting clips because the lenses fit tighter against the bucket. This is the result and I'm really pleased with how it turned out (and yes that is one meaty chin strap attached to the ear screws, don't know why but I decided to fit a 38mm elastic piece for a chin strap - it works though). 2 Quote
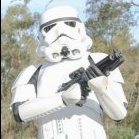
Haso[TK] Posted April 30, 2016 Author Report Posted April 30, 2016 Some last minute pre-submission pics, any glaring issues/feedback? I'm planning to have the wife take submission pics tomorrow... Me with my happy face: I've since put some padding in the right shin to try to stop the sideways movement. Both shins are also snapped to the boots to keep them over the boots and help prevent sideways travel at bottom.... I wanna cut off the large tab from the shoulder straps, more accurate I believe, should this be ok?... Quote
Haso[TK] Posted April 30, 2016 Author Report Posted April 30, 2016 ...Shin twisting issue now fixed by glueing a strip of 25mm thick foam around the top of each shin. Hopefully I can get some good submission pics tomorrow. Quote
Haso[TK] Posted May 1, 2016 Author Report Posted May 1, 2016 Shin Twist adjusted... I've put some padding in both shins and this is how they are looking now. Twisting has been hugely reduced. I've heard it mentioned before that the AP shins are a bit funny in that you can either centre the bottom or top of shins, or compromise between the two. Anyhow, I think I'm pretty much right unless anyone thinks otherwise? 1 Quote
Haso[TK] Posted May 1, 2016 Author Report Posted May 1, 2016 (edited) Some other last minute bits & pieces... I decided to not get submission pics today and concentrate on a couple of other parts that I want to have ready. Ab/kidney brace support - I installed some braces to give some extra support for the torso armour, but especially to lift the ab/cod & kidney/butt sections and keep them tucked in a bit more under the chest piece. This was to help keep the ab armour under the chest armour. I put a single snap in the centre top of the kidney piece to attach the back of the brace, and then super glued two plastic brackets inside the ab armour, through which I looped each side of the front braces.... I also installed a black pencil case in the chest plate to hold phone/licence/keys etc on me. Again I just used a couple of snaps to attach it... I plan to get some kind of voice system which will likely go here, and at that point I'll revisit my storage and maybe put a couple of smaller pouches in the back plate or something. I'll worry about that when I get to it. I'm also assuming I can use the snaps I've installed in the chest for future voice installation. Gotta say after test fitting this rig it feels really good and tight, sits well and definitely brings up the ab under the chest and the weight of the storage bag brings the chest down over the ab. So this seems to work really well. The braces are just some that I had lying around that I had from a costume party a couple of years back. Lastly, I trimmed the large plastic rectangle tab off each shoulder snap at back, to make this part more screen accurate (I've still got to give the cut edges a quick sand to tidy them up and get rid of the pencil line)... Submission pics planned for next Saturday, which I'll do with another recruit who plans to get their pics done too. Edited May 1, 2016 by Haso 1 Quote
Pyrates[TK] Posted May 1, 2016 Report Posted May 1, 2016 Looks awesome mate and sorry my friend I haven't been here to root you on - finishing day 3 of our comic expo. One stellar looking trooper none the less can't wait to hear that new TK ID!!! 2 Quote
Sentry71[TK] Posted May 2, 2016 Report Posted May 2, 2016 Shin Twist adjusted... I've put some padding in both shins and this is how they are looking now. Twisting has been hugely reduced. I've heard it mentioned before that the AP shins are a bit funny in that you can either centre the bottom or top of shins, or compromise between the two. Anyhow, I think I'm pretty much right unless anyone thinks otherwise? Looks great! I made a slight mod to my boots, adding a bit of hook Velcro on the boot top in front, and a matching loop Velcro strip inside the front of the shin. Stopped my twisty shins. I also added a bit of foam behind the knee plate, to keep it outward. 2 Quote
ComradeDave[TK] Posted May 3, 2016 Report Posted May 3, 2016 Really awesome progress bud! Sent from my SGH-I317M using Tapatalk 1 Quote

Recommended Posts
Join the conversation
You can post now and register later. If you have an account, sign in now to post with your account.