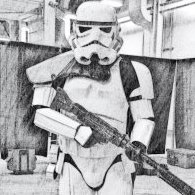
BigBadaBoom Posted August 8, 2014 Report Share Posted August 8, 2014 Hey guys, I'm getting very close to a complete build and I am having some trouble with my shoulder bells and my bicep pieces. Part of me is worried that my shoulder bell strap is too short, in which case I can make another longer one. Then the other part of me is concerned that my bicep pieces are too large, thus kicking my shoulder bells out too far. My range of motion is limited right now, because my shoulders will unsnap from my shoulder strap if I move my arm too high. My bicep pieces are also uncomfortable as I can't move as easily and they seem to keep sliding down my arm. I took some pics with me wearing them as is, then another with where the bell would sit if I lengthened the strap. Any input would be appreciated. These images are as they currently are. Next is the longer strap adjustment. Here is one bicep piece I am concerned is too large. Here is a shot I took a few days ago when preparing submission photos to the Legion. You can see it all put together. Quote Link to comment Share on other sites More sharing options...
pattrooper Posted August 8, 2014 Report Share Posted August 8, 2014 Yes your biceps look overly large, maybe slowly trim where necessary. Then see where the shoulders hang. Quote Link to comment Share on other sites More sharing options...
BigBadaBoom Posted August 8, 2014 Author Report Share Posted August 8, 2014 Thanks. I'll trim them down tomorrow. Quote Link to comment Share on other sites More sharing options...
I'm Batman[501st] Posted August 8, 2014 Report Share Posted August 8, 2014 Yep, biceps look huge. Ideally you'd want the shoulders only a few mm off the straps (definately not under the straps as appears to be the case in the first two pics). Although many people leave return edges on those pieces to show 'bulk', if you look at the pics in the photo reference section, you'll see that a lot of the pieces did not have any return edges on them at all. No return edge on the shoulders will allow them to sit flatter against your biceps. Quote Link to comment Share on other sites More sharing options...
gazmosis[501st] Posted August 8, 2014 Report Share Posted August 8, 2014 Definitely. Take most if not all the return edge off the top of them. This will allow you to size them down to fit you better. Have someone help you to squeeze the parts around your arm when you have the halves separated. It is hard to do by yourself. Squeeze them together until snug then let off just a tad until comfortable. Flex your gun to make sure it's not too tight. Mark both sides at the overlap, cut and re-glue Quote Link to comment Share on other sites More sharing options...
BigBadaBoom Posted August 8, 2014 Author Report Share Posted August 8, 2014 Thanks guys. I'm gonna recut my biceps in the morning and shave down the return edge on the shoulders. I'll even tighten the bicep strap. Quote Link to comment Share on other sites More sharing options...
BigBadaBoom Posted August 8, 2014 Author Report Share Posted August 8, 2014 How about impressions just on the armor in general in last two photos? Quote Link to comment Share on other sites More sharing options...
Rystan Posted August 8, 2014 Report Share Posted August 8, 2014 How about impressions just on the armor in general in last two photos? I'm by no means an expert, but the only area I think stands out a little is when viewing from the back, you might want some more tapering in the thigh...especially on the right leg. It looks to flare out a lot...although it might just be camera angles? Take anything that I say with a grain of salt as I'm still working on completing my first armor piece. Quote Link to comment Share on other sites More sharing options...
Locitus[Admin] Posted August 8, 2014 Report Share Posted August 8, 2014 Try to keep the distance between biceps and forearm less than between biceps and shoulder bell. What you're doing now is the reverse. At least in the first few images, it gets better in the last ones. Quote Link to comment Share on other sites More sharing options...
I'm Batman[501st] Posted August 8, 2014 Report Share Posted August 8, 2014 How about impressions just on the armor in general in last two photos? Maybe while you're tapering the biceps, have a look at doing the same to the rest of your limbs. I think I need to do a bit more to my armor too, but as an example, the rear shot of your right thigh looks to have a lot of overhang near the knee. Get your shins, thighs, forearms and biceps as close as possible while still being comfortable and able to move. Quote Link to comment Share on other sites More sharing options...
BigBadaBoom Posted August 8, 2014 Author Report Share Posted August 8, 2014 Thanks for the feedback. My thigh piece can't be narrowed in size any more than it is, because my quads are pretty large and the thighs barely make it up my leg as is. These pics are a little "older" as I adjusted them to fit higher on my thighs, creating a more defined space between my lower leg pieces and my thigh armor, thus no overhang. I just had to secure my thighs to my ab plate using a snapping strap system. I test fit it yesterday, but forgot to take a pic of the difference made in the legs. Quote Link to comment Share on other sites More sharing options...
roguewedge[501st] Posted August 8, 2014 Report Share Posted August 8, 2014 (edited) one more piece of advice from a, not that experienced, Trooper: Is your Belt fixed to your front Abb plate? As it is right now, it seems to be a bit low. see how mine is placed: Edited August 8, 2014 by roguewedge Quote Link to comment Share on other sites More sharing options...
roguewedge[501st] Posted August 8, 2014 Report Share Posted August 8, 2014 (edited) Also, are you thinking of making straphooks for your biceps? you can find a great tutorial here: http://www.whitearmor.net/forum/tutorials/article/37-howto-create-a-bicep-strap-hook/ you can see a hook on the right biceps in the below picture. My armor was approved half a year ago, and I am still tinkering and adjusting on a weekly basis. There are always things you can or need to improve. Once you start trooping, you will find out the hard way, where the unconfortable parts are. But you are almost there! Keep up the good work. Good to see a beefed up Stormtrooper as opposed to my skinny @$$! Edited August 8, 2014 by roguewedge Quote Link to comment Share on other sites More sharing options...
BigBadaBoom Posted August 8, 2014 Author Report Share Posted August 8, 2014 I haven't fixed my belt to my ab plate yet but I have some industrial strength Velcro I've been using. Quote Link to comment Share on other sites More sharing options...
BigBadaBoom Posted August 9, 2014 Author Report Share Posted August 9, 2014 Been cutting and gluing all day. Sized down my bicep pieces so they are very snug. I can really feel them if I flex a bit, but they're holding fine. I just can't get all "puffy chesty" in my armor or I might bust a seam, heh. I also added some strap hooks for my shoulder bells. I trimmed all of the return edge off both shoulder bells and they fit flush to the biceps. I have some sample photos here tonight, because I am really tired, but I will get a full armor photo up again sometime this weekend most likely. Thanks for all your help, fellas. Quote Link to comment Share on other sites More sharing options...
BigBadaBoom Posted August 9, 2014 Author Report Share Posted August 9, 2014 And here is the end result of my work on my biceps and shoulders. This is the closest that I could get them to fit, given the width of my shoulders. Quote Link to comment Share on other sites More sharing options...
Dday[501st] Posted August 9, 2014 Report Share Posted August 9, 2014 Looking better. One thing to keep in mind when using coverstrips.... The raised edges where the coverstrips are. What you want to do is the raised edge should be approximately as wide as the coverstrips, not much wider as I've seen in a few photos. If you can trim some more off so that they are the same width as the cover strips, that would be ideal. Also, you will want to trim all of the return edge off of the bottom of the bicep. This is from a screen used suit, you can see there is 0 return edge on the bottom. For your shoulder placement, you will want them as close to the shoulder straps as possible without going under. But definitely not longer and hanging out, the goal in all cases all over the suit is to remove as much black as possible. For your belt, check this: You see the holes on the left and right near the cod piece, there used to be snaps there where the belt attaches. These are used the position the belt right on the ab. Check this screen shot: The top of the belt should come to the bottom of the lower blue button. This will keep it from sliding down like a big smile, and looking droopy. Overall, you're on the right path, and with a few small changes like I've outlined and the input form others, you've very close to having a very slick looking TK suit. Quote Link to comment Share on other sites More sharing options...
SCTrooper[TK] Posted August 9, 2014 Report Share Posted August 9, 2014 If your arms a long enough, you could try wearing the biceps like this. Your shoulders are really broad, this may help or get larger bells. Quote Link to comment Share on other sites More sharing options...
BigBadaBoom Posted August 9, 2014 Author Report Share Posted August 9, 2014 Thanks. I've put industrial strength Velcro in 3 spots on my ab plate pretty much exactly where those snap locations are in the pic. Unfortunately I'm an awkward fit for the bicep pieces as my arms aren't long enough to wear them low and still be able to use my arms. I will remove all of the return edge from the bottom of the biceps later tonight. And though it may appear that the tops of my shoulder bells are under or inside my shoulder straps, there is about a 1/2 inch gap I created on the snap strap. I even had to add Velcro to the snaps to prevent the bells from popping off the strap when I extend my arms. Quote Link to comment Share on other sites More sharing options...
BigBadaBoom Posted August 9, 2014 Author Report Share Posted August 9, 2014 Oh and I can't remove any more material where the cover strips are or I won't be able to wear the pieces. I spent all yesterday tweaking the biceps down to a tolerable size. Quote Link to comment Share on other sites More sharing options...

Recommended Posts
Join the conversation
You can post now and register later. If you have an account, sign in now to post with your account.