BigBadaBoom
-
Posts
95 -
Joined
-
Last visited
Content Type
Profiles
Forums
Gallery
Articles
Everything posted by BigBadaBoom
-
 Asking for membership status. My 501st Member Profile TK-11886
 -
Need some shoulder/bicep help (11 pics)
BigBadaBoom replied to BigBadaBoom's topic in Build Threads Requireing Maintenance
Oh and I can't remove any more material where the cover strips are or I won't be able to wear the pieces. I spent all yesterday tweaking the biceps down to a tolerable size. -
Need some shoulder/bicep help (11 pics)
BigBadaBoom replied to BigBadaBoom's topic in Build Threads Requireing Maintenance
Thanks. I've put industrial strength Velcro in 3 spots on my ab plate pretty much exactly where those snap locations are in the pic. Unfortunately I'm an awkward fit for the bicep pieces as my arms aren't long enough to wear them low and still be able to use my arms. I will remove all of the return edge from the bottom of the biceps later tonight. And though it may appear that the tops of my shoulder bells are under or inside my shoulder straps, there is about a 1/2 inch gap I created on the snap strap. I even had to add Velcro to the snaps to prevent the bells from popping off the strap when I extend my arms. -
Need some shoulder/bicep help (11 pics)
BigBadaBoom replied to BigBadaBoom's topic in Build Threads Requireing Maintenance
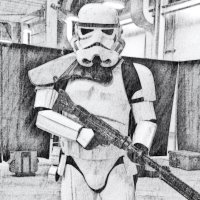
And here is the end result of my work on my biceps and shoulders. This is the closest that I could get them to fit, given the width of my shoulders. -
Final touches and fixes on the armor done. Time for another round of submission photos for pending approval.
-
Need some shoulder/bicep help (11 pics)
BigBadaBoom replied to BigBadaBoom's topic in Build Threads Requireing Maintenance
Been cutting and gluing all day. Sized down my bicep pieces so they are very snug. I can really feel them if I flex a bit, but they're holding fine. I just can't get all "puffy chesty" in my armor or I might bust a seam, heh. I also added some strap hooks for my shoulder bells. I trimmed all of the return edge off both shoulder bells and they fit flush to the biceps. I have some sample photos here tonight, because I am really tired, but I will get a full armor photo up again sometime this weekend most likely. Thanks for all your help, fellas. -
Need some shoulder/bicep help (11 pics)
BigBadaBoom replied to BigBadaBoom's topic in Build Threads Requireing Maintenance
I haven't fixed my belt to my ab plate yet but I have some industrial strength Velcro I've been using. -
Need some shoulder/bicep help (11 pics)
BigBadaBoom replied to BigBadaBoom's topic in Build Threads Requireing Maintenance
Thanks for the feedback. My thigh piece can't be narrowed in size any more than it is, because my quads are pretty large and the thighs barely make it up my leg as is. These pics are a little "older" as I adjusted them to fit higher on my thighs, creating a more defined space between my lower leg pieces and my thigh armor, thus no overhang. I just had to secure my thighs to my ab plate using a snapping strap system. I test fit it yesterday, but forgot to take a pic of the difference made in the legs. -
Need some shoulder/bicep help (11 pics)
BigBadaBoom replied to BigBadaBoom's topic in Build Threads Requireing Maintenance
How about impressions just on the armor in general in last two photos? -
Need some shoulder/bicep help (11 pics)
BigBadaBoom replied to BigBadaBoom's topic in Build Threads Requireing Maintenance
Thanks guys. I'm gonna recut my biceps in the morning and shave down the return edge on the shoulders. I'll even tighten the bicep strap. -
Need some shoulder/bicep help (11 pics)
BigBadaBoom replied to BigBadaBoom's topic in Build Threads Requireing Maintenance
Thanks. I'll trim them down tomorrow. -
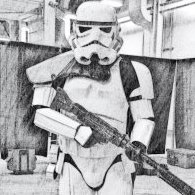
Hey guys, I'm getting very close to a complete build and I am having some trouble with my shoulder bells and my bicep pieces. Part of me is worried that my shoulder bell strap is too short, in which case I can make another longer one. Then the other part of me is concerned that my bicep pieces are too large, thus kicking my shoulder bells out too far. My range of motion is limited right now, because my shoulders will unsnap from my shoulder strap if I move my arm too high. My bicep pieces are also uncomfortable as I can't move as easily and they seem to keep sliding down my arm. I took some pics with me wearing them as is, then another with where the bell would sit if I lengthened the strap. Any input would be appreciated. These images are as they currently are. Next is the longer strap adjustment. Here is one bicep piece I am concerned is too large. Here is a shot I took a few days ago when preparing submission photos to the Legion. You can see it all put together.
-
Would like to see some pics too. I've been procrastinating on my thighs and I would like to see some sort of guide.
-
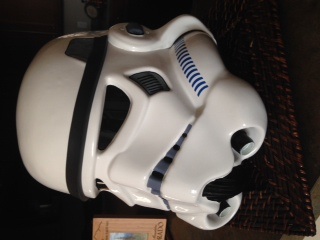
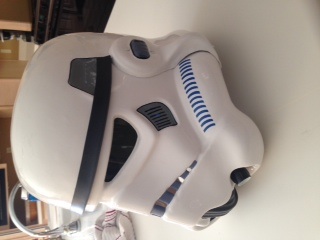
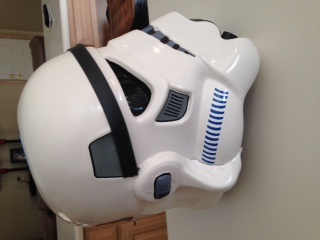
ATA Bucket Ear Bumps and EI Status
BigBadaBoom replied to BigBadaBoom's topic in ANH (Stunt and Hero)
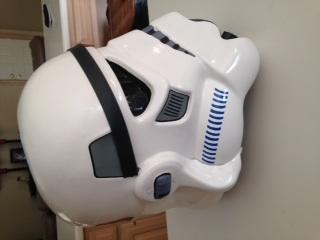
Found out I can email pics to myself in a smaller size. Here are a few from before I got my mesh in behind the frown.

-
ATA Bucket Ear Bumps and EI Status
BigBadaBoom replied to BigBadaBoom's topic in ANH (Stunt and Hero)
Found the problem with the issue I was having. Apparently my memory is terrible. I first worked on the 3 bump but then used the 4 in final product. Heh. My mistake. I got them switched. I'm trying to post pics but files on my iPhone are too big. Suggestions? -
ATA Bucket Ear Bumps and EI Status
BigBadaBoom replied to BigBadaBoom's topic in ANH (Stunt and Hero)
Yes kit had two sets in case you screwed up. I'll get close up pics tonight. At work now -
TK-19019 Requesting ANH Stunt EIB Status [TM][362]
BigBadaBoom replied to tgibson43's topic in Request Expert Infantry Status
Great looking build! -
So I got my bucket together and finished 3 days ago and I was checking the guides where it says all helmets must have 4 bumps. Yet my ATA kit came with 4-bump right ears and 3-bump left ears. Has anyone found a way to mod an ear to be acceptable or is this going to give me a problem? I would like to eventually take my build to the centurion level for both ANH Stunt and HWT. Any input is appreciated.
-
Elleerre's ATA build
BigBadaBoom replied to elleerre's topic in Build Threads Requireing Maintenance
Congrats on getting the box! Got mine a year ago and finally just got around to getting the bucket together. -
I'm expecting my ATA to be ready to be shipped to me in less than two weeks and I can't wait. I'm really excited to get it so I can start trimming and assembling. I've heard nothing but praises for it.
-
Building my own Scratch MiniMag PTL
BigBadaBoom replied to BigBadaBoom's topic in Build Threads Requireing Maintenance
Decided this week to get back to work on my Minimag. I am thinking of coating it with some fiberglass to smooth out the edges and areas with visible tape. It should help in defining those corners on the end of the barrel. I am also going to try to install an old camera flash with a green coat of paint over the lens to create a light when I fire as well as installing a small fire extinguisher to blast some exhaust out when fired. Before it is done, I want to replace the sight with a more sturdy one that is retractable from the body of the launcher so that I can attach a rifle sling to it to make it easier to carry while trooping. I will update as progress is made. -
T-21 Build (I'm Bored)
BigBadaBoom replied to gmrhodes13's topic in MiniMag PTL Missile Launcher, T-21, RT-97C (MG-15)
Hot dang! That is a fine-looking T21. I used to tote one back in the early days of SWG. I miss it so. Great work! -
E11 Conversion put together. Just some final touches left then paint. Still waiting on Armor, but I'll just have to work on my DLT-19 next.
-
E11 Conversion put together. Just some final touches left then paint. Still waiting on Armor, but I'll just have to work on my DLT-19 next.
-
I want one of those so bad for my arsenal! Guide please!