DarthDyer76[501st] Posted December 11, 2013 Report Share Posted December 11, 2013 I recently got my black TX kit from ATA (after an 8-month wait!), but needless to say I was ecstatic. I already finished my helmet back in the summer, so the focus could solely be on the armor... Quote Link to comment Share on other sites More sharing options...
DarthDyer76[501st] Posted December 11, 2013 Author Report Share Posted December 11, 2013 After drooling over the contents of my brown box, I hooked up with a Garrison buddy over the weekend to get started with more of my TX build... the ATA armor is very sturdy and thicker than some other kits, so I felt most comfortable using the dremel to do the rough cuts... I completed the thermal detonator and cut a couple other pieces at home, but I will post pics of that later.. I did most of the rough cutting, then measured for Ed while he did some of the detail cutting... We got everything rough cut, now it's a matter of sanding and starting to glue pieces together... but it's a good start! Quote Link to comment Share on other sites More sharing options...
Tolo[TK] Posted December 11, 2013 Report Share Posted December 11, 2013 (edited) One day I'll have one, one day... Sent from my iPhone 5 using Tapatalk Edited December 12, 2013 by Tolo Quote Link to comment Share on other sites More sharing options...
pattrooper Posted December 11, 2013 Report Share Posted December 11, 2013 Nice Quote Link to comment Share on other sites More sharing options...
Cantina Security[501st] Posted December 12, 2013 Report Share Posted December 12, 2013 Wow, dark... Looks really cool. Quote Link to comment Share on other sites More sharing options...
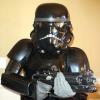
infantry509 Posted December 30, 2013 Report Share Posted December 30, 2013 Question, for the frown on the helmet, what color paint did you use and who made it. I am finding it difficult to get the color I want. I am currently thinking of using the testors 1138 grey bit just wondering Quote Link to comment Share on other sites More sharing options...
DizzyStormtrooper[501st] Posted December 31, 2013 Report Share Posted December 31, 2013 1138 is for white helmets (and 1110 for tube stripes fyi), use 1146 silver for shadow frowns. Quote Link to comment Share on other sites More sharing options...
gazmosis[501st] Posted January 1, 2014 Report Share Posted January 1, 2014 A piece of information for you and working with black ABS. If you bend or cut the ABS(like your waist belt or power pack for the thigh), you will end up with a white edge or something considerably lighter than your ABS. You can get rid of this instantly and permanently by just waving a heat source over the area. I used a propane torch on the lowest possible flame. Quote Link to comment Share on other sites More sharing options...
infantry509 Posted January 18, 2014 Report Share Posted January 18, 2014 Got ya thanks also do the ears have screws in them as well as other buckets and are the painted flat black, all the picture references are not close enough to tell. Thanks again Quote Link to comment Share on other sites More sharing options...
mikedwelle94[TK] Posted January 19, 2014 Report Share Posted January 19, 2014 The CRL for Shadow Stormtroopers does not mention ear screws, but you will be needing them in order to attach the ears to your helmet. They will need to be painted black. Like the TK helmets: three screws for stunt, two for hero. Here is a side-shot of an AT3 helmet by ARAKYEL: http://i.imgur.com/dEBwg.jpg The screws are also useful for mounting your lenses. Quote Link to comment Share on other sites More sharing options...
Darth Aloha[Admin] Posted January 19, 2014 Report Share Posted January 19, 2014 Ed and Julie FTW! -Eric Quote Link to comment Share on other sites More sharing options...
infantry509 Posted January 19, 2014 Report Share Posted January 19, 2014 thanks guys Quote Link to comment Share on other sites More sharing options...
DarthDyer76[501st] Posted January 20, 2014 Author Report Share Posted January 20, 2014 According to the Spec Ops guys, you can go with either silver or gray for the frown... I like the silver better because I used silver lenses for the helmet... then flat black stripes and left the rest the gloss black of the plastic without painting... the less painting, the better IMO... the stripes were annoying enough... LOL Quote Link to comment Share on other sites More sharing options...
DarthDyer76[501st] Posted January 20, 2014 Author Report Share Posted January 20, 2014 Update on progress... this is from a few weeks back... Got some more work done today on the kit... did lots of sanding/smoothing of pieces and started to glue the cover strips (most of which we cut last weekend)... Ed started making the snap plates and glued a few of those on... it's starting to come together... hoping to make some more progress next weekend! Quote Link to comment Share on other sites More sharing options...
DarthDyer76[501st] Posted January 20, 2014 Author Report Share Posted January 20, 2014 More work photos, after an impromptu and short visit with Ed on Sunday... we should be getting pretty close.. he did some more gluing of the legs and arms, and got all the snap plates glued on... the only issue was with one of the biceps, which was dramatically different than the other... when assembled, the one bicep had a very narrow opening, so it would be impossible to get my arm through... he used some CA glue and accelerant to reinforce it and took the heat gun to it... we were able to bend it enough to get it closer to the right shape, so it should be fine now... I keep telling him the imperfections and asymmetrical nature of the armor are both cool and weird at the same time... as long as it works, it doesn't matter to me... LOL I hate my camera phone, so some of these pictures suck... I apologize in advance... LOL The corrected bicep... I didn't get a side by side shot of how different they were, but picture the correct one with a horizontal opening, and the other with a vertical egg-shaped opening... pretty crazy... just glad we got it fixed... Completed thigh... we didn't have to do much sizing, because it fit me just right... guess I'm the perfect size for a stormtrooper... Strapping done to connect front and back... Sizing for shoulder straps... Next up was the belt... because I'm going for Specialist, I got a patent leather woman's belt off eBay... by some mistake, they sent me two belts, but it didn't matter because using both proved to be the best method to mount the plastic belt... we riveted the belt to the plastic in the center... Quote Link to comment Share on other sites More sharing options...
DarthDyer76[501st] Posted January 20, 2014 Author Report Share Posted January 20, 2014 Ed said we could put snaps on the ab plate to help hold the belt in place... more secure and less likely to shift around... Snaps on the belt to connect to the ab plate... The joint where the two leather belts come together... overlapped and riveted... Drilling holes for the rivets on the ends of the belt... One more session, and we should be ready to go... just some polishing and approval here we come! Quote Link to comment Share on other sites More sharing options...
DarthDyer76[501st] Posted January 20, 2014 Author Report Share Posted January 20, 2014 Ed and Julie are awesome! Love those guys... Quote Link to comment Share on other sites More sharing options...
DarkTrooper[TK] Posted January 20, 2014 Report Share Posted January 20, 2014 Very nice build so far. I miss my TX . . . it was my 1st 501st costume. Quote Link to comment Share on other sites More sharing options...
Griffin-X[TK] Posted January 21, 2014 Report Share Posted January 21, 2014 Great job so far! Sent from my iPhone using Tapatalk Quote Link to comment Share on other sites More sharing options...
DarthDyer76[501st] Posted January 21, 2014 Author Report Share Posted January 21, 2014 Thanks, Jim.. posted this on our board as well.. I think Ed and I are planning to finish this weekend, so I will post results! Sent from my XT907 using Tapatalk 2 Quote Link to comment Share on other sites More sharing options...
DarthDyer76[501st] Posted February 9, 2014 Author Report Share Posted February 9, 2014 Just realized I never updated this thread with the finished product... we got everything done a couple weekends ago, and I got approval within a couple days... already trooped twice in my shiny black armor! LOL Quote Link to comment Share on other sites More sharing options...
Griffin-X[TK] Posted February 9, 2014 Report Share Posted February 9, 2014 Nicely done trooper. Quote Link to comment Share on other sites More sharing options...
Toddo[TK] Posted February 9, 2014 Report Share Posted February 9, 2014 Always great to see another Spec Ops brother. Congratulations! Quote Link to comment Share on other sites More sharing options...
Cantina Security[501st] Posted February 10, 2014 Report Share Posted February 10, 2014 Cool, very nice work... Quote Link to comment Share on other sites More sharing options...
Tolo[TK] Posted February 10, 2014 Report Share Posted February 10, 2014 Is this the natural shine of the ATA black ABS? Sent from my iPhone 5 using Tapatalk Quote Link to comment Share on other sites More sharing options...

Recommended Posts
Join the conversation
You can post now and register later. If you have an account, sign in now to post with your account.