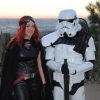
Hunterhwt Posted June 30, 2012 Report Posted June 30, 2012 TJ Hutcheson TK 7944 Hunterhwt Mountain Garrison Armor-FX Helmet-ATA Blaster- Hasbro Height-5'10" Weight-182 Boots-TK Belt-Mountain Princess Handplates-FX Electronics-Aker voice amplifier, 501st Icomm, Phillips Mp3 continuous loop chatter, helmet fans-radio shack 273240 1.3 amp Neck Seal- Mountain Princess Holster-Mountain Princess Quote
Mongoose[TK] Posted June 30, 2012 Report Posted June 30, 2012 Looks good on you. It looks like your right shin has the opening seam facing the outside. I believe it's supposed to be facing the inside. I am fairly new at this so before you go changing anything I would wait until someone with more experience chimes in. I'm almost to the point of putting everything on with my armor and trying to hide the black seams. Yours looks good. Quote
jnnfr72[TK] Posted July 1, 2012 Report Posted July 1, 2012 (edited) Hey T.J. Are you an officer? (I married an officer.. retired, now though.) I'm thinking you could probably make the ab plate and connector plate more flush, and I think the right calf - closing does need to get flip - flopped so that the outter shin plate closes over the inner shin plate. I had to go back and edit.. I saw the shoulder bells. (Man, I'm one picky woman!) This is from the CRL: [One on each shoulder. The shoulder bells are considered effectively symmetrical; they may be worn interchangeably on the left and right shoulders and should have a black elastic strap that wraps around the inside of the bicep.] Mostly, I'm super jealous that you look better in your armor than I look in mine! Keep up the good work, Trooper! Cheers! Jenny Edited July 1, 2012 by jnnfr72 Quote
Hunterhwt Posted July 1, 2012 Author Report Posted July 1, 2012 Thanks Jen I'm making the changes , and yes I was an officer USAF Quote
jnnfr72[TK] Posted July 1, 2012 Report Posted July 1, 2012 Awesome and Awesome Have a good rest of the weekend. Quote
Mogwai[TK] Posted July 1, 2012 Report Posted July 1, 2012 Looks good so far. Something on the Belt I would change to make it look better. Cut it a little bit more on the Upside and Downside (I hope you understand what I mean with my bad English ) For me, you left too much Plastic there. Then cut the edges to a 45 degree Angle. That way it will look a lot more better and Screen Accurate. Quote
FunkyTrigger[TK] Posted July 1, 2012 Report Posted July 1, 2012 Hi there, I've spotted a few easy fixes that look like they need addressing for your EIB. 1. Your main belt is sitting a bit low, the top of the belt should be close to the height bottom ab buttons. 2. The Main belt corners have not been cut at the 45 degree angles to meet up with the belt. 3. Your knee ammo belt has also not been cut with the lower rounded corners. All no cost and simple to address areas to get you started. Quote
FunkyTrigger[TK] Posted July 1, 2012 Report Posted July 1, 2012 Also... As Mogwai said, your main belt needs more trimming. Closer to the boxes would be better. Someone else also mentioned that there is an issue with your right shin at the rear. The overlap is going the wrong way on the rear of your right shin, this leaving the overlap showing to the outside, rather than the inside. Quote
Hunterhwt Posted July 1, 2012 Author Report Posted July 1, 2012 Thanks all getting these items taken care of then will resubmit should I do all pics again and my Heavy weapons as well? Thanks all Quote
Locitus[Admin] Posted July 3, 2012 Report Posted July 3, 2012 Thanks all getting these items taken care of then will resubmit should I do all pics again and my Heavy weapons as well? Thanks all Hi, Sorry for leaving a late reply. I do think that with just a little bit of extra work you can make your armour pop. And yes, you should fix the incorrect overlap of the shin. I would suggest spending a bit of time fixing the D-ring of your blaster as well. It looks quite sloppy, I'm sorry to say. Looking forward to seeing what you come up with. Quote
Hunterhwt Posted July 3, 2012 Author Report Posted July 3, 2012 thanks sir all will be fixed and re posted on weds for both TK and HWT Quote
Locitus[Admin] Posted July 3, 2012 Report Posted July 3, 2012 Good luck, and remember that you can always ask us for tips and advice. We're happy to help. Quote
Hunterhwt Posted July 4, 2012 Author Report Posted July 4, 2012 Changes made for EIB status. Elastic added to bicep/shoulder bells, right shin rebuilt with seam facing correct direction, ammo pack on knee lower corners rounded, belt trimmed down, adjusted up cut at 45 degrees to match canvas belt. Gun-t-track added and d ring improved. Side plate seams matched to ab plate. Quote
Locitus[Admin] Posted July 4, 2012 Report Posted July 4, 2012 Great improvements! If I were you I'd cut out the v-shape from the other shin as well to make it symetrical though. While reviewing this I noticed that while you have covered the open row of holes on your E-11 seen in your last picture, you haven't made a new row of holes near the bottom, next to the stock - which is required when using the hasbro as a base. "If using the Hasbro E11 toy blaster and you cover all the rows of holes, the blaster will have 7 T-tracks total. But, if you want to have the correct number of T-tracks (6 total) with the lower row of open vent holes on the magazine housing side, then you shall cover the pre-existing rows of holes with T-tracks, and grind off the lower integrated T-track on the magazine housing side and drill a new row of holes in its place." Your HW application is looking better though. I'll get back to that after some more reviewing. Quote
Hunterhwt Posted July 5, 2012 Author Report Posted July 5, 2012 I will be making these changes and thanks Quote
Hunterhwt Posted July 14, 2012 Author Report Posted July 14, 2012 Changes made to shins, hovi mics attached and gun adapted Quote
Locitus[Admin] Posted July 16, 2012 Report Posted July 16, 2012 Hi Nice fixes. I think it's safe to say that you meet the EIB requirements now. Approved! Quote
matt black Posted July 16, 2012 Report Posted July 16, 2012 Congratulations TJ. As you are now double EI what would you like on your profile of the EI page? Your TK or your HWT? Quote
Hunterhwt Posted July 16, 2012 Author Report Posted July 16, 2012 I would like HWT please and thank you all !! Unquestioned loyalty brothers Quote
Dazauto[TK] Posted July 16, 2012 Report Posted July 16, 2012 Congrats TJ and welcome to the EIB ranks, great work trooper Quote

Recommended Posts
Join the conversation
You can post now and register later. If you have an account, sign in now to post with your account.