Daetrin[Admin] Posted August 17, 2007 Report Posted August 17, 2007 Yup, get a crotch zipper added or ditch the one piece and get some underarmor instead. Quote
huttman[TK] Posted August 18, 2007 Author Report Posted August 18, 2007 Ok so I have been a little busy. Too many pics to show on the thread so I figured I would come up with random updates with a lot of pics. So click HERE to view my latest. The thighs were VERY challenging to do. Im a little nervous about the size still but they seem to fit. Im already working on pics for my next update so stay tuned. Meanwhile if you have any questions or comments, dont hesitate to ask cheers! Quote
huttman[TK] Posted August 21, 2007 Author Report Posted August 21, 2007 fine, *dont* say anything about my pics Quote
SuperTrooper Posted August 21, 2007 Report Posted August 21, 2007 Ok, one quick question. Since you had to trim down the thighs, why not glue them in back instead of velcro? Other than that looks like your of on the right foot. Quote
huttman[TK] Posted August 21, 2007 Author Report Posted August 21, 2007 Ok, one quick question. Since you had to trim down the thighs, why not glue them in back instead of velcro? Other than that looks like your of on the right foot. Fear, the dark side was testing me on that warm night. I want to field test them before i "lock them in" sort to speak. Plus I have been working out my legs lately. paranoid mostly. for the record, i only had to trim one. one was just right, the other was quite larger for some reason, about an inch larger. Quote
SuperTrooper Posted August 21, 2007 Report Posted August 21, 2007 for the record, i only had to trim one. one was just right, the other was quite larger for some reason, about an inch larger. Yep, the left is bigger. You'll have to cut an upside down V wedge to get the left and right to match. The left thigh is much larger around the bottom. A tailor's tape measure is great when matching them up. Quote
huttman[TK] Posted August 21, 2007 Author Report Posted August 21, 2007 well i added the snaps for my garder. ill be adding another session of pics tonight. Quote
Sandman[TK] Posted August 22, 2007 Report Posted August 22, 2007 I like the pictures looking good so far. If I could request it, I would like a close up shot of how you are attaching the snaps to the back of the armor. Quote
huttman[TK] Posted August 22, 2007 Author Report Posted August 22, 2007 you got it, my next batch of pics will have it step by step. i cant take the credit for the technique though. i adapted it from Daves video. Quote
Sandman[TK] Posted August 23, 2007 Report Posted August 23, 2007 Cool..I myself just finished watching Dave's video last night, and will watch it again when my armor arrives. Quote
huttman[TK] Posted August 24, 2007 Author Report Posted August 24, 2007 on my lunch break the other day I picked up one of THESE for a hair over a hundred. it was a steal. now i dont have to borrow my friends anymore. and it will get lots of use. wooT! /me is off to get snap happy. Quote
Sandman[TK] Posted August 24, 2007 Report Posted August 24, 2007 Cool, that another thing to add to my list of things I need to aquire. Quote
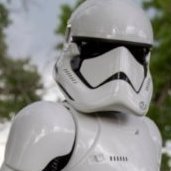
huttman[TK] Posted August 26, 2007 Author Report Posted August 26, 2007 Ok, I did a test fit today after i finished my snap system. Everything seems to feel okay but im a little concerned about two things, well, maybe 3. My left shin- the knee plate is on straight on the shin, but when i walk, it shifts to the side, therefore digging into my knee. Im thinking I have to adjust the arc for fit, because of the way it sits on the caboot, but this is something im a little sketched on doing. second, im wondering if "Large" was the wrong size? are there suppose to be gaps like that under my arms? ive looked at various pics and im not seeing that kind of gap. (I realize btw, I dont have my O2 tank mounted, like i said, this was a test fit) The chest plate: shall I use a white or black elastic to hold it together? Also, after this pic was taken, I added some foam inside the thigh to straighten it against my leg better. The seem was a little crooked so I used industrial velcro to put it on. Anyway here is the pic, Comments, suggestions welcomed! Ive got a bunch of pics im editing to add to my collection during assembly. Quote
SuperTrooper Posted August 26, 2007 Report Posted August 26, 2007 The gaps on the side are one of the inaccuracies of the FX kit. There are several threads that discuss how close the gap. On the chest plate, I used black velcro. Just mount it to the contoured corners (near where the bicep meets the shoulder bell in your pictures) so it's visibility is minimal. Did you trim the left thigh to match the size and contour of the right? In my opinion it just gives a better overall look to the armor. Other than that, it is lookin good. The ab button upgrade is a nice touch. Quote
huttman[TK] Posted August 26, 2007 Author Report Posted August 26, 2007 yeah the thighs are the same diameter. the left one is "flatter" im still working on a way to deal with the knee plate issue. Quote
TK-6044 Posted August 26, 2007 Report Posted August 26, 2007 Hey Felixx I put small blocks of foam in the inside of my Shins and my thighs to straighten them up, its just a case of "Trail & Error". I used White Velcro on the sides of my chest but you can use black no-problem. Your armor looks good, what I have realized with our armor is this: Don't try and make FX armor into AP armor... Just don't do it to yourself... FX is FX... AP is AP... They are 2 very different styles... Enjoy your armor for what it is. Star Wars Fans will look at you and see a "Stormtrooper" not a FX Stormtrooper or a AP Stormtrooper but a Star Wars Stormtrooper ... You have done a great job, good luck finishing up! Dave TK-6044 Quote
huttman[TK] Posted August 26, 2007 Author Report Posted August 26, 2007 Thanks for the kudos! Indeed i will be doing some fine tuning now that the major chunk of the armor is done. Ive started to continue with the helmet. Painted the last night, man was I nervous about getting it straight. I think it came out okay. ok, off to work :-/ Quote
WhiteCommando[501st] Posted August 26, 2007 Report Posted August 26, 2007 Nice work. I am new to TK trooping too. I found that a heat gun, and a large dowel cut to a size that can cause a front-to-back spread (maybe even 2" x 4" would have been better) and jam it in the bottom of your thigh hole, while the thighs are duct taped very well at the back seam. Then use a heat gun with broad sweeping strokes - on the knee area and the inner thigh - to get the hole at the bottom of the thigh armor to become more round. As for the chest to back strap you want, I suggest white if you are positioning them low (over the torso armor). Or use black if doing it high, under the arm pit. Position dictates the color. You may want to make a small shim for the torso. I used sheet styrene with detail stripping and a lot of Velcro. It is so tight, I do not need a strap harness. See my shims... Your suit looks nice for a test fit! Later Brother, John Ok, I did a test fit today after i finished my snap system. Everything seems to feel okay but im a little concerned about two things, well, maybe 3. My left shin- the knee plate is on straight on the shin, but when i walk, it shifts to the side, therefore digging into my knee. Im thinking I have to adjust the arc for fit, because of the way it sits on the caboot, but this is something im a little sketched on doing. second, im wondering if "Large" was the wrong size? are there suppose to be gaps like that under my arms? ive looked at various pics and im not seeing that kind of gap. (I realize btw, I dont have my O2 tank mounted, like i said, this was a test fit) The chest plate: shall I use a white or black elastic to hold it together? Also, after this pic was taken, I added some foam inside the thigh to straighten it against my leg better. The seem was a little crooked so I used industrial velcro to put it on. Anyway here is the pic, Comments, suggestions welcomed! Ive got a bunch of pics im editing to add to my collection during assembly. Quote
TK-6044 Posted August 26, 2007 Report Posted August 26, 2007 Thanks for the kudos! Indeed i will be doing some fine tuning now that the major chunk of the armor is done. Ive started to continue with the helmet. Painted the last night, man was I nervous about getting it straight. I think it came out okay. ok, off to work :-/ Nice job painting The Frown! Dave Quote
huttman[TK] Posted August 30, 2007 Author Report Posted August 30, 2007 Ok, last night I finished the major parts of my bucket. Sad thing is I had to "re-glue" the dome piece because the front lip on the down had an angle on it. Therefor was creating gaps in the seam. So after using a blade and sanding the epoxy off the dome and the rest of the bucket, I took advantage of having the dome off and tightened the diameter along with trimming the lip in the front. The 9th picture shows the nice seam after. the 10th was actually a shot i took before re-gluing. Anyway, Im okay with how its turning out. I did what I could with the ears by trying to rid of the gap that meets the jawline as best as I could. Click HERE to have a look. Ill post more pics of my other armor assembly soon. Cheers! P.S. Thanks "Machorascal" for the trim, I really like it better than the fat stuff my kit came with! and Green Lenses from Dave are on the way Quote
huttman[TK] Posted September 2, 2007 Author Report Posted September 2, 2007 Well im pretty much done with my armor now. Yesterday I did some work on my E11, bought some nice fans (4) for my bucket, and have some minor adjusting to do that you cant see. I think im ready for the application. Now I know im going to need some photos of myself wearing the armor and such, how did some of you submit your pictures? did you have some nice ones taken? did you just take some quick shots? Thanks for following along my construction thread, im at work atm so ill post the another update photo gallery later. cheers! EDIT: In light of Weird Al's appearance here in SD on Oct 13th, I went ahead and signed up for the 501st on this day, Sept 2nd 2007 - 9:10 AM PST Im not sure what my chances are being a part of the show to help out, but Im pretty close to being completed with the armor. no more than an hours work. Woot!! /me crosses fingers for his TK# choice Quote
huttman[TK] Posted September 5, 2007 Author Report Posted September 5, 2007 Ok guys, Thanks to the wife on short notice, Pics taken!. I created a little page HERE so lemme know what ya think! Afterwords I couldnt resist a brief walk around the complex and after about 10 feet people were sticking their heads out the window and a neigbor actually screamed when I walked up behind her, lol. One of my neigbors who is from russia has never seen any of the movies (im working on that btw) so I figured Ide knock on the door for a face to face dealing with a tropper and it was quite amazing. Even with that short walk I noticed my caboots left some black marks on the shins. Time to go buy some pledge. I used to use that when I was part of a small pit crew at a track to keep the paint off from other cars. Anyway, thanks to all who have followed along, I spoke with my squad leader this eve here in SD and there is a meeting the 23rd. Im really excited! cheers! Quote
huttman[TK] Posted September 6, 2007 Author Report Posted September 6, 2007 Wow, a whole day with nothin is it bad? Quote
TK-2126_MD[TK] Posted September 7, 2007 Report Posted September 7, 2007 Gets better and better every timme i come back. Graet job Trooper Quote

Recommended Posts
Join the conversation
You can post now and register later. If you have an account, sign in now to post with your account.