Search the Community
Showing results for 'cover strips'.
-
I've been printing, sanding, applying XTC-3D, and cementing the cover strips lately. Everything is printed now which feels good to complete. Everything is also sanded. I did a very rough sanding with a belt but then did everything else by hand. Most cover strips have been coated with the XTC-3D sealant by now. I discovered the craft brushes below that I wish I knew about before! They made the application of the sealant and cement so much easier and more precise. I highly recommend them when using the XTC and J-B Weld. So far, the upper arms and forearms have the cover strips cemented on. The thighs and lower legs are next. I also printed, sanded, coated, and cemented the vertical strip of the abdomen center detail.
-
Correct, you can go larger if required, many add to the rear to leave the front standard sized. It's entirely up to your GML what they consider approvable so best check with them before going too big. You'd be amazed how many threads there are looking for cover strip sizes but using the search function can help https://www.whitearmor.net/forum/search/?q=cover strips&quick=1 You can even find measurements in the RS photo gallery A helpful video on cutting cover strips
-

TK ANH Stunt by CloseTheBlastDoor
gmrhodes13 replied to CloseTheBlastDoor's topic in ANH Build Threads
The ridges are a tad wide towards the bottom. There can be a little width but normally closer to the top as you can see in this reference Personally I know it's a pain to rework but it will pay off in the end and look much better. Shouldn't be too hard to pry off the cover strips, once you have lifted an edge the pressure of pulling should release them. -
I don’t think it looks ridiculous. I’ve seen many troopers with this kind of shape. And I think I could pull off the look with elbow pads beneath my undersuit to round out the look. But I would rather slim it down to fit me better. My current plan is to slice off the rear cover strips and the meat underneath, close up the gaps and reapply the cover strips. While this will result in double-thickness strips, they’re currently the same thickness as the rest of the armour so I think I can get away with it. My WTF strips are thicker – unvacformed and unstretched. And I’m happy with the look of those.
-
I've seen a few scattered postings mentioning proper widths for the cover strips, although that's not mentioned in the CRL. I think it was 25mm on one piece, and 15mm on another... but I can't find those references now that I'm looking for them. What are the usual width measurements of those strips on the ANH TKs for biceps, forearms, thighs and calves? (Head, shoulders, knees and toes, knees and toes!)
-

TK ANH Stunt by CloseTheBlastDoor
CloseTheBlastDoor replied to CloseTheBlastDoor's topic in ANH Build Threads
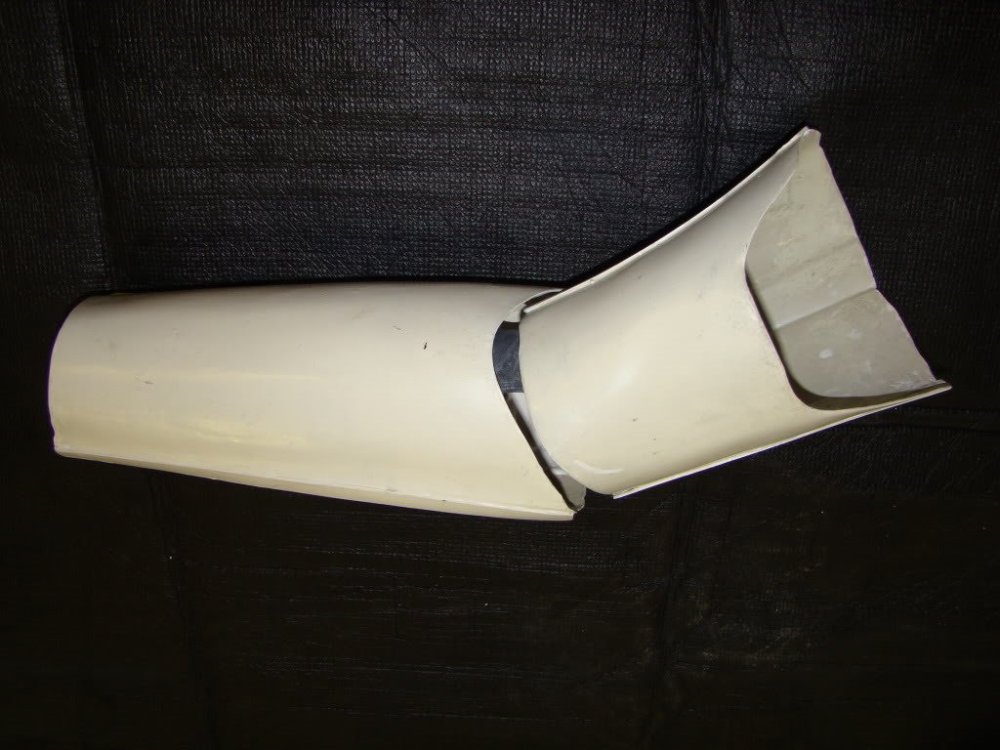
Onward to the right shin. After trimming the front, cutting strips, and aligning the tops, there arises the length disparity noted in other WTF kits (outer half is longer). Also, the right shin is more of an oval shape than a round one. So I decided to glue both a front and back cover strip to the front of the shin, which afforded lots of strength against bending, then used a water bath to reshape. Here is a comparison (both shape and length difference on right shin are shown). Right shin is on the left, sorry. For the water bath, I had no vertical pot large enough, so I went horizontal with a roasting pan over the stove: My wife commented that it looked like I was roasting a turkey leg! After all, you can’t spell TurKey without TK! After getting the water just past 170 degrees, and a 30 second dip and reshape two times, I got the shape I wanted. Since the sides were coming together at an angle, I also found it useful to clamp them together so they would heat-form more aligned: I then fitted and trimmed the back edges, and trimmed off the excess on the bottom of the shin so it was nice and even. Then I glued the back strip and waited. Last thing to do is to decide on whether I want the extra inner backing strip to support the mating Velcro. I am a bit concerned that adding this inner strip only makes me have to open the shin even wider to fit it on (which puts more stress on the ABS), and I’m already opening it pretty wide. -
G'day there - new TK recruit from down under
gmrhodes13 replied to Slouch's topic in New Member Introductions
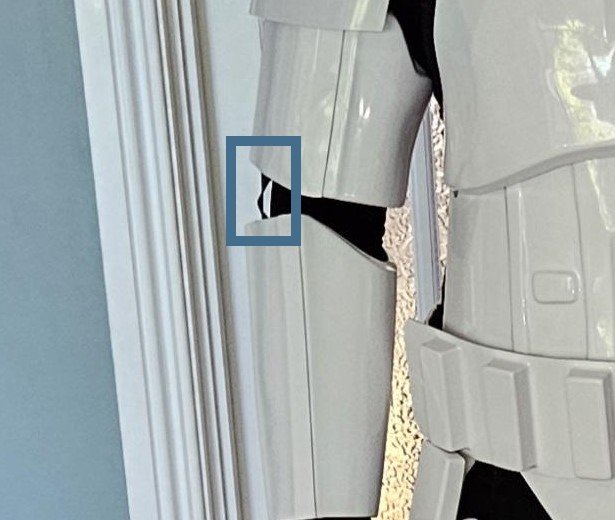
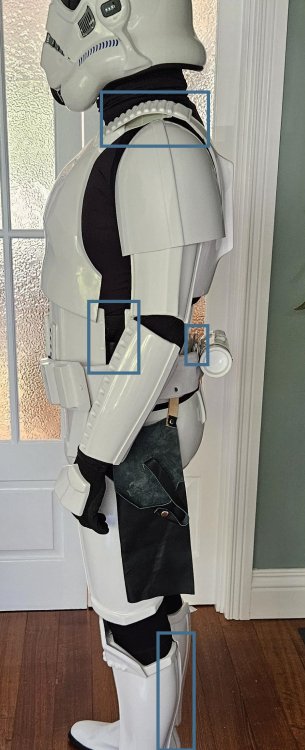
Hello and welcome to the forum from the West. First off your GML (garrison membership liaison) has final say on your costume. One thing that stands out is your bicep cover strips and raised ridges, generally we try to keep any front sizing as close to screen used, the raised ridges should be just outside the cover strips, yours have a big gap. Larger cover strips may be used on the rear to achieve a larger size if needed. Back of shins should close outside over the inside, this is so the don't appear open from the sides, yours are opposite. Cold also rotate your detonator so the O can be seen Left Right Small ab plate could be trimmed flat, should not have excess material on sides. Large ab plate is missing a base, it's been overtrimmed. You could also apply some heat to the belt (hot water bath) to help it conform to your armor better, your arms will catch the belt as they are. Elastic on your bicep to forearm appears on the sides (right arm) should be on the inner top Right arm You helmet sits a little high, could try reducing the padding. Detonator clips not completely down on belt. Shoulder elastic appears it may be a little loose, straps only just reaching the backplate. You may also want to add side shims to reduce the black seen between the abdomen and kidney (although this is for higher levels) OPTIONAL Level two certification (if applicable): Any gap between the abdomen and kidney armor is no more than 1/2" (12.5mm) wide. Any shims used to achieve this effect are of a similar material and color as the abdomen and kidney armor. Shims fit flush and seams are allowed..thumb.jpg.e41fc1b8fc87426b9f0455438f73c697.jpg)
-
 Hi Tim, and thank you for your EIB application! CRL and EIB Application Requirements: All required photos have been submitted, and on behalf of the entire D.O. staff we are pleased to welcome you to the rank of Expert Infantry. Congratulations! Other-Armor Fit/Assembly; In this area we review observations made by your fellow troopers and the DO team. Some observations may lead to suggestions to improve the overall look of your armor, and please keep in mind that we consider both text (CRL) and pictures (screen caps/reference images) when reviewing submissions. The angle of screws should ideally line up with the back of the trap. The left side is pretty close , but the right is just a bit off. References The shoulder straps are floating a bit in the back. This should be an easy fix with a hot water bath. References Your left thigh is sitting a bit high when compared with the right side and will likely cause armour bite where it meets the cod piece. This is likely more of a strapping issue and should be an easy fix. The sniper knee plate may need to be shifted forward to make room once the thigh is lowered. This may be achieved with some padding at the top front portion of the shin armour. May also want to trim off the top of the front cover strips on the thighs as they will dig into the upper leg when walking. References *************************************************** Centurion Requirements: In this section we prepare you for our highest tier of approval. Because Centurion photos must show more detail than EIB, items pertaining to Level 3 might be seen there and not here and additional photos may be required. We try to point out all that we can from what we are able to clearly see, but the final accuracy is the responsibility of the trooper. Your right shoulder bell distance from the shoulder strap is perfect, the left could be moved in a bit. This can be corrected with a slightly shorter strap or by moving the snap further in on the shoulder bridge L3 CRL: There should be a minimal gap between the shoulder armour and the chest/back plates References Fill in gap at bottom of rear of the right thigh. You can use Sugru or ABS paste for this L3 CRL: Lower thigh ridge joins (front and rear) shall butt-up flush against each other. Any gaps must be backed with ABS or filled as not to be noticeable. References Your ammo belt should be brought up slightly to sit at the bottom of the lowest blue button. This can be corrected with a bit of Velcro to hold the belt in place. L3 CRL: The top of the ABS ammo belt should sit at or just above the bottom of the central and vertical abdomen button panels. References
 -

TK ANH Stunt by CloseTheBlastDoor
Tilheyra replied to CloseTheBlastDoor's topic in ANH Build Threads
That gap will be reduced as you do further fitting for the biceps. Ideally, those raised portions will be cut down to just wide enough to fit under the cover strip (any extra amount beyond that depends on the size of your bicep), so the ridges on those raised portions should be slightly beyond the edge of your cover strips. I had to go a couple of milimeters beyond due to the size of my biceps. You should end up with something like this immediately after gluing (I cut my cover strips longer than needed, so I trimmed off the excess once I was happy with how it all came together): Yes, as parallel as you can keep them. -
Hello, I just got a submission and noticed the back strips of the thighs are very wide. Personally they look well beyond expectation and the CRL reference images, but there’s not specific width detailed on the CRL so I wanted to run this by detatchment to see if my expectations are beyond basic approval or in agreement with adjustments needed. thanks.
-
KJ Build thread? Walt's Trooper Factory Kit
gmrhodes13 replied to MSF Productions's topic in ANH Build Threads
Normally you trim the front of the thighs to the base @ 20mm width raised ridge to raised ridge, if that can't be obtained larger cover strips are normally used to fill this area or lager coverstrips on the rear. I would definitely reach out to your GML and discuss the cover strips before going to much further, as a GML I would not approve as they are and your GML may feel the same way. From our DL As a rule of thumb, front leg cover strips are 20mm wide approximately, you usually go a bit wider on the calves for the enclosure, say 25mm. Now in saying this, if you can keep the front cover strips close to this , you can go wider on the back to try and cater for a wider girth. I know plenty of troopers who went with 30mm on the rear of the thighs because they needed a bit more. at basic i would be surprised if a GML pulled you up on something like that. Note the raised ridge in these references Here's a couple of extreme examples which added extra material on the backs of the thighs As I say speak to your GML to check what is acceptable for your garrison -
Shoulder Bells, Biceps and Arms: While recuperating from minor surgery, I discovered RS Props, U-Tube videos, I think I've made some good progress - from initial trimming to a point where I can consider cover strips and final sanding and shaping - welcome your thought before I start sticking things together. These bits are hard to cut this way... apparently a Dremel is way easier. I found measuring and ruling the marker line quite effective with good matches when placing the two halves together. Once I found the overall measurements on the top and bottom parts of each (based on a 14 inch bicep) I was away. Trusty sawhorse and a nice thick straight piece of aluminum, plus a sharp knife with clamps, became my best friends. So this is where I'm at today. On the to do list, 1. Rough sanding 2. Remove pencil marks 3. Cut, sand and apply side strips 4. Dremmel / Hamd sand - take out the returns, rough edges etc Shoulder bells I trimmed some time ago - Biceps and forearms fit nicely. Will need to see where the shoulder bells fit into the overall layout. May need an extra trim, though will wait until I've got the chest plates underway. Welcome your thoughts.
-

TK-12953 - A Dave's Darkside Depot EIB AHN Stunt build
jsilvius replied to jsilvius's topic in ANH Build Threads
Okay, last pictures for the night. Both biceps are together. I've added a cover strip to one side and I started adding cover strips to the forearms as well. So need to shape up the shoulder bells. Then I'll start work on the ab/kidney sections. We have two armor parties next week, so hopefully I'll have a bit of help to finish my helmet. I'm so close. Sent from my SM-N981U1 using Tapatalk -
TK ANH Stunt by CloseTheBlastDoor
CloseTheBlastDoor replied to CloseTheBlastDoor's topic in ANH Build Threads
It’s been a while since I’ve posted anything, but I’ve been hard at work when time allowed. Bending the clips properly was indeed the next challenge for me. In one of my earliest posts, I had pre-drilled the screw holes in the strips before bending, and those points proved to be the weak points in the curve. You can see that the arc is sharper at those points: This strip, I screwed onto the sacrificial PVC pipe I used earlier, first with one screw at the end to hold it, then attempted to bend it by hand. This didn’t work great. Trying to keep it all square, plus having enough hand, or even clamp strength to get the bend, plus not knowing exactly how much arc to impose overall made all of the process awkward. The aluminum bar that I used was pretty stiff, maybe stiffer than typical for this? So after some noodling, I thought I’d make a jig that better imposed the required shape. I broke out the hole saw set and cut a semicircle in the edge of a 2x4. This would be the outer side of the arc. For the inner side, I cut off some of the PVC. Since the PVC is 2” inner diameter, 2.375” outer diameter, and the biggest hole saw in my set is 2.5,” this left 1/16” of radius for the strip - perfect! I had not initially seen @ukswrath's build thread. Looking through it, I was so impressed with the amount of detail and clear images. The approach to the TD build was easy for me to follow, so I decided to back up a bit and start over with the strips. Here is that post: I got the bars to length, drilled holes and rounded the corners on one end: Then worked each bar into the jig a little bit at a time until I got the angle I wanted: The curve is a bit smoother: Now to drill the holes in the tube. I marked everything as carefully as I could. The hole closest to the control panel, I drilled to 9/64”, which is what is recommended for #6 screws. For the other set of holes, I wanted to have a little bit of play just in case my marks were off, so I drilled those to 11/64”. The screws I got were not black. It was hard enough to find the right size to begin with. So I needed to hit the heads with black. After screwing them in, they will need a bit of touch-up where the screwdriver was in contact. Next was doing the rest of the bending on the clips. Tried to get a square bend on the first one. Then I flipped it over and increased the angle. A bit of bending by hand with spacer in place followed this, so I got to close to 180 degrees: Then on to a vice to take it the rest of the way: Fitting the clips and caps onto the tube was next: I think it turned out pretty well! Now, all I need to do is glue the cover on. -
I experimented with some color on my cover strips. The white of the 3D prints are more white than the 850 armor. I mixed a little (and I mean a little) yellow acrylic paint in with the XTC-3D to make the cover strips a bit off-white to match the armor. It's difficult to see in the pictures below, but I used too much yellow and will try again with a little less. The cover strips are not attached; just resting on the armor. Original 3D print: XTC-3D mixed with the yellow acrylic paint:
-
TK ANH Stunt by CloseTheBlastDoor
CloseTheBlastDoor replied to CloseTheBlastDoor's topic in ANH Build Threads
I told myself I wouldn’t post again until I made some progress! A few things I discovered: My photos before were of me putting the left bicep on my right arm (as evidenced by the “thumbprint”) The left bicep assembly has an oval opening on the bottom, while the right bicep is much more circular. I don’t know why this is so, but in the WTF forum on FB, this was also pointed out. It’s something everyone is aware of, including Walt, and it needs to be rectified. More on this later. So because when I was fitting the left bicep on my arm, I felt the squeeze on the short axis of the oval against my arm, and thought that that was as far as I should go. Much too big. So I need to work on that. I took to focusing on the right bicep. Per Mario’s advice, I got to roughly 7.5mm on each side on the front of the bicep. I also decided to further sand down the return edges on the bottom. I tried to test fit everything before committing to gluing. Not glued yet, just practicing with clamps and magnets: At the top, the two halves kinda peak, instead of making a straight, continuous edge profile. I hope that’s OK, and that since it’s under the shoulder bell, it should not be an issue. After gluing, waiting, and peeling, I got the first cover strip in place! PandaProps was also very helpful here. Feeling a bit more confident, I glued the backside strip as well. I don’t have massive biceps by any standard, but I did go wide of the 15mm a bit. For the left bicep, since it was needing to be reshaped, I was concerned about the return edges getting some stress. So I knocked down the remaining piece of return edge. I then got a piece of scrap 4.5” pipe I had lying around in the workshop, and rubber banded each half to it. And here’s where it gets weird… I didn’t have a pot tall enough to get full immersion, so I pulled out the sous vide gadget, filled it with very hot water, and set the target temperature to 200F. Pipe end. Bicep strapped with rubber band(s): The dunk! This turned out to work quite well. Immersion time was 30-40 seconds, and I did each half at least twice. The left and right biceps look a lot more similar now: I then got the edges cut and sanded down and started gluing. Since the left bicep was stretched out, the edges didn’t quite meet in a straight line, and I”m hoping that the glue and cover strip will provide a little bit of assistance here: I have glued each strip one by one in the hope of learning and refining my technique. I’m pretty close, although there is still some sloppiness in the form of glue residue, scratches, and dull spots right along the edge of the cover strips that I’m not sure are OK. Once everything was glued, the final step was to even out all the return edges. I learned a lot on this, hopefully it makes everything else go smoother. I hope this is all good enough! Thanks to everyone thus far for all the great advice! -
 Artillery Trooper CRL First Draft The Rogue One CRL was used as the base considering it is the same armour, so level 2 and 3 also easily apply. Helmet Traps (trapezoids on dome of helmet) and tears (area beneath the corners of eye lenses) are gray. Rear traps and tears have engraved vertical black lines. Lenses can be flat material, green in color, sufficiently dark enough to obscure the costumer's eyes. The “ear” bars are gray or painted gray, with the largest bar oval cutout painted black. Frown is painted gray and does not leave the teeth area. The space between the 8 teeth is hollow and backed with Black or Dark grey wire screen mesh. Tube stripes are medium blue, numbering 12 per side. The stipes are straight, not curved like ANH. Vocoder (vertically ribbed chin detail) is painted black. Aerators/Hovi mix tips (cylinders on either side of the vocoder) have a black exterior and silver in color screen mesh. Tears and traps may not be hand-painted. Tube stripes are recessed, and the recessed section painted blue or backed by blue mesh. Special unit details in yellow shall be present. The yellow detail will start from the back of the dome, continue over the head, down the face plate and ends underneath the chin area at the neck seal. Helmet and details/paint should be lightly scuffed,(battle worn), but not weathered like a Sandtrooper (TD) Note: The helmet is accurate in detail and proportion to official references. Many commercially available helmets or those considered disproportionate in size or shape are ineligible. The Black Series helmet is approvable if modified to meet the level 1 CRLs. OPTIONAL Level two certification (if applicable): Lenses have a very slight curve and are convex in style. Flat lenses and ANH style bubble lenses are not permissible. Rank bar area on ear must be of the correct RO style and pattern, no ANH style ear bumps allowed. Head opening has black trim running all along the edge. Brow trim should be positioned 1/4" above the eyes. Ear screws must not have a visible slot mark and be flush to the ear. Any gap between the ears and helmet will only appear to be a seam, not any bigger. Correct 'Hovi mic' aerator tips. Chin section has a well defined seam from the angles of the mouth. OPTIONAL Level three certification (if applicable): The Tube stripes are completely hollowed out with a blue section underneath. Vocoder is tubular in nature with 7 vertical tubes. A visible gap must be present between the Vocoder and the helmet. The inside of each tear will be a raised area that is grey, with 8 engraved black lines, hand painted lines like ANH are not permitted. The frown shall be recessed to the proper depth, unlike standard ANH. The inside of each rear trap will be a raised area that is grey, with 13 engraved black vertical lines, hand painted lines like ANH are not permitted. The inside of each side trap will be a raised area that is grey. There is a small bump in the right eye socket (when worn) under the lens as an intended flaw to pay tribute to the original trilogy designers. Neck Seal Black with horizontal ribs, fitted to the wearer, and extending from the base of the neck to conceal the entire neck. Under Suit Black non-textured material, either one-piece or two-piece construction with no visible zippers or logos/designs. OPTIONAL Level two certification (if applicable): Top, where visible shall be fully ribbed with all horizontal ribbing on the arms, chest, and back. The centre of chest and back may be mesh as long as it is covered by armor. Pants shall be black non-textured material and have horizontal ribbing at the knees only. Knee gaskets are allowed as long as they correctly match top ribbing material, spacing and color. The hip section shall not have ribs. OPTIONAL Level three certification (if applicable): All ribbing on knees, arms, chest, and back must be stitched between each rib in detail and proportion to official references. The armpit area shall have the correct hexagonal mesh detail. Shoulder Armor One on each shoulder. The shoulders are considered effectively symmetrical; they may be worn interchangeably on the left and right shoulders and may have a black elastic strap that wraps around the inside of the bicep. Special unit details in yellow shall be present along the outside edge. Shoulder bells/Special unit details should be lightly scuffed,(battle worn), but not weathered like a Sandtrooper (TD) OPTIONAL Level two certification (if applicable): OPTIONAL Level three certification (if applicable): There is no swoop on the shoulder bell raised area. There is no elastic strap that wraps around the inside of the bicep. Shoulder Strap They may be affixed with Velcro or adhesive. OPTIONAL Level two certification (if applicable): OPTIONAL Level three certification (if applicable): These shall be inserted behind the chest tabs and into slots of the backplate. Upper Arm Armour Both biceps are symmetrical and interchangeable. The front strip is beveled and approximately 1/8" thick that does not extend beyond the bicep, and has a smaller cover strip layered thereon. Special unit details in yellow shall be present in the form of one vertical stripe, running the length of the bicep. The stripe covers the front cover strip top and sides. Bicep/Special unit details should be lightly scuffed,(battle worn), but not weathered like a Sandtrooper (TD) . OPTIONAL Level two certification (if applicable): OPTIONAL Level three certification (if applicable): Cover strips will cover both the front and back joints. Biceps are loosely held closed in the back with elastic, shock cord (bungee cord) or white Velcro and are designed to remain flexible. Forearm Armor The front strip is beveled and approximately 1/8" thick that does not extend beyond the bicep, and has a smaller cover strip layered thereon. Special unit details in yellow shall be present in the form of two vertical stripes, running the length of the forearm. One on the front (cover strip area top and sides of strip), the other on the outside raised section containing the 12 indents. This stripe is only on the top surface, not on the sides of the raised area. Forearm/Special unit details should be lightly scuffed,(battle worn), but not weathered like a Sandtrooper (TD). OPTIONAL Level two certification (if applicable): OPTIONAL Level three certification (if applicable): Forearms are loosely held closed in the back with elastic, shock cord (bungee cord) or white Velcro and are designed to remain flexible. Cover strips will cover both the top and bottom joints. Hand Plates Roughly pentagonal in shape, the hand plates are mounted securely over the back of the glove. As an alternative to plastic, these may be made out of latex or latex-like material. Special unit details in yellow shall be present in the form of vertical stripe that runs down the center ridge of each hand plate. It continues approximately 3/4 of the way onto the wrist end section of the plate, finishing with a foot like shape as per visual references. Hand plate/Special unit details should be lightly scuffed,(battle worn), but not weathered like a Sandtrooper (TD) OPTIONAL Level two certification (if applicable): Hand guards shall be made of plastic. OPTIONAL Level three certification (if applicable): Hand guards should follow the correct RO shape, ANH hand guards are not acceptable. A small indent in the front of the hand plate shall be present. Gloves Black in color, made of either rubber, Nomex, leather, or leather-like material, with no visible straps or logos/designs. The fingers are enclosed, non-textured. OPTIONAL Level two certification (if applicable): Gloves shall not be made of rubber. OPTIONAL Level three certification (if applicable): The base material of the gloves will be a black synthetic material similar to Lycra, Spandex, Elastane, or Nylon. Palms of gloves shall be shiny black fabric or leather or leather-like material. On the index finger shall be a stitched piece of fabric made from the same material as the hand's underside that while stitched to the finger has one cutout towards the end of the finger that reveals the netted material underneath. Gloves shall have the correct leather pattern along the fingers/palm. Back Armor Back plate contains an "O II" design. There are raised trapezoids at the top of the backplate section beneath which the shoulder straps insert. The backplate continues past these trapezoids towards the top of the shoulder OPTIONAL Level two certification (if applicable): Top of box wall has a trapezoidal indentation. There is a roughly 8mm circular indent near the right top corner of the backplate. OPTIONAL Level three certification (if applicable): Bottom of backplate is curved and extends past abdominal back cover plate. The O cog shall have 16 spines. The 11 bars have 5 horizontal evenly spaced raised bars on the bottom of the face. There is a rectangular tab protruding from the bottom of each of the two raised trapezoids at the top of the backplate. Chest Armor Chest plate overlaps the abdominal plate. There are raised trapezoids at the top of the shoulder section beneath which the straps insert. Special unit markings shall be present in yellow on the front. The yellow detail starts a few inches from the top/center, then flares out and runs along the bottom edge. Chest/special unit details should be lightly scuffed,(battle worn), but not weathered like a Sandtrooper (TD). OPTIONAL Level two certification (if applicable): The chest and back sides shall be connected by black extensions pieces. OPTIONAL Level three certification (if applicable): Top pectoral out lines swoop correctly outward. Bottom of ribcage flares correctly outward. Abdomen Armor The abdominal armor consists of a one-piece corset design with a vertical opening centred on the back. The back opening is covered by a rectangular cover plate that is worn under the back armor. There are 3 vertical ribs centered on the front of the abdomen and two (one left and one right) ribs further spaced to each side of the center. There are two (one left and one right) angled (approximately 70 degrees) ribs on each side of the abdominal armor. There are two (one left and one right) angled (approximately 70 degrees) recessed ribs on each side of the abdominal armor behind the raised angled ribs that are black. Any side shims added are to be added to the white areas of the armor. The center front detail consists of a raised rectangular panel. On the right half of the panel, there is a vertical column of 4 buttons approximately 7/16” (11mm) in diameter. The bottom button is blue while the other three are grey. On the left half of the panel, there is a vertical column of raised evenly spaced horizontal gear teeth with a recessed trapezoid at the top of the column. The rectangular inside bottom of the trapezoid is black. The left front detail consists of a raised rectangular panel with an angled top. There is a vertical column of 4 buttons approximately 7/16” (11mm) in diameter. The bottom button is blue while the other three are grey. The right front detail consists of a primary raised rectangular panel with an additional secondary raised rectangular panel covering the top 1/3 of the primary panel. There is a column of three thin horizontal evenly spaced raised lines across the top ½ of the secondary panel. The abdominal armor is accurate in detail and proportion to official references. OPTIONAL Level two certification (if applicable): The cod armor is separate from the abdominal armour. The right front detail panel is centered between the two outer vertical right ribs. The left front detail panel is centered between the two outer vertical left ribs. OPTIONAL Level three certification (if applicable): The abdomen armor has two horizontal recessed rectangles centred above the center front detail panel and on each side of the center rib. All 8 Button details are recessed and bordered with a thin edge, only the recessed portion is painted. The center front panel column of raised gear teeth has only 9 teeth. There is a recessed edge (approximately 1/8” 3mm wide) along all four sides around the face of the center front panel The right front detail panel is centered between the two outer vertical right ribs. The left front detail panel is centered between the two outer vertical left ribs. There is a recessed edge (approximately 1/8” 3mm wide) along the sides and top around the face of the left front detail pane The abdominal armor back cover plate has two protruding tabs along the bottom that rest inside the back hard belt. Cod Armor The cod armor consists of a body shape formed triangular plate with a raised center rib and raised lower portion and is accurate in detail and proportion to official references OPTIONAL Level two certification (if applicable): The cod shall be a separate piece from the abdominal plate. Kidney Armor The kidney armor is separated in the back and covered by a rectangular plate. The rectangular plate is separate from the posterior armor. Posterior Armor The posterior armor shall be a separate piece from the abdominal armor Belt The Ammunition belt consists of a hard belt made of the same or similar material as the armor in two separate parts front and back (with overlap). The back belt overlaps the front belt on the sides. There are 6 ammunition boxes mounted to the belt. There are 2 (one left and one right) drop boxes suspended by black webbing approximately 2" (50mm) wide. Drop boxes must be accurate in detail and proportion to official references. The ammunition belt is accurate in detail and proportion to official references. OPTIONAL Level two certification (if applicable): The only detail visible on the front belt is the mounted ammunition boxes unlike the squares present on ANH belts. The top edge of the front belt has protruding teeth that nest inside gaps between the ribs and detail panels of the abdominal armor. The two center ammunition boxes are thinner than the other mounted ammunition boxes. The second and fifth mounted ammunition boxes are slightly wider than the two center ammunition boxes. The two outermost ammunition boxes are almost square. The two drop boxes are rectangular and as wide as the mounted square boxes. OPTIONAL Level three certification (if applicable): The ammo boxes across the front are all made separately from the main belt and are secured to it The two drop boxes hang no more than 1” 25mm below the front belt and the black strap is visible. The second and fifth mounted ammunition boxes have trapezoid detail on the top of each ammunition box. The front belt protrudes past all mounted ammunition boxes above and below by approximately 1/8”-1/4” 3-6mm. All ammunition boxes have slightly bevelled edges on the face of each box. Thermal Detonator The thermal detonator consists of a grey tube approximately 3” 76mm in diameter and 8” 203mm long approximately. There are two white endcaps and a white control panel. The white control panel has a horizontal row of white rectangles along the bottom of the control panel and a grey “D” shaped recessed on the left side of the horizontal row. There is an oval greeble that protrudes from the control near the top right side. The thermal detonator is mounted to the rear hard belt and there are no visible screws or clips and is accurate in detail and proportion to official references. Thermal Detonator is only worn in absence of the munitions pack. OPTIONAL Level two certification (if applicable): The thermal detonator mount should be fully enclosed with solid walls on all four sides. The center of both end caps is gray. OPTIONAL Level three certification (if applicable): The control panel bottom detail is a raised panel with 7 raised rectangles, all are evenly spaced except the right most rectangle. There is a panel line approximately ¼” 6mm from the edge around the control panel. There is a panel line approximately 1/8” 3mm from the edge of each endcap. The inside edge of both endcaps is bevelled. The oval greeble consists of an oval tube protrusion with the top edge slightly extending past the tube wall thickness and is visually similar to the Deathtrooper chin greeble. Thigh Armor The thigh armor is mirrored for each leg and not interchangeable. The cover strips are bevelled and approximately 1/8" thick that does not extend beyond the thigh and has a smaller cover strip layered thereon. The top edge of the thigh armor is unadorned, and the bottom edge has a raised detail that fallows the bottom edge contour. The small ammo belt consists of 5 evenly spaced rectangle ammunition boxes and is installed on the bottom of the right thigh, there are no visible screws or rivets. The special unit markings shall be present in yellow along the top of the thigh, the markings shall continue approximately 2 inches further down the front cover strip as per references. Thighs/Special unit details should be lightly scuffed,(battle worn), but not weathered like a Sandtrooper (TD). OPTIONAL Level two certification (if applicable): Thighs are loosely held closed in the back with elastic, shock cord (bungee cord) or white Velcro and are designed to remain flexible. Cover strips will cover both the front and rear joints OPTIONAL Level three certification (if applicable): The bottom outside edges of the small ammunition belt are angled at approximately 45 degrees. Thigh armor is suspended by a black strap approximately 1” 25mm in width with a plastic side release buckle that is covered by black webbing or elastic that runs down the side seam of the leg. Lower Leg Armor The greaves are mirrored for each leg and are not interchangeable. The top edge of the greaves has a raised detail that follows the top edge contour. The bottom edge of the greaves flairs out to cover the top of the ankle and boots. The cover strips are bevelled and approximately 1/8" thick that does not extend beyond the greave and has a smaller cover strip layered thereon. Greaves are loosely held closed in the back with elastic, shock cord (bungee cord) or white Velcro and are designed to remain flexible. Cover strips will cover both the front and rear joints. The trapezoid knee plate (sniper knee plate) is affixed to the top of the left greave and there are no visible screws or rivets. Sniper knee plate must be aligned with the vertical cover strip and the top raised edge detail on the greave and is accurate in detail and proportion to official reference The base of the center trapezoid on the sniper plate is painted yellow. Special unit markings shall be present in yellow around the bottom of both greaves as per official references. Greave/Special unit details should be lightly scuffed,(battle worn), but not weathered like a Sandtrooper (TD). OPTIONAL Level two certification (if applicable): The sniper knee plate has raised detail that fallows the top edge contour. The sniper knee plate has 3 trapezoidal lugs on each side and 2 on the center bottom edge (totaling 8) of the knee plate. Boots Boots are above ankle height and the same style as the First Order TK. Chelsea type boots in the style of OT TK are not acceptable. Boots are all white and made of leather or leather-like material Flat black soles without a heel. Patent leather or high gloss is not permitted. Boots are lightly scuff and weathered. OPTIONAL Level two certification (if applicable): There is no seam present on the front of the boot. The wearer's inner side of the boots have zippers and no side elastic. Munitions Pack Pack must be accurate in colour and details styled after the munitions pack as seen in The Mandalorian season 2, and official reference images. Pack must be lightly scuffed and weathered. Pauldron UPDATED Although the Artillery Trooper is clad in Rogue One armor, the Pauldron that denote rank or mission specialization are an ANH style in construction. *A Yellow ornament made of leather plastic or leather-like material, worn over the right shoulder. The Yellow is specific to Rogue One/remnant as seen in The Mandalorian. *The colored panel is divided into three sections by color matched stitching to conform to the wearers shoulder and has black piping around the outside edge. *The remainder of the Pauldron is black and divided by black stitching into 10 segments. *The neck closure is black, it is mounted on top with two silver rivets and has two silver snaps visible. *There is a black elastic strap that runs from back to front and is worn under the bicep to hold the Pauldron in place. The strap is conned to the Pauldron on top by two black snaps inlayed in black “D” shaped leather or leather-like ends. *The underside of the Pauldron is white or black regardless of top color and is divided with white or black stitching into 3 segments. The entire outside edge is finished with black piping and the underside of the neck closure is black.||}} Merr-Sonn Munitions 201 telescopic mortar. *Launcher can be scratch-built, or 3D printed. *As with all 3D printed accessories, it can not contain visible print lines and must be sanded smooth for a more realistic appearance. *The Mortar shall match official reference and include A control panel shall be present on the left side of the mortar attached to the center section where the Bi pod also mounts as per references. *The mortar and details/paint should be lightly scuffed,(battle worn),similar to that of a blaster.
 -
Legacy Fem, Version A Build
Tilheyra replied to Tilheyra's topic in Legacy Stormtrooper Build Threads
Still messing with the forearms. The wide cover strips have cured to one side of the joint, but additional shaping will be needed to be able to effectively and properly glue the cover strip to the other side of the joint. I haven't had much time to do that shaping yet. I have had the time to start working on the snaps! As I learned during my shock trooper build, using nylon for the snap bases works out really well, and allows the snap bases to curve with the curves of the armor! For those reading a build thread for the first time, here's the process for the snaps: I am using nylon from a long tie-down strap, cutting the nylon into smaller pieces, and then using a lighter to melt the ends of these nylon pieces to prevent fraying. I then punch a hole approximately in the center of each nylon piece and attach the snaps accordingly. I am using heavy duty snaps I purchesed from my local Michael's craft store and used special pliers to contect the two halves of the male snaps to the nylon. E6000 is then applied to the bottom of each nylon piece (avoiding glue coming into contact with the metal of the snaps) and applied to the appropriate place on the interior of the armor. The place on the interior side of the armor where the nylon snap base is glued was scratched with sand paper to allow a better surface for the glue to adhere. Upon gluing, rare earth magnets or clamps were applied to hold the nylon snap bases in place while the glue dries/cures for 24 hours. Here's the abdominal piece: The kidney piece is next in line for this treatment. -
1) a good guide for assembling the belt (I want to know how far I need to cut it, where to rivet and any general dimensions). Varies from maker to maker 2) is there an approved way to make the thigh pieces wider? Right now getting both sides closed is almost impossible. Maybe a bigger strip in the back? Any photos of such fixes would be greatly appreciated! Larger cover strip on rear may be allowable, check with your GML as it is up to them if they will approve. If it's too big a gap you may need to add some more material to the sides on the rear. Some links in this thread: Third bonus question: for the strips that seem the armor together, is there a specific width they should be? I saw a pic from someone’s post using 15mm but I haven’t seen that written anywhere. Forearms and biceps 15mm Thighs and shin front 20mm Shin rear 25mm
-
KJ Build thread? Walt's Trooper Factory Kit
Tilheyra replied to MSF Productions's topic in ANH Build Threads
It is always amazing putting on the full armor for the first time! Were you able to address the issue with the cover strips on the front of the thighs with your GML? I recall a discussion earlier in the thread concerning the width of these cover strips and distance between the raised ridges on the front of the thighs. If there is an issue, it is certainly easier to make changes before you attach the thigh ammo belt. -
TK ANH Stunt by CloseTheBlastDoor
CloseTheBlastDoor replied to CloseTheBlastDoor's topic in ANH Build Threads
Continuing with the forearms, I removed all the return edges at the wrist ends of each side, then cut the front edges down so they could accommodate the 15mm cover strip. Then I taped the front sides and attempted some sizing. Since I wasn’t keen on the strength of the boundary between the curved and ridged edges, I opted to cut and install some inside strips as well: After 24 hours, the inside strip: Now I get to the HELP moment! The WTF forearm parts are not exactly the same length on the left side, so they don’t align. I had read several other threads, and asked the WTF FB group, and the advice was to line up the top (elbow) sides of the forearms, not the wrist side. Then trim at the wrist side. So I followed that. But somehow I guess the strip upon gluing slid up a bit, and now I’m left with an even larger alignment problem, as seen here: Is it OK to trim roughly where the pencil mark is? I am worried that trimming will make the outer side’s edge look bad. I hope this is not an irreversible mistake! -
I finished the lower leg and thigh cover strips. Those were the last parts of the build for the body armor. It feels good to have gotten that done! I'll post full body pictures next.
-
Excellent pick up - thanks I noted the 12mm from a uTube press and later hunted down and found on Whitearmour a thread where someone kindly listed the strip sizes for all cover strips. TBF it was that thread which gave me the confidence to soldier on.
-
Getting back to the build! Started the lower legs. Like other parts of the 850 Armor Works kit, the sizes are big for me. I needed to cut down the length and mold them so they were tighter around my leg. I used a large pan on the stove top in order to get the full piece heated at once. It was tricky and took several times of shaping and fitting before I was happy with them. I decided to use a butt joint rather than overlapping the front joint. I felt that the front cover strips wouldn't cover the joint if I overlapped it. I do worry that taking the lower legs on and off will eventually weaken the butt joint, however, it's reinforced on the back and will eventually have the cover strip on the front. I'm hoping those will make the joint strong enough. I had to trim the back of the lower leg armor quite a bit in order to duplicate the CRL. Once I sized them for me, the raised detail and the opening of the back of the knee had to be recreated as best I could. I worked on the left leg with the sniper knee plate first. The sniper knee plate also had to be reduced in size to match the size of the leg armor. As I attached it, I taped a cover strip underneath to ensure there was enough space when it comes time to attach one. After a final test fit, I attach a little bit of foam on the inside to bring it off of my leg a little so it was more comfortable and sat more symmetrical along my shin. I also attached velcro at the back bottom of the armor. In the picture below, the inside of the armor is on the outside to show where the velcro was placed. I finished up with the right lower leg and assembled it with a butt joint like the first one. At first, I was overlapping the joint but after I thought about it and did some test fitting, the butt joint made more sense and allowed me to get the front width for the cover strip to be more consistent from top to bottom. I still need to clean the excess glue off the front once it dries more.
-
TK-12953 - A Dave's Darkside Depot EIB AHN Stunt build
jsilvius replied to jsilvius's topic in ANH Build Threads
The weekend was a bit slower with not being able to use both hands to their full extent. But forearms are together, need to add cover strips, and the start of one bicep.


.jpg.1d977a66f92ef4c0660023c5141fe61e.jpg)