Search the Community
Showing results for 'Hasbro' in content posted in ANH BlasTech E11.
-
Thanks, could have gone futher but think I would just do a complete scratch build if I did, it is cool to get the insides, blaster sounds and lights out of a hasbro. It is still very light so should hang well in the holster, unlike some metal builds. I am glad I added the laser in the front, looks cool at night when you shoot something
-
Very cool ... you guys make me want to do more with my Hasbro.
-
Very nice indeedonly one thing is that here in the UK the Draconian gun laws and of course the price of deactivated firearms like the sterling are astronomical even to consider a chop job on one let alone buying one so if one is`nt filthy rich we have to stick to the Hasbro model for conversion which I find very light I`d love to get a sterling convert it or then again would I just keep it as a oldd friend as we once were during my time in the British army a very bad choice but thank you for sharing a piece of joy to see built .
-
I've decided I am not happy with the rear scope solution and I will be removing the Hasbro rear cap and replacing with the scotch tape inner roll and a sanded down mini magnifier glass from the dollar store eyeglass repair kit $2. Photos to follow as I get things moving.
-
Not easy at all. So many oopsie moments Had I simply followed the repeated words of wisdom on FISD, I would not have has to use so much bondo to fix my mistakes ) So, for all those potential Hasbro modders out there. Open 'er up before drilling the row of extra holes on the magazine housing side. That extra unseen plastic inside is brutally unforgiving. Secondly. Dremel set to lowest speed that works on either the plastic or resin. Anywho. It'll be my troop blaster. I'll get a full Doopy E11 for the formal later.
-
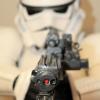
Matte Clear Coat added, silver on ejection port and a comparison with original Hasbro. I still need to add some weathering, but I hope to learn some techniques from the local Canadian Garrison at their upcoming Armour Party.
-
Wow. Insert Detroit joke here...but seriously, I am so sorry. I can vouch for the Doopys as well. I have received a lot of compliments on mine and I find it satisfyingly heavy...But I would also recommend a Doopys Hasbro conversion for trooping in those kinds of environs in the future. Less weight, is passable, and not as big a hit if some douchebag decides to make off with it...
-

ANH E-11 Blaster (Doopy Doo's and Hasbro)
bigironvault replied to bigironvault's topic in ANH BlasTech E11
Hasbro conversion done. Well the basics at least, which is really what I want to leave it at because it's going to be my trooping blaster. So no point spending a ton of time on it. For formal events or pictures I'll bring the resin E-11 instead. That really didn't take a long time at all to convert! -
ANH E-11 Blaster (Doopy Doo's and Hasbro)
bigironvault replied to bigironvault's topic in ANH BlasTech E11
It's been a while since I updated this. Work and other stuff got in the way but today was a weapons only day for me. As you can see quite busy working on three projects at various stages of completion. DL-44, Hasbro Mod, and E-11... now that I have a dedicated working space (and the weather is cooperating, I hope to finish these quite soon!) And yes, I clearly have a newborn! Haha. -
The ones I got at Lowe's were 1/4-20x3/4. The heads are a bit larger than 1/4", and I had to do a bit of filing to get them to fit into the Doopys muzzle (I cut off the thread length and glued the heads). I bought another pair that are ".8" measurement for my Hasbro conversion, but might exchange them back for the size I used previously - the jury is still out on that.
-
2 things learned on this build tonight. 1. Krylon paint is garbage, and I'll never use it again. 2. Don't rush these things, but make sure you have a deadline. I put down the coat of black paint on this and it's a mess. The paint was spraying unevenly, clogging, had a weird nozzle, the button would stick, just a nightmare of painting. The railing is glued in place, so it's pretty much good to go. Just needs some touch up work here and there. I've had a lot of fun building this, and I would do it again, especially considering what I've learned in doing this one. The gun has a good heft to it and feels solid. I'll have to see how it does on a troop tomorrow. I'm just so happy to not have to use my Hasbro anymore.
-
I finally broke down and got myself a proper blaster to replace my Hasbro POS. The kit arrived today. So, now I have a fun project to work on. This is my first time working with something like resin, so I hope I don't screw it up.
-
Nice work Brent! This is one of the best Hasbro mods I've seen yet. Especially cool mod on the scope. Nice paint job too.
-
I cut off the Hasbro barrel and attached my new one. So far so good. I'm almost ready to seal up the body except I can't get the soldering to stick on the watch. I think I'm stuck until I can get some magnet wire and possibly a finer soldering iron. Even the finest wire I have can only make a temporary bond to the tiny solder pads on the watch, and when I try to move it in to position for gluing, the wires tend to pop off. Once sealed I need to extend the Doopy Doos folding stock by about an inch. Anyone have suggestions on what I can use for that? I'm thinking of using whatever scrap plastic I have around to make a rough skeleton for the gap, then fill it over with Bondo. Would some sort of clay be better? Fiber glass? I need to be careful because this will be up against the finished barrel, which I will try masking off.
-
After painfully waiting for the paint to dry I finally was able to peel back the "chips". This is two layers of metallic, followed by some latex, followed by flat black, followed by a wider layer of latex, followed by hammered black. I then peeled off the paint by dabbing at it with masking tape. I think the two layers of paint give it a more "worn" look. The metal is a bit two shiny I think. I'll stick with this recipe for the rest of the gun for consistency, but I think future attempts will use a more dull metallic layer. In the reference pictures of the folding stock I showed earlier you can see that where the paint is worn away the metal is a very dark grey except for right on the edges. It seems that if I want to replicate that look I'll need to do a lot of experimenting. This is definitely turning out to be pretty heavy weathering, which I wasn't originally planning on, but I think will turn out fine. The pictures in this post are right after peeling back the paint. I've now applied a clear coat on top of that, which I'll need to let dry before I can move on to the next part; attaching the barrel to the Hasbro.
-
I picked up some Duro Super Glue. It says it contains Cyanoacrylate, which I assume is CA? Is that the sort of glue you mean? They also had it in a gel form, maybe that one would be more useful. Thanks! At least the front won't have much Hasbro to it.
-
It's possible that "button" is supposed to represent the screw that is the safety (turned using the other side of the grip though) but really it's not like anything on the Sterling grip. i think the people at Hasbro just went with their own ideas when it came to the whole trigger group and grip area. Your work here is amazing - putting that watch in and wiring it to the actual gun battery! I'm speechless - you've got skills sir...
-
Now that the barrel is more or less complete, my attention is back on the body of the gun. Adding a timepiece I came across a thread discussing having a clock handy for trooping. It was suggested that one could build it in to a blaster, which I think is a great idea. I bought the smallest digital watch I could find and worked on finding a way to integrate it in to the blaster. Two suggestions from that thread were in the counter or in the scope. The size of the numbers on the watch didn't lend themselves to putting in the counter, so I'm opting to build it in to the scope. The biggest problem I have with this is that I'm pretty sure once this is sealed up, I will never want to open it again. This means no changing the battery, and no resetting the time. The battery part is easy to fix. The Hasbro already has an accessible pair of AA batteries for the lights and sounds, and as it turns out the coin sell battery is the same voltage. This does mean that the need to reset the time will be all the more important. To set the time I would need to expose the three buttons out to the exterior of the gun. There isn't enough room to just hide them in the battery compartment so I needed to hide them on the outside. The easiest is to use the trigger as one button. I can hide a button on the grip like in erv's e-11 model "x". The third button can go in the counter module as the reset button. Soldering on to the button pads is a bit of a challenge. I've made some test connections, but it will be tough to get the wires to stay in place. To add a real button to the counter module I cut out a little rectangular piece of plastic and used the engraving tip of the dremel to carefully carve out a channel for it. The button is held in with some J-B weld. I tried using super glue, but it didn't seem to hold the metal to the resin very well. I cut out a channel in the plastic piece that I cut put a nail through. That way when it is all assembled I can glue the nail in place from the outside and the button won't fall out. Before I can connect the counter to the gun I had one more thing to do to it. I want to have numbers on the front. I made a counter image and printed it out, then covered it with a few cut out pieces of plastic from packaging material. I'm holding them all together with spray glue, which fogs up the "window" a little bit, but I think that actually helps. The numbers actually presented a bit of difficulty for me. I want them to be my TK ID, but I do not yet have a TK ID. I guess I'll just need to make it such that I can pry off and replace this part later. The ID I wanted is taken and there aren't really all that many left. As of yesterday there were 569 IDs available, which means the legion has used 94% of available 4 digit IDs. I'd say that's pretty impressive, and if I want a 4 digit number I'd better get my armor made quick . The button on the grip will go where there is an indentation that looks like a button anyhow. I'm not sure what, if any, function that had on the original Sterling. Safety? On the other side the button intersects with the trigger, so I needed to cut back the plastic a little bit. These Hasbros are overengineered and can stand to have lots of random plastic stripped away from them right ? Back to the barrel After the E-6000 was dried on the barrel I applied a bit of Bond to the gaps. I also sanded down a flat space where the bayonet would attach, but I forgot to get pictures. I then decided it was finally time to paint it. I used a staw to cover the LED on the end and I made a little cardboard cover for the internal LEDs. Spray painting is another thing I've never really done before and I'm nervous about getting good results. Based on other threads, and the instructions on the back of the can, this is what I plan on doing. DONE: Lightly apply Rust-oleum Universal Metallic Paint & Primer (Satin Nickel) base coat you can see through portions at this point DONE: 5-10 minutes later: apply Satin Nickel base coat again still not 100% covered, I missed a few angles. The paint looked like it was starting to pool a bit so I got nervous about applying any more TODO: 48 hours later: apply Satin Nickel base coat again I wouldn't do this if there weren't still gaps around the muzzle. The base also needs to be painted a bit further back. TODO: 48 hours later: apply Rust-oleum Painter's Touch Flat black TODO: 1 hour later: weather away black with fine sandpaper TODO: 48 hours later: apply Rust-oleum Painter's touch Matte clear coat I've tried a few variations on these, as well as using Rust-oleum hammered silver and hammered black, on some scrap pipe and I think this combination will be the best. I like the hammered texture as it has a genuine Sterling look to it, but I had difficulty applying it evenly and it made a thicker rubbery surface that was difficult to weather using the sandpaper method. Some additional concerns that I have so far: The Bondo doesn't seem to cover as well as the plastic. Maybe it requires a different primer? WIth a layer of paint all the messiness of the E-6000 is a lot more visible. I should probably have spent more time filing, cutting, rubbing, or doing whatever it takes to clean it up.
-
I think you're better off with CA glue on small parts like these. Very impressive build btw! It's not much left of that hasbro anymore.
-
I'm trying to think what you could cut it with that would allow it to go back together nicely. I suppose you could probably work an exacto through there very slowly and carefully and pray that whatever funkiness you create is covered by the t-track. The epoxy putty made for plastic that I used is probably dense enough to be structural for this cut if it were thick enough... but it seems like quite a bit of effort for not too much payoff. Or you could find a clever way to put wax paper in between the two halves before applying epoxy so it eventually comes apart cleanly and nicely. I say goop it up with the epoxy putty inside and out to build enough thickness to drill your holes and leave it sealed up. Even if the barrel is shorter than a real sterling it will look way better than most of our crappy hasbro hacks Good luck... I am looking forward to seeing what you come up with Aloha, -Eric
-
If you decide not to replace the barrel I suggest the epoxy putty stuff for plastic at Ace hardware. Cut off a bit, mix it up with a putty knife and sculpt away. Easily sandable and it likes plastic... Where convincing bondo to stick to plastic is difficult. Fiberglass resin is just epoxy not actual fiberglass. If you use it straight you'll just be glueing the barrel together. I love my hasbro but wish I had gone right to the full resin droopy kit. Keep up the photo documentation and excellent work. We dig it. Aloha and good luck, -Eric
-
Thanks. I've been following your scratch build with a lot of interest. I can't wait for you to release your templates, the barrel template has already been useful, and it is very nice to have a good reference on the dimensions. Today I found a local supplier of transparent 1.5" O.D. acryllic tube, so I picked up a piece. I could see getting some good use out of it soon; I just need to finish the Hasbro and build some armor first.
-
This is some impressive level of detail for a Hasbro Mod. Nice skills sir. I think after this you are going to find a pipe build or a scratch build an absolute walk in the park.
-
Starting out. Initial gun, right out of packaging with screws removed. First thing to do was apply the dremel to take off the orange muzzle. Since I have some things I want to do in the guts I needed to split it open. I tried the screwdriver technique to get the scope cap off, but my Hasbro wasn't having any of that. I gave up and dremmeled the scope cap off, and it looks like there was no way that glue would have given to the screwdriver. The thing was fused on there solid. Once getting the scope cap off I discovered that the scope rail and top t-track fin were also glued. The scope rail came apart with a little prying with a thin knife blade, but the t-track did not give so easily. When I attempted to separate it cracks formed along the edge of the track, and I was worried they would extend in to the body of the barrel. I eventually gave up on being ginger with it and forced it open. There was a little damage, but it wasn't excessive. I probably could have got away with sealing it back up that way, but I had another idea. I had already been tempted to remove the built in t-track and put in new holes and t-track for a somewhat more detailed effect, so I decided to commit and strip away the built in t-tracks. In that last picture you can see where I got a little too agressive with the sander and put a hole in the body. This was my first time using the dremel for sanding, and it's easy to get carried away. For these long straight sections I think I will refrain from the dremel in the future and stick with a block and sand paper. The dremel does make quick work of the t-tracks though. It might be a bit hard to see in this last picture, but my next problem was that under the top t-track the plastic is slightly recessed. If I simply sanded it off I would end up with a long hole going down the length of the barrel. To fix this I am attempting to fill the gap with bondo. I'm not sure if this will end up working since it is on a seam and I will want to have a row of holes in it, but I figured it is worth a shot. The worst that can happen is I botch the barrel so badly I need to replace it altogether, which while unpleasant, I'm pretty sure is doable (and I could get a correct length barrel as a bonus). While the Bondo was setting on the left side, I took to sanding down and prepping right side. After getting it to pretty much the same state, I started drilling holes. I used a hand drill with a small bit to start pilot holes. The problem here was that my surface was round and not very even (I need to work on my sanding). You can see that while I tried getting straight lines, the bit would shift when I started the drill and I couldn't get them to line up very well. I decided to scrap this approach and try dremeling with a template. I printed out the tube template from The Best Sterling Templates EVER! (Thanks ZeroRoom!). I lined up the template with a light and attached it with a little spray glue. I roughly dremeled out the holes with a cutting bit and then filed them out with a round file. They didn't turn out too bad. I've gradually been touching them up with a file every time I notice any lopsidedness. Once the Bondo had dried on the other peice I was ready to cut down the rest of the top t-track. I Bondo'd up the right hand side and let that harden while working on the left now. You'll notice a little more Bondo where I had patched that sanding hole from earlier. There are a few bubles in the Bondo as well as a pretty uneven edge. I'll have to apply more when I seal it up. I'm just hoping the Bondo will be strong enough to withstand drilling/sanding out the holes. We'll just have to wait and see! Next step was to do the same template cut and sand procedure to put holes on the left side. I left the third hole small. I'm not sure if I want to widen it out or put a bayonette bolt here. This concludes what I did on Saturday. I did more on Sunday, but I'll split that in to another post.
-
I am ashamed of my Doopy/ Hasbro conversion now.