

Nassik
-
Posts
549 -
Joined
-
Last visited
Content Type
Profiles
Forums
Gallery
Articles
Everything posted by Nassik
-
My nearly ready to ship TE RoTJ suit
Nassik replied to Nassik's topic in Build Threads Requireing Maintenance
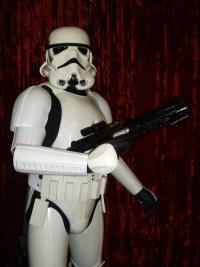
Seven and a half months later and my armor is painted! YES!!! Finally, the beast moves one HUGE step forward. Thanks to my squad mate Gav for making it happen! I've got to tidy up a few paint smudges and clear coat the armor, add the sniper knee plate and thigh ammo belt, paint my boot soles white, and then attach the E-11 holster. And this baby will be done! It's been two years to finally get it to this point. The end is truly in sight. -
My nearly ready to ship TE RoTJ suit
Nassik replied to Nassik's topic in Build Threads Requireing Maintenance
It's Winter so I expect rain until September (start of spring). If I'm lucky the rain will ease up by then. Or I go with my wife's idea... pay a paint shop to paint the armor for me and then it wouldn't matter what season it is. I suspect that it wouldn't be cheap even though twelve pieces of plastic armor are a lot smaller than a car. -
My nearly ready to ship TE RoTJ suit
Nassik replied to Nassik's topic in Build Threads Requireing Maintenance
Not really. We've got to bang out a couple of snap plates for the chest and after that it's just waiting for the weather to allow for painting. -
My nearly ready to ship TE RoTJ suit
Nassik replied to Nassik's topic in Build Threads Requireing Maintenance
I am still working on this suit, even though we took a break from it recently. The plastic belt and drop boxes have been riveted back on with a new and much-improved canvas belt from TK-J. This is a great belt! And we've sorted out the shoulder bridges. Those were more hassle than I expected them to be. No rivet covers on the ROTJ belt. The ab plate buttons are still appropriately colored black and dark blue. Drop boxes fitted with inner drop boxes. Shoulder bridge fixed in place with Velcro. No flat ends. It took some playing with a heat gun to get the bridges to sit correctly. Again, it was more hassle than I expected. The chest plate isn't symmetrical and that makes things look a bit odd and unbalanced on me. To counter this, we're gong to fiddle with the chest plate so that it conforms to my body a bit more. It looks better when we do this by hand and so we'll rig things to sit that way permanently. I'll sand the RT-Mod parts today and they'll be ready to paint. It's winter in Australia, though, and this is the wet season in Western Australia. The weather will postpone painting for months, I suspect. My brother in-law will paint the parts but he'll wait for drier weather, which will come with spring. So I'm looking at September or October before these parts will get painted. -
My nearly ready to ship TE RoTJ suit
Nassik replied to Nassik's topic in Build Threads Requireing Maintenance
Thanks, Caleb. Painting is the one big hold-up on the armor. I've got the paint here ( I would never accept this in two different colors). But I'm having a hard time getting my brother in-law to pull out his compressor to paint the white ABS. The bells are currently padded, even in those pictures. That's why the bells aren't resting on the biceps. I can pad it further, though. At the moment, we've adjusted some of the strapping to pull the chest up a bit. We're working on the shoulder bridges and once they're in place we can adjust the bells and biceps to hang properly. We're sorting out the belt as well. With my canvas belt in place, the holes on the plastic belt no longer line up with the holes drilled into the ab plate. To compensate for this it looks like we'll have to drill new holes into the ab plate to get things to line back up. Fortunately, the original holes will be hidden behind the belt. -
My nearly ready to ship TE RoTJ suit
Nassik replied to Nassik's topic in Build Threads Requireing Maintenance
We're still working on things here. We've worked on the bells and biceps. At the moment things are looking like this... We're adjusting things slightly but some of it is impossible to fully correct. Because of my disability I'm a bit lop-sided. My left side is smaller and a tad shorter than the right and so we're trying to adjust the strapping in order to make me look a bit more balanced. We'll never get me to look perfectly balanced but we're trying to get it as close as we can. We'll raise the right bicep a bit and that may help. The shoulder bells are padded. -
My nearly ready to ship TE RoTJ suit
Nassik replied to Nassik's topic in Build Threads Requireing Maintenance
We've adjusted the strapping and the chest and back are now sitting as I want them to, we've added snaps for the ab to kidney plate straps (that should be the very last snaps needed to complete my strapping system), and we've also set up padding that will lift the shoulder bells off of the biceps a bit. We also discovered that the the original shoulder bridges are different lengths. One bridge is approximately seven millimeters shorter than the other one. My guess is that the bridges were originally ANH bridges and that the flat ends were simply cut off without bothering to measure them for consistent sizing. So I can either trim the longer bridge down to match the shorter one or leave them as they are and figure that no one will notice the difference. I haven't decided yet. -
My nearly ready to ship TE RoTJ suit
Nassik replied to Nassik's topic in Build Threads Requireing Maintenance
Things are still moving forward. All of the RT-Mod parts have been assembled. The shoulder bells have been pinched and their corners have been rounded. Snaps have been added to the shoulder bells, biceps, and thighs. Our next step is to add snaps in order to strap the ab plate and the kidney plate together. We've got to adjust the strapping a little bit. The upper back plate is sitting about an inch higher than I'd like and its upper ends are sitting up and off of my shoulders. And I think that the chest plate can be put just a bit higher. I think that the straps connecting the back and chest plates over the shoulders should be lengthened a bit. That may sit the back plate a little lower and allow it to lie flush on my back. As it is, my shoulder bridges will have to sit at a downward angle if I left things as they are. -
My nearly ready to ship TE RoTJ suit
Nassik replied to Nassik's topic in Build Threads Requireing Maintenance
You're welcome. The left thigh was trimmed, glued, and clamped last night. Once it's fully cured we'll add the hook Velcro to the rear of it and that will complete the thigh. Now all of the RT-Mod parts have been assembled. We'll work on the shoulder bells tonight and when they're finished, all of the new parts will be ready for sanding and painting. After which we'll add the sniper knee plate and the thigh ammo belt. Now we've got a few more snaps and straps to add. -
Thanks!
-
ROTJ original strapping system discussion
Nassik replied to Rich330's topic in Build Threads Requireing Maintenance
I like it!!! Top notch, especially in light of the fact that it's made of modern materials. That's a great touch! Will these be made available to other troopers? -
SL-6764 requesting 501st access... http://www.501st.com/members/displaymember.php?userID=13208&costumeID=106
-
My nearly ready to ship TE RoTJ suit
Nassik replied to Nassik's topic in Build Threads Requireing Maintenance
The following technique comes from Troopermaster. I take no credit for it and am grateful that it was shared with me... "The first thing I would do is place a bell on a scrap sheet of wood and draw around it. Then I would draw the desired shape I want to change it to. Notice how much you need to bend it in certain areas and fix some small screws either sides of the outlines so that when you slot your bell back onto the board it should look like how you want it to look when finished. You may need to put a screw on the outside in some areas and some on the inside, just enough to manipulate the plastic to the desired shape. Next, you need to heat the plastic enough to take on the new shape. Do this slowly and it may take several attempts, but it will get there in the end." -
ROTJ original strapping system discussion
Nassik replied to Rich330's topic in Build Threads Requireing Maintenance
Which sounds like it works out well for us. In that case, none of us have to strictly replicate these particular shoulder bells. Using a heat gun, if we get the pinched look, at least approximately, we should be in good shape. Centurion requires the pinch, though, so we'll work with it. I don't know if there was padding in the shoulder bells or not. Some of the pictures in this thread suggest that there was padding in some shoulder bells. I can also see how pinched bells could create the same look without padding. I do think that the raised look of the bells is a good detail for ROTJ troopers to include, no matter how it is created. -
My nearly ready to ship TE RoTJ suit
Nassik replied to Nassik's topic in Build Threads Requireing Maintenance
We've got the right thigh trimmed to look nice in the back and it's been glued with E6000 and clamped. Tonight we'll do the same to the left thigh. Thanks to the advice and tips of TM I've now got a way to properly shape my shoulder bells. Once the left thigh is complete the shoulder bells will be the last major bit of work for this build. To keep track of my remaining tasks with this suit I'm working from a list... Assemble left thigh Install snaps in thighs for the garters Glue in snaps for kidney to ab plate straps Install kidney to ab plate straps Round corners of the RT-Mod shoulder bells Use heat gun to create the ROTJ pinch in the bells Add snaps to shoulder bells and biceps Strap shoulder bells and biceps Make sure that the bells flare out correctly (by either properly shaping the pinch or padding if necessary) Glue inner drop boxes into the drop boxes Attach webbing to drop boxes for attachment to belt Sew Velcro onto canvas belt Rivet plastic belt to ab plate through the canvas belt and drop box straps Install shoulder bell straps (to go around the biceps) Sand the new RT-Mod parts Paint the RT-Mod parts Attach sniper knee plate with rivets Attach thigh ammo belt with brads Grind down aluminum mic tips to fit the TE helmet Repaint mic tips to cover raw aluminum Install mic tips with installed micro speakers Install ROM/FX Paint boot soles white Attach holster to belt Touch up TE parts with left over paint, paint rivet heads, brads, and Chicago screw heads. Despite the length of this list there's not all that many things left to do. As I mentioned earlier, the shoulder bells will require the most work. The most time-consuming task will be the painting of the RT-Mod parts. My brother in-law has a compressor and will paint them for me but he's not in the mood or getting ready to do the painting. He wants to clean up his place and create custom frames for each part before he'll paint anything. And since he's not in the mood to do it yet it could be weeks before he's ready to paint things. And so I'll do everything I possibly can to assemble, strap, and prep everything I can that doesn't require painting. My helmet is at my brother in-law's house so that he can fit my aluminum mic tips to the helmet. The mic tips don't quite fit in the right side space for the mic tip and so the tips are being ground down ever so slightly so that they'll sip into position without scratching off the helmet's paint. Once ground, the tips will be repainted in flat black, their screens will be reinstalled, and the micro speakers will be reinstalled as well so that the mic tips can be put back on my helmet. After the RT-Mod parts are painted the main torso of the original suit needs some touching up. There are some scratches and dings, which I don't mind as they add to a weathered appearance. But there are also a few pink marks on the back of the armor and an odd green mark on the chest. Those odd-colored marks need covering. I don't know where they came from... the suit has been in storage in its original box for over a year. While we're touching things up we'll also paint the rivet heads on the belt and sniper knee plate, the Chicago screw heads holding the holster in place, and the brads on the thigh ammo belt. I also need to redo the rank stripes on my helmet's ears. Since the Centurion requirements state that the ears will only have one or two stripes per ear I've got to get rid of the third stripe that each ear has. Fortunately, I purchased some paints from TK-4510 to take care of this little detail. And while I'm at it, I'll repaint one of my ab plate buttons. The dark blue paint on one of my bottommost buttons has worn almost completely off and so I'll restore it. Aside from gluing the left thigh tonight and the work on the shoulder bells everything else is relatively easy to do. The painting and mic tip installation is being handled by my brother in-law and my sister in-law will sew the Velcro to my canvas belt. I'm trying to do at least one thing each night and that brings this armor ever closer to completion. -
We've got one these hilts here at home. After hearing the reputation of the seller's electronics I bought an empty hilt for my wife's birthday (her request). I bought the electronics for it through The Custom Saber Shop. The hilt arrived and upon inspection I found that it wasn't ready for electronics installation. There's no hole drilled to install a power switch or button. There's no hole or other way to install a blade retention screw. To remove the pommel for access inside of the hilt it looks like I've got to undo a couple of set screws in order to remove the pommel. It's a nice enough looking hilt but it's not friendly for someone who wants to install any electronics.
-
ROTJ original strapping system discussion
Nassik replied to Rich330's topic in Build Threads Requireing Maintenance
Thanks for weighing in on this thread, Paul. I had hoped that you'd participate. If I'm seeing what I think I am in this picture... It looks like the definitive pinch in the ROTJ shoulder bells is approximately 1/4 to 1/3 of the way up from the bottom of the shoulder bells. From that point upwards the bells taper towards a point at the very top of the shoulder bells. With the taper being too tight to fit over the trooper's shoulders the bells are forced away from the body and that creates the raised look they have. And as you said, the thin elastic strap that wraps around the bicep prevents the bells from flopping around. Barring shoulder bells with that taper, it seems that a small amount of padding could recreate that look, though. My concern with my new RT-Mod shoulder bells is that they swell out from the bottom and get wider as they near the top of the bells. It will require careful use of the heat gun to reverse that swell and introduce a taper. -
My nearly ready to ship TE RoTJ suit
Nassik replied to Nassik's topic in Build Threads Requireing Maintenance
We did add the shoulder and cod straps last night and I've now got something of a wearable torso. Episode VI is on the television. Rather appropriate. After the straps were added in we started test fitting the first thigh Yoda is my supervisor and was examining the back of the thigh. "Trimming to shape, it needs!" We've got to trim a bit off the top in the back in order to tidy it up. Look, Ma, I don't need to shim it! These pictures better illustrate the difference in color between the original suit and the new parts. Tonight we'll trim up the back of the right thigh and then it will get glued with E6000 and clamped for a day. Tomorrow we'll repeat the process for the left thigh. Once the thighs are done we'll add the final snap plates for the ab and kidney plate straps and we'll look at the shoulder bells. -
My nearly ready to ship TE RoTJ suit
Nassik replied to Nassik's topic in Build Threads Requireing Maintenance
The strapping is moving forward. The back and kidney plates are strapped together and the chest and ab plates are strapped together. Tomorrow we'll add the shoulder straps and the cod strap, at least. With at least this much strapping completed we'll be able to test fit the thighs with the torso in place. If all looks well we'll be ready to glue and clamp the first thigh. I'm glad that we've replaced the original strapping in this kit. It's stronger now and we've corrected a misalignment of the back and kidney plates. When I really started looking at things I noticed that the back and kidney plates weren't lined up quite right. They were misaligned by about three millimeters and the remaining original strapping kept that misalignment in place. Fortunately, it's corrected now and I'm happy with it. -
ROTJ original strapping system discussion
Nassik replied to Rich330's topic in Build Threads Requireing Maintenance
Mason, that is a fantastic picture! Lots of detail to see here. Thanks for posting it. -
ROTJ original strapping system discussion
Nassik replied to Rich330's topic in Build Threads Requireing Maintenance
That is a possibility. This same elevated shoulder bell look is also seen on other troopers, though, including screen shots. Though possible, I doubt that each trooper with this look has failed to wear the bells properly. On film the bells would have flopped every which way without proper use of the bell straps. Even if there wasn't any padding in the bells, the use of padding would recreate that look. -
ROTJ original strapping system discussion
Nassik replied to Rich330's topic in Build Threads Requireing Maintenance
This is too good a thread to let go... How do you think the drop boxes were attached to their elastic straps? I've seen it done in multiple ways. 1. The elastic is riveted to the inner drop box. 2. The elastic is fed between the inner and outer drop boxes and glued to the inside of the outer drop box. 3. The elastic is glued to the inner drop box and is visible if the drop box is flipped over for examination. I think that option #3 is the likely method of attachment. From pictures I've seen, admittedly of tour suits, I can see the elastic on the back of the drop box and it looks glued to the inner drop box. -
CFO is the way to go. It's the most accurate helmet available, hands down. With its preserved kink it's more accurate than my TE ROTJ helmet.
-
My nearly ready to ship TE RoTJ suit
Nassik replied to Nassik's topic in Build Threads Requireing Maintenance
Thanks, Rich. I was enjoying the discussion, though, so I didn't mind the detour in my thread. The armor is still progressing. We're still installing snap plates at the moment. The original ROTJ strapping was apparently Velcroed in but I prefer the security of snaps. We're following TM's strapping diagram with a deviation or two gleaned from examining ROTJ screen shots. Gluing and clamping in the snap plates is a time-consuming process but once they're all in, the actual strapping ought to be quick. We haven't assembled the thighs yet. I'm holding off until the torso is fully strapped. That way I can see how the thighs will fit when the torso is on. -
ROTJ original strapping system discussion
Nassik replied to Rich330's topic in Build Threads Requireing Maintenance
Padding out the shoulder bells seems easy enough. Cool, Joe. I look forward to seeing what he found.