

Nassik
-
Posts
549 -
Joined
-
Last visited
Content Type
Profiles
Forums
Gallery
Articles
Everything posted by Nassik
-
TK-6764 Requesting ROTJ Centurion Status[36][TE*]
Nassik replied to Nassik's topic in Request Centurion Status
I saw it this way somewhere. That's why I did it that way. The RT-Mod thigh ammo belt comes with a nub there for mounting the belt. Since it's a dedicated ANH kit I ignored the nub. Here's something... If you zoom right in, the rivet isn't in the uppermost corner of the thigh ammo belt like the RT-Mod one is. It's a bit lower. It's a tad higher than mine, but lower than the RT-Mod. So there is a degree of variance. -
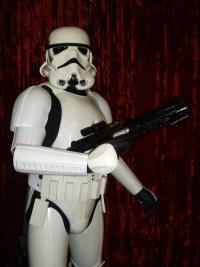
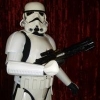
Name: Shawn Hisey ID#: TK-6764 FISD forum name: Nassik Garrison: Terror Australis Garrison Squad: Desert Scorpion Squad Armor= TE (chest, back, kidney, ab plate, shoulder bridges, and hand plates) RT-Mod (biceps, forearms, thighs, calves, thigh ammo belt, sniper knee plate, and shoulder bells) Helmet= TE Blaster= SR Props E-11 base with resin, plastic, and aluminium parts. * The hammers come from Smitty. * The D-rings come from Sonnenschein. * The E-11 kit comes from SR Props. * The forward D-ring holder and original front sight come from Blind Squirrel Props. * The U-track comes from TK-J. * The scope, scope rail, and door catch come from predalien64 on eBay. * The muzzle used, The front sight used, and the rear D-ring holder were made by Dave Carver. * The decals on the E-11 stand came with the SR Props E-11 kit as did the decal used in the scope. Height = 5'9†Weight = 195 lbs. Boots = TK Boots Canvas belt = TK-J (Jason) Electronics= ROM-FX voice amp, Tk-4261 helmet fans, TK 6294 Aker Amp Mic Tips = Russ at RB Replicas (first run) Undersuit = stormtrooperundersuits.com Neck Seal = Evolution Props Holster = TK Bondservnt 2392 Gloves = GBFans.com Helmet S-trim: TrooperMaster Helmet liner: Sskunky Shoulder bridges (updated) Helmet Green bubble lenses Helmet S-trim Proper hard hat liner and chin straps Proper Mic tips Shoulder bell strap (an inch above the curve corner of the bell): The shoulder bells are held out by padding within the bells. Forearms (No return edge on the inside of the front of the forearm) and rubber gloves: Ab plate buttons (black and dark blue) Belt Closed drop boxes Thermal detonator Thighs Boots Holster Cod/crotch (snaps are internal and not seen when the armor is worn) No visible side rivets E-11
-
TK-6764 Requesting ROTJ EIB Status[218][TE]
Nassik replied to Nassik's topic in Request Expert Infantry Status
Thanks for the congratulations, folks. I sincerely appreciate it and the great help of this Detachment! This could never have happened without my fellow TKs. Mark, if the rosters are up-to-date, then yes... I am the Desert Scorpion's first EIB. -
TK-6764 Requesting ROTJ EIB Status[218][TE]
Nassik replied to Nassik's topic in Request Expert Infantry Status
Thank you, Mathias! The shoulder bridges are "floating" a bit. Underneath the forward end of the bridges are plastic spacers that measure approximately 3-4 millimeters thick. The TE shoulder bridges are too short to properly fit and so I had to build the spacers in order to give the bridges a way to touch and hold on to the armor. They are firmly held in place with Velcro, they don't move. -
TK-6764 Requesting ROTJ EIB Status[218][TE]
Nassik replied to Nassik's topic in Request Expert Infantry Status
If none of these are acceptable, I'll have to put the armor back on, then. All of my photos are from the same photo shoot. -
TK-6764 Requesting ROTJ EIB Status[218][TE]
Nassik replied to Nassik's topic in Request Expert Infantry Status
Action... -
Name: Shawn Hisey ID#: TK-6764 FISD forum name: Nassik Garrison: Terror Australis Garrison Squad: Desert Scorpion Squad Armor= TE (chest, back, kidney, ab plate, shoulder bridges, and hand plates) RT-Mod (biceps, forearms, thighs, calves, thigh ammo belt, sniper knee plate, and shoulder bells) Helmet= TE Blaster= SR Props E-11 base with resin, plastic, and aluminium parts. * The hammers come from Smitty. * The D-rings come from Sonnenschein. * The E-11 kit comes from SR Props. * The forward D-ring holder and original front sight come from Blind Squirrel Props. * The U-track comes from TK-J. * The scope, scope rail, and door catch come from predalien64 on eBay. * The muzzle used, The front sight used, and the rear D-ring holder were made by Dave Carver. * The decals on the E-11 stand came with the SR Props E-11 kit as did the decal used in the scope. Height = 5'9†Weight = 195 lbs. Boots = TK Boots Canvas belt = TK-J (Jason) Electronics= ROM-FX voice amp, Tk-4261 helmet fans, TK 6294 Aker Amp Mic Tips = Russ at RB Replicas (first run) Undersuit = stormtrooperundersuits.com Neck Seal = Evolution Props Holster = TK Bondservnt 2392 Gloves = GBFans.com Helmet S-trim: TrooperMaster Helmet liner: Sskunky Helmet and shoulder bridges: Green bubble lenses ] Helmet S-trim on neck: Proper hard hat liner and chin straps: Shoulder bell strap (an inch above the curve corner of the bell): The shoulder bells are held out by padding within the bells. Forearms (No return edge on the inside of the front of the forearm) and rubber gloves: Ab plate buttons (black and dark blue) Belt Closed drop boxes: Thermal Detonator Thighs: Boots: Holster: E-11:
-
TK-6764 requesting Detachment access. http://www.501st.com...8&costumeID=127
-
We prefer to be blown to bits while we're clean rather than getting dirty and whalloped on by teddy bears.
-
PM me with your e-mail address. I still have the full assembly instructions for the SR Props E-11.
-
Mine were cut before I got them. The shortened length makes them a challenge to mount.
-
I do like the distinction between Death Star and Endor troopers. Some of us pretty boys don't want to dirty our armor.
-
RoTJ blaster kit in development - need your input
Nassik replied to SamJ's topic in Build Threads Requireing Maintenance
It's a shame to see that this topic faded away. I hope that your ROTJ E-11 turned out well. -
My nearly ready to ship TE RoTJ suit
Nassik replied to Nassik's topic in Build Threads Requireing Maintenance
Thank you. Now I keep checking for my 501st profile to update. The FISD was the first 501st Legion detachment forum that I joined and it was the first costume that I started. Once my profile updates, I can get proper TK status here in the FISD and I can submit my photos for EIB and Centurion status. -
My nearly ready to ship TE RoTJ suit
Nassik replied to Nassik's topic in Build Threads Requireing Maintenance
I received word from my garrison's GML tonight... "BTW looked over the ROTJ TK all good Approved looks great mate Cheers" I'm finally a TK. It's taken me a little over two and a half years to get to this point, but I've finally done it. Once my 501st profile updates with the TK approval, I can go for EIB status. -
My nearly ready to ship TE RoTJ suit
Nassik replied to Nassik's topic in Build Threads Requireing Maintenance
Hhhmmm... maybe I'm wrong. I've found a picture of fan armor riveted like mine but I'm not able to make it out in the screen shots I've got. I know that I did it this way on purpose based on something that I'd seen, though. That's going to be stupid if I based it on fan armor. I'll keep looking, though. We did grab a few pictures of my armor last night, though... -
My nearly ready to ship TE RoTJ suit
Nassik replied to Nassik's topic in Build Threads Requireing Maintenance
I've seen the thigh ammo belt riveted in different positions.Some are up high like ANH and I've seen a couple of screen captures riveted about halfway up. I went with the halfway point as it keeps the thigh ammo belt from pivoting on my armor. -
My nearly ready to ship TE RoTJ suit
Nassik replied to Nassik's topic in Build Threads Requireing Maintenance
I'm still working on this. We had to take a break in order to get my Ghostbusters proton pack built for an event this week. With the pack built, we've come back to my armor. Today we created the final strapping for the arms. The armor now wears properly. We added a bit of padding to the left side arm and leg so that they fit me better. The last remaining task is to mount the shoulder bridges to the armor. Because of the rubber armor trim, the bridges can't sit flush on the armor. We've removed a little of the bridge curvature with a heat gun and that has helped but not enough to fix the problem. So now we're creating plastic spacers on the underside of the forward end of the shoulder bridges to bridge the gap. This seems to be working. Once the E6000 sets on the spacers we'll put some industrial Velcro in there and that should fix the problem. -
My nearly ready to ship TE RoTJ suit
Nassik replied to Nassik's topic in Build Threads Requireing Maintenance
My ROTJ replica hardhat liner and the chin straps have been installed in the helmet. The arm strapping is the last remaining bit to do. I can very easily see the discrepancy between the armor trim and the armor. I've noted it ever since the armor arrived years ago. The only feasible thing to do, if I were to try and make them match, would be to paint the trim. But the trim is rubber and rubber just doesn't take paint very well. My boot soles took around ten coats of paint to make them white and they certainly aren't perfect. -
My nearly ready to ship TE RoTJ suit
Nassik replied to Nassik's topic in Build Threads Requireing Maintenance
The armor's out back under cover at the moment. The paint keeps smudging, despite drying for days. It seems alright now, but I've clear-coated everything under multiple coats and I'm leaving it to fully dry outside. The temperature is 38 today (in the 90s if you're used to Fahrenhiet). The heat ought to dry everything completely. I'll check on it in a few hours. Right side of the helmet with new rank bars. Yes, that's accurate S-trim underneath the helmet put on correctly. Front view. With first run Russrep mic tips Left side of the helmet with new rank bars Right side attached E-11 holster. The buttons really are black and dark blue Sniper knee plate Thigh ammo belt Drying in the heat Boot soles going white And yes, that's a Ghostbusters proton pack behind my boots. -
My nearly ready to ship TE RoTJ suit
Nassik replied to Nassik's topic in Build Threads Requireing Maintenance
Further progress on this suit... The sniper knee plate and thigh ammo belt have been riveted on and their rivets painted to match the armor. The holster has been attached to the belt. My boot soles have been painted white. The black rank stripes have been repainted on the helmet. I've lost the strapping for my arms. After seven+ months I'm glad to have found everything else. We'll recreate the missing arm straps, hotglue in my replica ROTJ hardhat liner, and install my chin strap. That will finish everything. -
My nearly ready to ship TE RoTJ suit
Nassik replied to Nassik's topic in Build Threads Requireing Maintenance
It's so close to finshed. I need to rivet on the sniper knee plate and thigh ammo belt (as per the CRLs), adjust the strapping on my left arm, rivet on the holster, and paint my boot soles white. And then it's done! -
My nearly ready to ship TE RoTJ suit
Nassik replied to Nassik's topic in Build Threads Requireing Maintenance
Today is touch-up day. I've added in black and dark blue where it's chipped off the ab plate buttons. And I've repainted the bumps on my helmet's ear caps. My TE bumps had three black rank stripes on them and so I had to paint over the stripes in order to put on the correct number and pattern of rank stripes. -
My nearly ready to ship TE RoTJ suit
Nassik replied to Nassik's topic in Build Threads Requireing Maintenance
It wouldn't surprise me. In the end, I figured that it was easier to paint my arms and legs to match the usable torso and helmet than it would have been to repaint those bits. I'd have had to paint everything to ensure that it all matched. It seemed easier just to match everything to the off-white TE bits that I can use. It certainly wasn't quickly accomplished, but it was quicker to paint the arms and legs than it would've been to paint the entire kit. The color-matched paint I bought over a year ago wasn't terribly cheap, but it has made the armor match. If the TE kit had been glossy white I definitely would've gone that route. That wasn't the case, though, and so I stayed with the creamy-colored look. I'm truly thrilled that my armor is finally in a presentable state. It's taken two years to finally get it to this point. I don't mind that it's creamy off-white as opposed to gloss white, even if it may not be dead-on accurate. It's nice to have a set of armor that is finally all one color. . -
My nearly ready to ship TE RoTJ suit
Nassik replied to Nassik's topic in Build Threads Requireing Maintenance
It looks so good. Here's the full set... You can even see the glossy white ABS within a few pieces. And here is a comparison shot... This picture shows the originally painted back plate next to a newly painted shoulder bell for the sake of color comparison. I had my original TE armor color-matched over a year ago and it looks like the paint was perfect.