troopermaster
-
Posts
3,638 -
Joined
-
Last visited
-
Days Won
12
Content Type
Profiles
Forums
Gallery
Articles
Everything posted by troopermaster
-
Nice aquisition . Steve did a great job with this helmet. I got see it personally last year at MEM and was impressed how well it turned out after the condition it was recieved (badly made). Looks fabulous now though!
-
I think Cameron had a real helmet and cast it, but from the photos I have seen the helmet is not assembled correctly. I think CO must have made copies of the unassembled helmet and put it together wrong and made his moulds for the one piece fibreglass helmets. This would explain why the face plate is too far down in the helmet and looks odd, while the overall shape and features of the helmet look to be accurate (apart from the assembly). I remember when CO had a website which showed just about every angle of his helmets, but I am sure it is down now.
-
You don't want to eat junk food and get fat, that is not the best way to gain weight and will not do your health any good. If there is a gymnasium near you, try calling in and joining up. The guys there will tell you all about nutrition and the best way to build yourself up properly, and be in the best physical condition of your life. A good balance of healthy food and weight training will soon have you filling out your armour perfectly! That's my advice anyway
-
Rapstertee's AP Build - July 08[*AP]
troopermaster replied to rapstertee's topic in Build Threads Requireing Maintenance
Have you tried putting the trim on the opposite slot in the profile? I cut the length slightly longer and then force it on to the bottom of the helmet and it usually stays in place without any gluing. When I do glue them on, I just run a bead of E6000 into the groove/slot of the trim then apply it to the helmet and use small clips to hold it in place for 24 hours. -
Here is a comparison shot of the neck trims. Unfortunately I cannot find the sample of the new SWR150, but if you have it, you already know how thick it is.
-
Very nice Dan, looks fantastic! I like the changes you have made to the moulds and I think you should pull some HDPE over them Great job mate, well done.
-
Rapstertee's AP Build - July 08[*AP]
troopermaster replied to rapstertee's topic in Build Threads Requireing Maintenance
Blood, sweat and tears.....all part of the assembly process -
The old style SWR150 is now obsolete. This profile I have is the best that I have found and not as big as the new SWR150 but bigger than the Webers' trim. I will take a pic of the profile against the Webers and Seals direct to compare. It's not as square as I would like, but looks good enough on the helmet.
-
I've got some nice 'S' profile neck trim if your looking to buy some?
-
I can't tell wether they are dome head or flat, but you want flat head machine screws and keep them in place with nuts on the inside of your helmet, not glue.
-
Judging by the trooper in the LFL promo pics, the left hand side of the belt (as you wear it) with the holster attached goes under the right hand side. Now it would be impossible to say if they were all done like this, but I would hazzard a guess that they were done both ways. I mean, it's only a case of which way you hang the holster and drop boxes off which will determine wether your belt fastens with the overlapping from the left or right.
-
ROTJ helmet references
troopermaster replied to TreeHead's topic in Build Threads Requireing Maintenance
Yeah I don't know what the deal is with that suit. It was obviously cast from either an ROTJ or tour suit, but I can't understand why it has been reworked so badly. I will see if I can get all the pics back from my contact at Disney, since I lost the ones I had on my old computer. -
Preferred way...
troopermaster replied to MandalorianWarrior87's topic in Assembly, Mods, and Painting
I start off by marking the outlines with a pencil where I want to cut. I like to drill three holes, one in each corner of the eye sockets using small drill bit about 5mm. Then using a Stanley knife, I score a line between each hole on the inside of the helmet. Do a couple of light passes until the blade comes through and you can remove the triangle shaped piece. Then using the sanding wheel on my Dremel, I sand the remaing plastic away from the inside of the helmet to avoid any slips which will mark the outside face. Then you can go over the edges with some sandpaper for a really smooth finish. -
ROTJ helmet references
troopermaster replied to TreeHead's topic in Build Threads Requireing Maintenance
That's not an original ROTJ. I used to have lots of pics of that suit and it is a reworked casting which is very sloppy. -
For the strips, I use 15mm for the arms and 20mm for the legs with the exception of 25mm for the backs of the shins only.
-
Yes. When I bent my elbows, my skin would get trapped between the bicep and forearm. I tried shaving more and more away from the forearm but it still pinched. I suppose you can never eliminate the problem, but I have since found that pulling the forearm up closer to my inner elbow makes the forearm tuck under the bicep and reduces the chance of pinching (notice I said 'reduces' )
-
The forearms, along with the biceps, shins and thighs were all assembled by butting the two halves of the armour pieces together and gluing a joining strip over the seams. The width of the strips varies, and I use 15mm for the arms, 20mm for the legs and 25mm for the backs of the shins. The backs of the shins only had the strip glued to the outer half so that the actors could open them up to get their feet through.
-
Obsolete - CRL ANH Stunt Stormtrooper text
troopermaster replied to SuperTrooper's topic in ANH (Stunt and Hero)
Chewie! Take the Professor in back and plug him into the hyperdrive! -
I found that cutting more out of the 'U' on the forearm made the pinching worse. The way around it was to pull the forearm up higher to the bicep, so the forearm tucked under the bipcep when bending your arms so no skin could get trapped. It is not 100% pinch proof though
-
When trimming HIPS, I always used tin snips to cut the majority of the flashing off the armour. I then used the sanding drum on my Dremel to fine tune the edges and scrapped off the rough bits with a Stanley knife. After that I'd finish off with some fine sandpaper for a nice smooth edge.....job done I use the same method for ABS BTW. Also, have you seen how well Rolfs' TE2 armour has shined up with just polishing it? Looks fantastic if you ask me and better than going to the trouble of painting it!
-
More importantly, the LFL suits are not the same white as any of the replicas.
-
Here's one that I was sent a while back. Only the ones on each end are LFL suits.
-
Great pics Andy! These remind me of the ones I have from the 1999 Wembly MOM exhibiton. I'll have to dig them out and scan them, even though they are nothing sprecial due to the crappy camera I had a the time and also wasting most of the film on Don Post statues and not expecting to see the 'tour suits'. Thanks for sharing
-
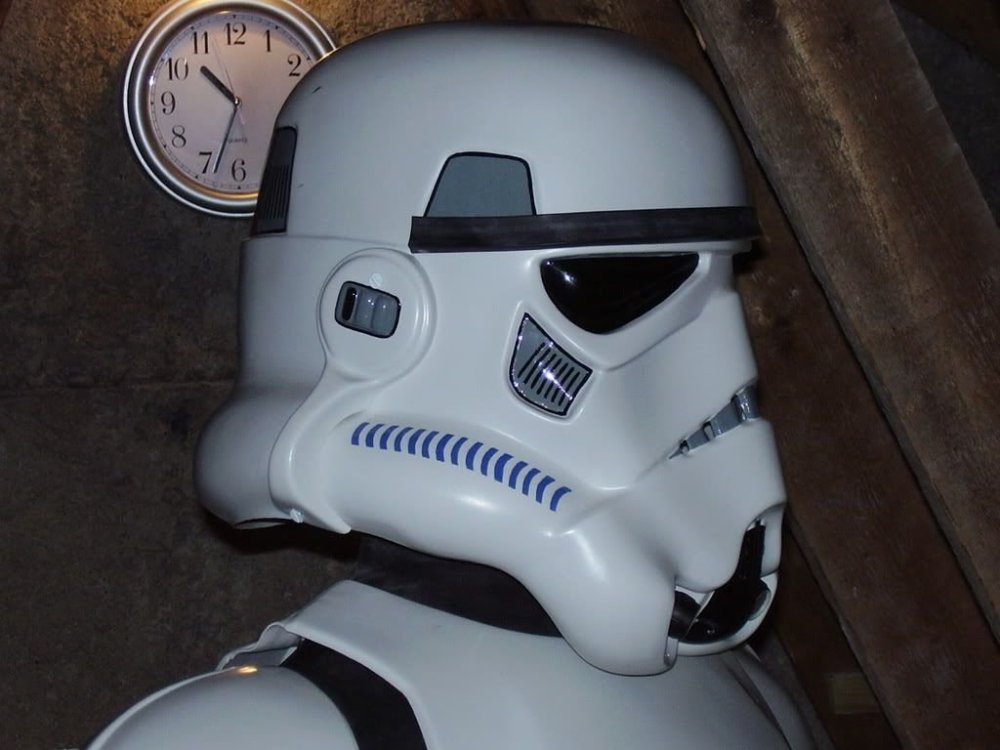
Here's a pic of my hero helmet with #14 French Blue tube stripes just for reference.
-
Looking at the comparison below, I'd say the #14 is the closest to the original colour. I still don't think they look glossy, but that could be just due to the age of the helmets and paint will break down over the years. I use #14 nowadays, but who is to say there was only one colour used on all the helmets ever made?