


TheRascalKing
-
Posts
1,440 -
Joined
-
Last visited
-
Days Won
34
Content Type
Profiles
Forums
Gallery
Articles
Everything posted by TheRascalKing
-
 It doesn't seem like it's nearly as common as even the Low-Profile (which isn't common haha). I found it on https://www.fastenation.com/ if that helps anyone. The armor party yesterday went great and @Oztrooper and I were able to help get several new recruits up and running, plus it seemed like everyone had a great time! I'm unsure whose shoulder bell upset me so much... hahaha More sanding this week but I'll report back soon!
 -
Some more updates happening! After today, every piece of the kit is in at least the first coat of filler/sandable primer! Lots of sanding and several more coats to go, but getting there. I also ordered a quart of Fibre Glast 1110 vinylester resin, which hopefully will work well to reinforce some of the thin/stress prone areas of the suit. It advertises a flexible but impact resistant finish, so I'm optimistic. Trying out "Ultra-Thin" 1" Velcro for the closures... Man, I've tried several without being happy so far - regular Velcro, Dual-Lock, low profile... It really doesn't need much to keep pieces shut, so hopefully this will do the trick. A few pieces are in final prep before the last coat of white paint - really hoping I can get a decent finish with Rustoleum 2X without too much orange peel. I purchased several extra spray nozzles (and uncovered an international spraypaint conspiracy apparently - did you know Rustoleum switched to a unique female cap a couple years ago, but doesn't sell replacements at all? I think they just assume you'll buy a new can instead of cleaning or replacing the nozzle. Google this, it's actually weird. I found an eBay seller who makes aftermarket nozzles that fit though) because it seems like I get only one good spray out of the can before it goes to hell and spews 100% chunks. Warming the cans up in water and thoroughly shaking has helped too. Fighting my own perfectionist nature to try to get things MOVING ("'Good enough' never is!" haha). A little afraid to actually trim the kit, but will be taking about 1" off the sides of the barrel, top of the cod, and will be splitting the thighs at the rear cover strip to overlap them. I was debating how to do the rear barrel closure when I ran across Rogue Repro on Facebook and their sweet zippered rear closure system. It looks pretty darn nice for the price, so I'm going to give that a try! Finally, I have Jeff (@11b30b4) whipping me up a pair of his excellent flexible urethane shoulder bridges - the ones supplied with the kit are way too long for me and prone to cracking from my understanding (and ANH experience), so these should be a nice upgrade. Getting all my ducks in a row! I have two more rounds of chemo left before radiation, and it does get harder every time. But things could always be worse - I'm determined to stay positive. In general, moving in a positive direction, and the masses in my neck and chest were 1/4 the size they started at in my last PET scan. My Garrison has been very supportive and I appreciate them immensely. I helped coordinate a mini TK Armor Party this weekend for about a dozen guys, so hopefully we get some good work in and have some more TKs approved soon! That's it for now, but hopefully I can get everything in white in the next week or two, then focus on strapping and weathering!
-
Got wayyyyyyyyyyyy off track with this project after being diagnosed with Hodgkin's Lymphoma late last year... so, you know, that sucks. Costumes and the club have definitely taken a back seat to my health, but having projects to keep me busy in between rounds of chemo definitely helps. So I'm back at this a bit while wrapping up the 15 other projects I constantly seem to have going at once. First up, some overall objective updates. I'm pivoting and going a different direction yet again. I think I am going to rattle-can paint the suit myself to save money (treatment bills, boo), but I think it will be fine for my new goal... which is possibly helping develop a new CRL using the suit. It'll become pretty obvious which one at a certain point, but I should technically stay quiet for at least another month. That being said - the paintjob doesn't need to be perfect, and I can have it painted by my auto paint pro down the road. For now, I'd like to get it going (possibly in time for WonderCon?) so I'll be doing the prep and spray myself. Jim's kit is actually pretty darn smooth to begin with, but I have high standards. So... Sanding. So much sanding. Initial paint tests are looking like if I do one coat of filler primer, sand it to like 400, mark any low spots or holes and add glazing putty, sand to 400 again, then spray an alternating color of sandable primer, sand to 400, then 1000, and then spray two coats of white, it should look halfway decent and acceptable for my next two projects using the suit. I have another helmet on standby for my first project, will likely have the fiberglass helmet professionally painted for actual R1 submission, and will probably convert a Black Series down the road for project #3 (already ordered and gutted, couldn't help myself). I'm starting with the pieces that I know will not need additional reinforcement while I continue to look for just the right type of resin to add to the rest of the panels that have thin spots or major stress points. I'm not good about documenting, but I'll give it a shot in case it helps others. I moved a mannequin in from the garage to the bedroom to test hanging some of the armor on him and forgot to tell my girlfriend. Scared the hell out of her hahahaha
-
MV's ANH TK Stunt [ATA] 1st Build Thread for Centurion
TheRascalKing replied to MaskedVengeance's topic in ANH Build Threads
I've seen guys take the rubber gloves off at troops and literally turn them upside down and pour sweat out of them, hence my words of caution hahaha Definitely for Centurion, definitely not for trooping, imo. Fans are totally up to you, just make sure you have good airflow so you don't fog up - that's the main thing. I definitely prefer the zipper and it's easier to put on correctly by yourself over the velcro. You're probably good on the extra ribs, but worth mentioning after having owned a couple. If you find you'd like it to be taller, he was actually really good about exchanging one for me at no charge as well. I prefer the larger premium one, mostly because the bib is one piece instead of being split in two under the zipper and I feel like it lays a little nicer, and can always be trimmed down. I eventually might get bored and sew in some velcro on the front and back (and on my undersuit shirt) to reeeeeally keep it flush and centered under my armor. 100% on the inner cover strips - they make assembly so much easier when you start with them, and will add strength. Trooperbay has sheets of white ABS for sale that you can chop up, or be careful when you cut and you can probably use trimmings from your suit as well in case Terrell doesn't include a ton of extra ABS. Thanks again man! I made good progress last night on kits and am on the mend. Getting PET scanned tomorrow to see if I need more chemo or not, so fingers crossed for more good news! -
MV's ANH TK Stunt [ATA] 1st Build Thread for Centurion
TheRascalKing replied to MaskedVengeance's topic in ANH Build Threads
Added some thoughts on stuff. Also, your strapping kit is seriously almost done - this round of chemo kicked my a** and set me back more than I expected, but I'm wrapping everyone up this week for sure. Making good progress and I LOVE seeing people do their research. Cheers! -
Some of our own in the new Mandalorian TV show??!!!
TheRascalKing replied to Ericnathan811's topic in Off Topic
Apologies - I did have the thread taken down, though I welcome someone to start another *SPOILER* flagged thread over in the 501st Only Discussion section - out of respect for our international brethren, but also so we can still have some lively conversation. Just decided to not have it be me -
Some of our own in the new Mandalorian TV show??!!!
TheRascalKing replied to Ericnathan811's topic in Off Topic
Someone could always do that. -
Some of our own in the new Mandalorian TV show??!!!
TheRascalKing replied to Ericnathan811's topic in Off Topic
CG flames, way cool armor. -
Some of our own in the new Mandalorian TV show??!!!
TheRascalKing replied to Ericnathan811's topic in Off Topic
If they got shot or went down, it wasn't us. Easiest way to tell are that the studio Anthology suits had detached, flexible cod pieces, so they can be spotted pretty easy between that and the other R1 details. -
RascalSnaps Installation/Support/Research Thread
TheRascalKing replied to TheRascalKing's topic in Tutorials, Tips and HOWTOs
Shoutout to wingnut65 for the below diagram as well. Here are a couple of shots of kits installed in customer suits!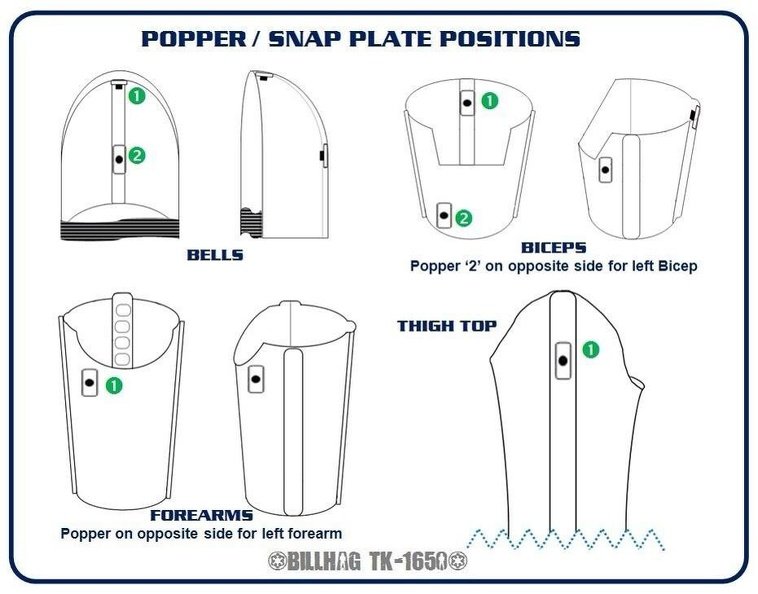
-
Some of our own in the new Mandalorian TV show??!!!
TheRascalKing replied to Ericnathan811's topic in Off Topic
The vibe I have been getting is a solid no. The 501st troopers on set and their personal armor will likely be counted as unique, a la "Mr. NoStripes" and will not change the current ANH-S CRL in any way. But undoubtedly the "Rogue One" Stormtrooper CRL will need to be updated with new information learned from the show. I personally think it should become one catchall "Anthology Stormtrooper" CRL that includes Rogue One, Solo, and The Mandalorian suits and their options. We'll see what the DO's have to say once they see it after March. Eh, is what it is. I know some of the guys put their armor away with little plaques on em and aren't wearing them again. I personally don't care - I built the suit to troop in and bring joy to people, and I can't quite afford to build another one at the moment while I'm undergoing cancer treatment, so I'll just keep trooping in mine. For me, this is the way. -
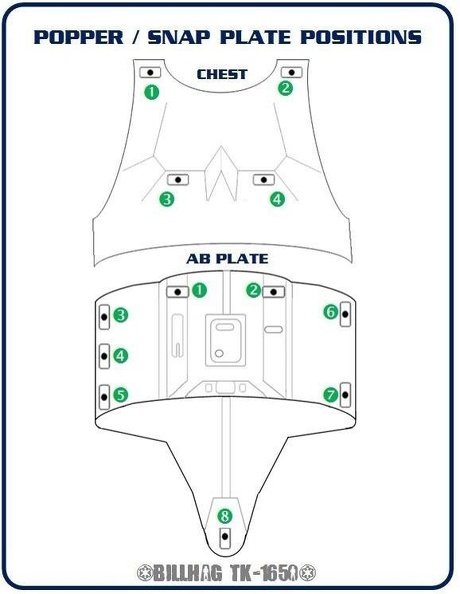
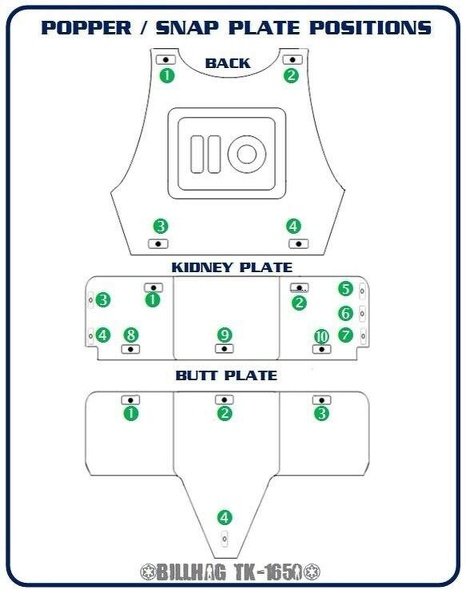
Reserved for a thread explaining installation and offering support for troopers running RascalSnap systems. This thread is for assistance only and kits are not currently available at this time. But maybe someday soon Thank you for your interest in RascalSnaps! This Line-24 snap-based strapping system is designed for Original Trilogy Stormtrooper, Shadow Trooper, and Sand Trooper suits from all makers and is made to be fully adjustable to the wearer and ‘one-size-fits-most’. They are the result of years of research and development and each piece has been thought about carefully! Thank you and enjoy! RascalSnaps Original Trilogy Stormtrooper Strapping System ------- RascalSnaps Packages Include: Basic Kit ❒ (2) 2” White shoulder straps (sewn in snaps) ❒ (2) 1” Shoulder to shoulder-bell drops ❒ (2) ¼” White Centurion elastic retainers ❒ (2) 1” Shoulder-bell to bicep elastic straps ❒ (2) 1” Lengths of elastic around bicep (glue in) ❒ (2) ❒ 1” ❒ 2” Bicep to forearm elastic straps ❒ Left side clamshell connection ❒ (2) 1” Nylon male connections (glue in) ❒ (3) 1” Nylon female straps ❒ Right side clamshell connection ❒ (2) 1” Nylon male connections (glue in) ❒ (3) 1” Elastic female straps ❒ (1) 1” Cod strap ❒ Anovos ❒ Standard ❒ (2) Chest to ab panel straps (longest) ❒ (2) Back to kidney panel straps (medium) ❒ (3) Kidney to posterior panel straps (shortest) ❒ (20) Male 2-snap tabs (glue in, +2 extras) ❒ (10) Male 1-snap tabs (glue in, +2 extras) ❒ Deluxe Kit Option ❒ Velcro garter duty belt - Size: _____ ❒ (2) 1” Nylon/velcro thigh garter drops ❒ Full Kit Options ❒ (1) Line-24 right side “Han” snap ❒ (2) Line-24 cod to posterior snaps ❒ (1) Nickel split-rivet for cod ❒ (2) Nickel split-rivet for knee ammo pack ❒ (6) Nickel split-rivet, left side kidney/ab ❒ (2) White belt drop box elastic lengths ❒ (2) Rear shin closure velcro ❒ (2) Handguard elastic lengths + retainer FAQ Who makes these? RascalSnaps are designed and made by Justin Reed, “TheRascalKing”, 501st Legion TK-61490 (4x Centurion #396), in sunny Southern California. Are custom kits available? Not really - there is a pretty wide degree of adjustment available in every kit pending where you glue the tabs in, and there are several options you can choose from. I am happy to make any reasonable accommodation, but what I won't do is answer "I am XX millimeters tall and XX stone, will this fit me?" posts. Are kits warrantied? All kits are warrantied for parts and labor for 1 year or 25 troops, whichever comes first. Please contact me here or by email at [email protected] with any questions or warranty concerns. I will typically send out a new strap at no cost, just pay for shipping. Are these kits screen accurate? In short, no. Please look into a bracket system for true-to-screen rigging. I personally believe these kits are better and more functional than brackets or any other strapping kit currently available for purchase. Are these kits L3 Centurion approvable? Absolutely. The kit includes and fulfills all L3 Centurion requirements at this time. Several mentees and I have been approved as such many times over. Snap Placement Guide (credit to TK-1650 - BillHag for these diagrams)
-
Some of our own in the new Mandalorian TV show??!!!
TheRascalKing replied to Ericnathan811's topic in Off Topic
If and when they decide to touch the CRL's, it's gonna be a mess. -
Some of our own in the new Mandalorian TV show??!!!
TheRascalKing replied to Ericnathan811's topic in Off Topic
Ask away and I'm sure we'll do our best without blatantly violating our NDAs or revealing anything from the last episode. -
MV's ANH TK Stunt [ATA] 1st Build Thread for Centurion
TheRascalKing replied to MaskedVengeance's topic in ANH Build Threads
Much appreciated, my dude! Hit me up in the new year if you still need some. I should be finishing up treatment by then. Trying to stay active on the boards when I can though. I'll jot down some thoughts on your build too when I have more time! -
3D printing is an option, but honestly not a good one for Stormtroopers. It's easier for some other costumes, but the suits were originally vacu-formed, and look best when that construction technique is followed. It would be a LOT of work and hundreds of hours of printing, sanding, and painting, and just not worth any cost savings you MIGHT get (probably not even). We do have a 3D printing section here on the forums you can check out, but it just isn't really practical for doing a whole suit. Custom lenses would be extremely expensive and probably not even work due to how they're positioned in the helmet. Visibility is never great anyways, but some guys can cram glasses in there. The best answer is contacts.
-
Heavy Weapons Trooper CRL Weapon addition thoughts?
TheRascalKing replied to Hellfire272's topic in Heavy Weapons Trooper
Yeaaaaaaa probably this. At least not officially as part of the CRL. But like he said, you can absolutely carry one after approval, and YOU SHOULD (cuz it's awesome). ;D -
FISD Master Armorer Program - Overview
TheRascalKing replied to Daetrin's topic in FISD Master Armorer Program
50/50 or "The assistance must be for a period of 30 minutes or more." as in the OP? Just to clarify. For example, if a suit was assembled by another "Master" armorer, but the suit was then repaired, updated for accuracy, and photographed for submission by another member over the course of many hours? Should both be counted as "wins"? If not, does the original builder get credit, or the one who helped with the EIB submission? Just want to make sure that's okay and we're on the same page, otherwise I will remove one of my wins. -
No worries, man - we all started somewhere. I don't believe I saw photos of your right shin and only of one bicep, so the jury may still be out on those. Feel free to post more pics from more angles tho - you wearing the suit is helpful because fit is as important as finish. Very little is beyond fixing, some just takes more work haha I would definitely save any scrap plastic that you trim off and look into making up some ABS slurry using acetone - it will help with blending your shim in and filling the rivet holes - don't throw the trimmings away! But yea, looking forward to see more pics and your progress. I gave you a LOT to chew on, so let us know if you have questions or need links. Also, no need to reply to people individually with the same thanks - we're all here to either learn or help haha Maybe just toss em a thumbs up!
-
Hey man! Not to be too negative, but there is a lot that will need to be updated. I believe it's doable, as the armor itself doesn't look too bad, but the majority of your fasteners and connection points will need to be addressed. As stated, EIB will be first, but I'll note anything I see up to Centurion. I may miss some stuff, and we would absolutely want to see more pics to be sure, but I'll try to dig into each photo and let you know what I see. Hopefully that all helps and keeps you busy for a while! Please post some progress pics and photos of you in the armor for us when you have a chance! Good luck!
-
ANOVOS TK in progress
TheRascalKing replied to Hesikaya's topic in Build Threads Requireing Maintenance
Personally, I wear the Anovos hard plastic handguards with my nomex/fabric gloves for trooping (with a 1" elastic strap around the palm and a thin one around my wrist), and glued my flexible urethane handguards to rubber/chemical gloves (with CA glue - not ideal, but I only ever wear them for HPEs or approval photos. The best solution is to embed duck cloth or the like in the handguards, like @justjoseph63 does with his - those E6000 in with no problem). But yea, right now you're combing something MORE accurate with something LESS accurate. Plus, the urethane ones make my hands sweat even more during warm troops. Also make sure you place something inside the gloves to keep the shape and keep them from gluing themselves together. I used a Novus bottle with some wax paper I wanna say. Good luck and the build is coming along nicely! -
I believe 1/4" is most commonly used. Totally dealer's choice for how you attach the ammo belt, just be aware of my warning as to folding/cracking the reinforcement in the canvas belt. Much less of an issue if you have a big crate with lots of room, a luxury I unfortunately do not have haha https://www.amazon.com/Chicago-Screws-Plain-Pcs-Silver/dp/B00355AN4U
-
Heavy Weapons Trooper CRL Weapon addition thoughts?
TheRascalKing replied to Hellfire272's topic in Heavy Weapons Trooper
It'll be a tough sell, but I'm all for it. Maybe add some screen caps if you can find em? Also, the other big question is who is making these? Anyone yet? o.o -
I wanna reinforce and thicken em up from the backside before I mess with mine, forsure. I think a cutoff wheel on my Dremel might be the right size, then finish to the ends with jeweler's files. They're so thin tho, it makes me nervous and I do NOT want to bust one of those little vents if I can help it. I may not cut em at all, we'll see. I plan to troop in this armor so I want it to be STRONG. Looking good tho, man!
-
Thank you for all you have done and continue to do! I'm sure we all appreciate your honesty and candor, and that we all wish you the absolute best as things continue to settle. Let us know if you need anything! Other than some more quality EIB and Centurion candidates of course
