

mr paul
-
Posts
250 -
Joined
-
Last visited
-
Days Won
4
Content Type
Profiles
Forums
Gallery
Articles
Everything posted by mr paul
-
 Slyfox there appears to be 2 types of antenna identified so far. A long and a short version. We believe the long version terminates into the grenade box and the shorter version tucks into the alice pack as seen at CE. Until further proof it is hard to say. Seeing as they went to the trouble of having variations in length of antenna it may be that the cable enters the pack in different ways too...This pack is being built to the CE spec and it was tucked into the alice pack before it got pulled out on display so for now we are reluctantly attaching it in this way. I looked at rubber catapult tubing during my investigations, the type used in fishing could not find the right colour or width. I think you are correct with the surgical tubing. Need to have some in hand but the "squishier" the better in order for it to not collapse on winding. The tightness of the winding is what holds it all in place around the rod. i think we can all agree that the tubing is made from silicone/latex.
 -
The antenna tip is now being discussed over here http://www.whitearmor.net/forum/topic/38162-rogue-one-stormtrooper-back-pack-part-found/Bare in mind the dimensions of the tip. It is quite small when compared to the rod tip and the antenna tubing
-
The sliders on the bottom corners of the inner side of the pack could have been painted and I have seen a picture that could verify this although lighting in this are is always dark and confuses the issue. It is possible that the frame at CE is also painted black but once again lighting is the problem. The other known 6 buckles around the pack look to be antique brass as they are in better lighting. For now I am assuming they would all be the same colour. There is however a possibility that 2 have been painted. Not sure why 2 would be a different colour but this does not rule it out.
-
Slyfox, surgical tube....love it..looks very much what may have been used as it ticks seemingly all the boxes. It may also give more accurate width to the antenna tip as the tube and the tip are very close in width according to the poor imagery we have seen. Wire running through the cable not convinced. Wire protruding from the end....possibly,,,, need to see that image Bulldog. The pictures I have seen show what looks like hot glue around the bottom of the tube,, maybe used to hold it in place on the pack,,could it be this instead of what looks like wire?....buckles are going to be discussed in the next section ...Excellent work peeps.
-
No worries, It is a hot topic I know. especially as there are no new TK suits on the horizon as of yet. It may be worth opening up that discussion in a separate thread
-
Could we not derail this thread please, thank you.
-
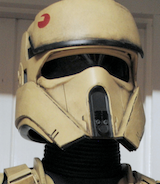
Yes I have experience with smaller scale modelling 1/16th, 1/6th 1/1 scale. 2d art as well. Techniques can transfer over to different scales. Some things work and some don't. I take whatever works and run with it. The process I used on the Shoretrooper helmet is relatively simple and I used paints and tools that are readily available. Hopefully the results are achievable for people with all levels of experience.
-
Here is the finished helmet. A great piece from Back Stage Props and well worth getting either as a display piece or part of your full armour build. I will be using pretty much the same techniques when painting and weathering the armour. I hope this tutorial has been useful. Have fun painting your bucket and any questions you may have please feel free to ask. Thank you for looking and thanks again for your kind comments.
-
I drilled a small hole into the back of it
-
Here are some pictures of the finished details up close. The lens is held in place with tape from the inside and black 2mm neoprene has been cut to shape for the lower eye lids. I have stuck this to the lens using 3m Spray Mount Repositionable Adhesive sprayed onto the neoprene. It is strong enough to hold the neoprene in place and allows you to position it correctly without getting glue over the lens. Also it can be removed if needed. The chinstrap can now be fixed back into the helmet along with the foam head support.
-
Because the recessed panel line is not accurate on the BSP helmet, and I was too late in fixing this problem before painting, I have chosen to lay a 2mm strip of black neoprene foam into this feature to bring it up flush with the surrounding surface. I am happy for now and if i feel the need to mod it in the future I will revisit it.
-
Before I weather the helmet I glue the snout and cheek greeblies in place using Loctite Super glue precision. The forehead is glued in place using E6000. Once everything is fixed in place it can be weathered as a whole to tie it all together. I am using these 3 colours to weather and dirty the helmet. I use 3 colours to keep it simple yet effective. The acrylic paint is mixed ver thin. Basically I am replicating muddy water. I have an atomiser which is an old kitchen surface cleaner bottle that I use to spray on the paint mix. This part of the process is fun and you cant really go wrong. The paint is very thin so if you do too much you can remove the excess with a soft damp cloth. Keep layering the different colours, allow to dry a little and rub off with the cloth leaving the paint to build up in the cracks and crevices. I use a hair dryer to speed up the process. I also use my airbrush to blow paint into corners to get a dusty effect. A dry scouring pad can be used to lightly scratch the surface and rub back the weathering revealing the brighter colours underneath. Keep repeating these techniques until the required overall look is achieved. I also use a toothbrush to flick paint and wire wool to add further scratches. Be creative and try to replicate the wear and tear this helmet would receive in the real world. I use 70% rubbing alcohol on a soft cloth to remove the acrylic paint if i have overdone the weathering or if I want some areas cleaner than others.
-
Rogue One Stormtrooper Back Pack part found
mr paul replied to Sly11's topic in Build Threads Requireing Maintenance
I believe the tip to be cylindrical and not tapered. The way the light reflects from the tip down the right side is deceiving. I do not think the prop guys would have packed the inner diameter for a tight fit. Its speculation but it would be nice and neat if it fitted without having to be glued in place etc. I have found a number of tips that fit the width of the rod but the shape of the tips I have are not correct. I have looked at rubber RC car antenna tips. Ferrules of all shapes and sizes. Wire/cabel end protector caps. Cord ends. CB aerial tips. AV whip tips. The closest I have found that matches the shape and also has some of the details that the CE presents is this shown in the image below. The tip from a panasonic G450/G600 mobile phone antenna. This I cannot find available anyway for sale and may be obsolete so I can't source one to trial. This may be enough reason why it was not used for the part anyway. For a temporary fix I am using a hard plastic CB antenna tip as it looks cool. I am still pursuing down the route of CB or Phone antenna tip, something built for purpose. Here are some comparison pictures of the tips I sourced next to the CE tip. -
There are liquid masks that you can buy from hobby outlets, I have also heard of toothpaste, mustard, mayonnaise being used. Anything that forms a mask and holds its shape and can be removed easily. i would go for hobby stuff if you do not have previous experience to avoid mess and mistakes.
-
Sorry I thought you meant is it the found part.....yes it could be folded if you wish however if you are going down that route then you could buy any piece of suitable textured fabric and fold it to suit.
-
A bit on the large side
-
Rogue One Stormtrooper Back Pack part found
mr paul replied to Sly11's topic in Build Threads Requireing Maintenance
It is definitely the green pack. Close observation of the CE pack shows the original colour coming through the black. the pack has been coloured black however it is not a true black. We will be posting materials and techniques very soon showing how the same look can be achieved. -
I do not think you will be far off in that tonal range. All these colours are very close to each other.
-
There you go. Available in U.S brilliant. The Valspar Shelley light is between 1014 and 1015 on RAL chart. Somewhere around there and you will be good.
-
As far as I have seen and heard no. i know Back Stage Props certainly are capable of producing this armour and it may be worth messaging them on Facebook to ask if it is in the pipeline. Apart from that it seems to be all ST and DT.
-
You cannot get Pebeo Studio Acrylics in the U.S however Windsor & Newton and Liquitex make the same modelling paste. Go for the highest density in either case.
