

mr paul
-
Posts
250 -
Joined
-
Last visited
-
Days Won
4
Content Type
Profiles
Forums
Gallery
Articles
Everything posted by mr paul
-
 Cut the end of the tube into a tapered point. Thread it like a needle. You do not need to use oil. Thread the end through, stretch thinner and pull it through. Be careful not to put too much stress on the guides as they may snap off if bent.
 -
No worries. Shame we can't identify the dude.
-
Where have you seen him before. I am trying to establish him as a recaster over on Bikerscout.net however those guys need some convincing.
-
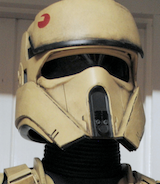
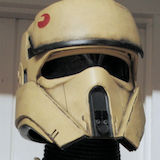
This low life is recasting Back Stage Props Shoretrooper helmet. -------------- https://www.facebook.com/HiddenAssassins/
-
Bedroll Buckles and Webbing The buckles that are used to hold the bedroll to the ammo box were identified very early on by ireachy whilst many of us were still recycling the unused sliders from the LK35 back pack. They appear to be 25mm cam buckles. There are many of these available to buy worldwide however they do vary slightly in shape. The CE buckles have certain features that helped me to source the closest match I could find. The shape of the sides is important. The shape of the shallow shelf along the front is also key in finding the correct looking buckle. I have a source in the UK for the buckle I used on my pack and it looks good in hand. http://www.pennineoutdoor.co.uk/buckles-webbing-cord-fittings/metal-buckles-hooks-rings-eyelets/cb25-cam-metal-cam-buckle U.S supplier (I have not seen these in hand) http://www.hudson4supplies.com/metal-hardware/metal-cam-buckle/cam-buckle-1-in-230-lbs.html Sometimes the buckle will arrive with text cast into the release tab on top. The buckles are generally made of cheap white metal so this can be ground away easily with a dremel and sanded smooth. The buckles on the CE pack have been painted a type of green and weathered with dirt and paint chips. I cannot say what type of green they are but I will go on to replicate the look as best as I can from the reference material available. The webbing itself is 25mm x 2mm cotton webbing. Ireachy and myself spent many hours looking for the correct colour, weave and size. we needed a webbing that when it frays displays a lighter colour inside. We failed to find such a thing and decided that it could have possibly been dyed or painted. That is the direction we chose to take in order to match the webbing shown at CE. The webbing I found that bares a close resemblance is this 25mm x 2mm light khaki available from here. http://www.ebay.co.uk/itm/Cotton-Webbing-Tape-Belting-Fabric-Strap-Bag-Making-Strapping-25mm-38mm-Width-/191918421240?var=490987304922&hash=item2caf3ab4f8:g:EQgAAOSwddNXgSe0 Painting the Buckles The buckles have had all the makers names removed with a dremel. I have given them a base coat with an all surface matte black spray paint. I use an airbrush to paint them with Vallejo acrylic U.S Dark Green 893. Allow to dry. I mix a very watery wash of Vallejo Light Mud 315 and drown the buckles in it, Allow to dry thoroughly. When the wash is dry it will give you an authentic, dirty, used look. All 6 of the buckles are then placed in a box and roughly shaken to chip the paint off and create wear. From trial and error with my version 1 pack I estimate the webbing to be 22 inches in length each. It may be possible that the 2 straps on top of there cE ammo box are longer than the ones down the sides however for consistency I am choosing to make them all the same size. Painting the Webbing The colour I have chosen to paint he webbing is Vallejo German Extra Dark Green 896. After many experiments painting and dyeing, I have found the most successful method is airbrushing the paint onto the webbing although hand painting can work if airbrush is not an option for you. Lay the lengths out flat and evenly spray them until a solid colour is achieved all over. Be careful to leave the ends the original light khaki colour. You can mask the ends if it is easier. A hair dryer will help speed up the drying time. When completely dry. Use a sharp knife and a ruler to trim the ends straight still keeping 2-4mm of light khaki showing. When trimmed rub the ends against your clothing to fluff them up and help them fray so they look like this. Stitching the Buckles Close inspection of the method used to attach the buckles to the webbing reveals very large and clumsy stitching. 4 stitches running across the width of the strap hold the buckles in place. This image shows how far the webbing is returned through the buckle before it is stitched. Once again due to poor reference and lighting it is impossible to accurately identify the colour of the thread used. I have chosen a light khaki to match the frayed ends of the webbing. I have doubled the thread over to make it 4 strands thick. Stitch all 6 buckles the same. The 6 straps can now be threaded into the ammo box in preparation for the black cloth liner to be installed.
-
No. No confirmation on the identity of the "bedroll"
-
We are aiming to get the last part of the build thread posted in the next week. It will include installing the ammo box liner, bedroll, straps and buckles. I will also show how I coloured and weathered the parts for my own pack. Another battle pack in production.
-
So according to a costume designer from the film the official paint colour used on the Shoretrooper is Sahara Beige produced by a paint manufacturer called Montana. Looks like my bucket is in for a repaint
-
Rogue One Stormtrooper Back Pack part found
mr paul replied to Sly11's topic in Build Threads Requireing Maintenance
The 3 small pouches along the front are stuffed full to give them shape, then the centre flap is bought down over the centre pouch and secured using the black polypropylene webbing threaded through the slider buckles as shown in the build thread. -
Rogue One Stormtrooper Back Pack part found
mr paul replied to Sly11's topic in Build Threads Requireing Maintenance
I don't know if they are sewn or folded in a specific way but the ends are a particular way and replicating this does give that look you need for the CE pack. I used canvas and scratch built mine sewing the ends shut. Once again the reference imagery is poor for this part of the pack unfortunately. My bedroll has a circumference of 14 inches. -
Rogue One Stormtrooper Back Pack part found
mr paul replied to Sly11's topic in Build Threads Requireing Maintenance
You need to refer to the CE reference imagery when stuffing the alice pack, it needs to be stuffed tightly and forming a rectangular shape. enough to push those 3 pouches into an outward facing position. That centre flap needs to be pulled down tightly and strapped into place. If by then it does not look packed enough or over stuffed you need to adjust accordingly until it takes on the shape of the CE pack. Ot is worth taking time doing this because once the ammo box is in situ you will not be able to go back and adjust it. i spent quite a while getting the stuffing right. Sometimes breaking off smaller pieces of foam to bulk out the pack and fill any sagging areas. -
Rogue One Stormtrooper Back Pack part found
mr paul replied to Sly11's topic in Build Threads Requireing Maintenance
That should give you plenty of fabric, it will be interesting to see how that looks on the pack -
Rogue One Stormtrooper Back Pack part found
mr paul replied to Sly11's topic in Build Threads Requireing Maintenance
Nice one,,,what is the diameter of the tent pole bag Bulldog? -
Wow thats awesome thank you
-
Hi Bill, no final coat of varnish was needed but if you wish to add that to your own helmet it would not do any harm. Thank you for your comments
-
Attaching the Ammo Box. Remove the tray from the ammo box and choose which half you are going to use. Both are identical so retain the other half in case a mistake is made on one. These are all of the parts that are removed from the ammo box before being attached to the frame. Take off the handles, latches and the grommet. Cut off the 4 lugs from the sides of the box. Do not worry about being neat. The CE box looks quite butchered. Using a 5mm bit. Drill holes into the back of the box in the following places. Note the placement of the holes. Take care to avoid the dividers within the box. I have cut 8 slots into he sides and back of the box. This is where the bedroll webbing will be threaded through. The straps are 25mm wide so cut them long enough to take the webbing. Use a drill to roughly cut the slot. A rasp will neaten and give shape to the drilled holes. Note the position of the slots around the box. Push the box downwards onto the frame compressing the alice pack until the top of the box is in alignment with the upper cross bar of the frame. I use zip ties to attach the box to the frame but before they are tightened into position make sure the frayed alice pack webbing stubs are showing and in place. The fabric patches are in the correct position. The pack is still folded neatly under the box. Feed the zip ties through the holes from the inside of the ammo box. Thread them around the frame, back into the box and tighten. I have positioned them here so they are discreet and not noticed when the pack is worn. Once secured to the frame note how far the alice pack steps out from below the ammo box. Make sure the box is all squared and level on the frame and do not worry too much if your cutting has not been tidy. I have left the sticker on my box because I like it All this will be hidden by the fabric liner of the ammo box and the bed roll.
-
Thats an awesome outcome. I like that.
-
The ammo box is the next stage of the thread. The ammo box is not painted. The facade has what could be described as a "paint job" We will go into this in a little more depth.
-
Yes the M75 is the correct part no doubt. The angle brace is placed differently on the M75 because of the longer shelf that sticks out on the M75. I expect to strengthen the structure and displace weight. The question remaining regarding the CE M75 is: Is it a black frame with black end caps or a green frame with grey end caps?
-
Painting the Orange Flash As stated above by ireachy make sure you have the correct shoulder strap before painting. Looking closely at the CE Images I estimate the orange rectangle to be approximately 85mm x 45mm. Also looking at the positioning of the rectangle within the shape of the shoulder strap I can mask out where it needs to be. I use normal masking tape from the DIY store. Block out the rest of the areas that you do not want painted. The paint I have chosen to use is a spray more commonly associated with the painting of radio controlled cars polycarbonate body shells. 276 Orange Power by Fastrax. The paint is essentially a liquid rubber that when dries forms a flexible gloss finish that replicates the look of the CE patch very closely. It tends not to soak into the fabric of the shoulder strap and resembles a screen print when dry. Shake the can well and apply in light even coats until a thick layer has been built up. Do not worry about achieving an even, flat coverage as the point here is to get a worn, used look. Here I am using scraps of paper to mask parts of the rectangle from the orange paint. This is to help break up the outline and speed up the weathering techniques that I will apply in the next stage. Although this thread is attempting to recreate the CE back pack this is your opportunity to add some individuality to your own pack. So far all the patches I have seen on screen and in images have been orange however they are all weathered and aged uniquely as one would expect. It may look odd if you all turn up to a troop with your orange patches all worn the same. Unless you want your patch to resemble the CE version, now is your chance to be creative. Allow an hour for the paint to dry and peel away the masks. To add age to the patch I used wire wool, a scouring pad and some fine sand paper. Without being too heavy handed I broke up the outline of the rectangle and removed areas of paint to recreate a scuffed and used look. The masked areas from earlier saved me having to take off a lot of paint. Try not to go at it too hard and risk damaging the fibres of the shoulder strap fabric. Carefully scratch and rub the paint off until the desired effect is achieved. Here is my finished shoulder strap in comparison to the CE pack. The orange patch will be knocked back into place further when the pack and straps are weathered and dirtied at the end. Shoulder Strap Webbing and Attachment. The shoulder straps are going to be attached onto this part of the frame. The straps can be attached to the frame now or can be attached later on in the build after the ammo box has been mounted. Turn the upper shoulder strap webbing upside down so the buckle matches that of the CE displayed pack and thread the webbing following the steps below. This part of the pack is very difficult to get right as the reference pictures are bad quality and its an area of the pack that has proven hard to get a clear view of. We are quite confident that the antique brass sliders are used and are threaded in a way close to what we have shown here however as more accurate images become available we can adjust our findings and our packs accordingly. This length between loop and buckle with give you a good positioning and height of the pack when worn with the armour. This can be adjusted if needed. Because of the poor imagery of this part of the pack we are unable to determine if the webbing exits from over or under the slider. I have mine exiting over the slider (step 3) as it looks a bit weird the other way (below) When all has been threaded you should have around 18cm of excess webbing each side. This will simply hang downwards from the back of your shoulder as seen at CE. The lower webbing of the shoulder straps is attached to webbing mounts either side of the M75 frame in the following manner. The lower webbing can be separated from the upper part of the shoulder straps via the quick release. It should make attaching it to the frame a little easier. THE CLIP GREEBLIE Undo the snap fastener of the left side shoulder strap and with a little force it can be pulled through the T-bar of the K-type dinghy quick release unit. There should be no need to undo the bolt on the greebie. Note that the nut is facing inwards and the bolt head is facing outwards. The clip part should be rotated to face outwards to replicate the CE displayed greeblie.
-
its been weathered. i am using an existing pack from a previous build. The weathering makes the pack lighter. The CE pack is not simply dyed black and finished. There are many layers of weathering effects. The dark green/black that is shown above in the dyeing process is a base for the weathering that I will show you in the final stage
-
Because I did not have a pot large enough for the alice pack and shoulder straps. You can experiment and follow the instructions if you wish but remember the alice pack does not appear to be true black. Also it could get very messy doing this in your kitchen. I opted for a bucket in the garden. The water cools off over the 3 hours but this does not hinder the dyeing process I also ignored the RIT instructions because it only has instructions for top loading washing machines.
-
Alice Pack Assembly Before I start I have noticed from this image that it appears more webbing has been replaced than I first thought. The webbing that retains the bottom corner buckles has been switched with the black polypropylene type. The following instructions do not include this modification. It is a simple fix that I can adjust in due course on my version 2 pack. depending on your perception of the image you can make this modification based on your own judgement. Baring in mind the above notification, these are all the parts I have removed from my alice pack. Starting with the 2 bottom corner buckles. Unpick the stitching far enough to allow the buckles to be removed. If at this point you choose to switch the webbing for the polypropylene, then simply remove it completely from the pack and stitch the replacement webbing back on in the same way as the original. Using strong black thread stitch it back together with the antique brass slider in place. do this for both sides. A close up of one of the sliders shows what could be black paint over the antique brass finish. This is also something that can be added later when further reference becomes available. The 2 buckles either side of the front middle pouch are removed and the webbing is unpicked and stripped away towards the back of the alice pack. This image is taken from the Celebration Europe pack. u Using a sharp knife cut the stitching and remove the webbing as far back as shown here. When you have peeled it back to this point cut it off and discard. In its place using strong black thread add 2 polypropylene retaining loops (same style as for the corner buckles) onto the front, bottom of the alice pack positioned against the seam line. Add the 2 antique brass slider buckles. Note the length of the replaced webbing. With a sharp craft knife or scalpel carefully remove the foam pad from the alice pack. There is no evidence this was removed however through trial and error I have discovered the pack cannot be folded adequately with this foam pad in place. An image from Celebration Europe reveals that further webbing has been removed. A frayed stub of original nylon alice pack webbing can just be seen poking out from under the ammo box. This is evident on both sides. The 2 longest straps on the alice pack need to be removed leaving 2/3 inches intact. This 2/3 inch stub is what is seen on the CE image under the ammo box. Ignore that this pack is already tied to the frame. This is for reference purposes regarding the webbing. With the replacement of the 4 buckles, removal of the 2 long straps and the foam pad, the pack can now be filled to shape using upholstery foam. I chose this as a stuffing because its reasonably light yet firm enough to hold a rigid shape. The foam is cut to size and pushed into the pack to create a rough rectangle shape. It needs to be filled high enough so the fabric patches are seen like this on each end. Stuff the alice pack tightly including the front 3 pouches. Tighten the pull chord of the alice pack and tuck it away inside the bag. Fold the alice pack neatly like the corners of a birthday present. Place extra foam under the large alice pack flap to bulk out the top of the centre pouch. The top of the centre pouch on the CE display pack sits higher than the 2 outer pouches. This added foam will help to achieve that look. Attaching Alice Pack to the Frame Thread the bottom corner buckles to attach them to the M75/LK35 webbing mounts as shown below. Pull them up as tight as they will go and do this for both sides. This will help hold the pack in-situ for the next step. Cut 2x 38 inch lengths of black polypropylene webbing. Stitch one end to an antique brass slider buckle using strong black thread. Heat, melt and seal the other end to stop it fraying. Do this for both lengths. In the following images look very closely how the webbing is threaded around the M75 frame and how it is threaded through the sliders. Through very close observations by ireachy and practical application by myself we concluded this can be the only way the pack could have been threaded given the reference material we had to work with. It works and it looks right. Follow the steps below and do it for both sides. This thread pattern achieves the same look as seen on the CE pack and functions correctly when used to tighten the alice pack to the frame. Between these 2 straps and the 2 bottom corner buckles the alice pack is held firmly in place. nothing else is needed to secure it. These pictures show the filled alice pack attached to the frame. Note where the buckles are placed compared to the pouches. While your pack is at this stage use the time to adjust and shape it to match what is seen in the Celebration Europe reference imagery. Once the ammo box is in place it becomes difficult to go back and adjust the pack. Note the frayed stubs of the remaining original webbing that will be seen from under the ammo box. Note the position of the fabric patches on the side. Note the taller middle pouch. This will become even more prominent when the ammo box is pushed down on top to compress the pack. The pack can look a little dishevelled at this point but do not worry. Straps can be adjusted/cut to length and the shape manipulated throughout the build. Disregard the fact that my pack is weathered in the images. I am using an existing pack from a previous build. The weathering can take place at the end.
-
Colouring the Alice Pack. At this stage I think can safely say that the alice pack is not painted or sprayed black. It is made from nylon and is quite resistant to dyes however I have successfully coloured 3 packs to date using the following method. Closer inspection of the pack displayed at Celebration Europe show that the original green colour of the pack is showing through on various areas all over. From the webbing of the shoulder straps to the actual pack itself. I am sure there are many ways to dye this pack but because I have not got an endless supply of them to experiment on I can vouch that this technique does work time and time again. In this image you can see the green webbing and an area where the original webbing has been removed revealing the green pack beneath. See how the pack appears lighter than the black fabric patches sewn to the sides. [/url To begin the process I am using a black dye called Idye Poly. it is specifically formulated for synthetics and I am going to completely ignore the instructions on the box. Soak the alice pack and shoulder straps in clean water first to make the whole thing damp. This will make it absorb the dye more willingly. Dissolve the bag of dye and the colour enhancer in a jug of boiling water then add the jug to a half filled bucket of boiling water and stir well. Add the pack and straps to the bucket and submerge completely. Agitate and stir every 20 minutes for 3 hours. After 3 hours remove the pack and straps, hang up and allow to drip dry. When completely dry, put it in the washing machine on a rinse and spin cycle and allow to dry again. After this first pass with the dye, the pack and straps should be a dark green and the forest camo pattern will still be visible on the padded straps. I now repeat the same process again using a black dye called RIT. Once again dissolve the satchet into a jug of boiling water and stir the jug into a half filled bucket of boiling water. Soak the pack and straps then add it all to the bucket of dye. Agitate and stir over a 3 hour period. Allow to completely drip dry then put it all through a rinse and spin cycle in the washing machine. This time when it has dried the pack should be a very dark green bordering on black. The shoulder straps will be very dark and the camo pattern barely visible if at all. The fabric patches are true black and darker than the pack itself. This process can have random results and I think this may have been the case with the screen used packs. The alice pack is now ready for the next stage. Parts of the pack are removed and webbing, buckles are replaced.
-
Yes the pack was definitely green without a doubt. The CE pack is not true black even after dyeing.
