

mr paul
-
Posts
250 -
Joined
-
Last visited
-
Days Won
4
Content Type
Profiles
Forums
Gallery
Articles
Everything posted by mr paul
-
 Thank you. I am glad you have noticed that. Allthough all of the shoretrooper helmets that were displayed have damage none of them in particular have lots of damage. Some areas of a particular helmet might have more damage than another area but generally there appears to be not a great deal off damage overall. I think when painting the Shoretrooper helmet there is a balance to achieve between the paint chips and the weathering. It is very hard not to overdo it. The armour is very chipped and weathered but the helmets less so.
 -
Thank you. Glad you appreciate
-
Back Stage Props
-
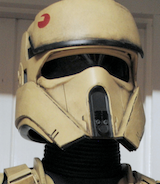
Here is the finished helmet with all the revisions. Hope you like it.
-
The dirt was applied with a dry brush technique stippling acrylic burnt umber into the cracks and corners and around edges. The excess was removed using fine grade wire wool and lighter scratch's added using course wire wool. I also sprayed a little Dirty Down dark brown onto the helmet and wiped away excess to add some age to it. I really tried hard to restrain myself with the weathering and damage this time around. However it still looks beaten up enough to look convincing. This time I cut the eye bags from 2mm rubber sheet. it has a more solid looking finish than the foam.
-
All over you can see how much less damage I have added compared to the previous paint application. And here it is so far with all the black detailing added. Greeblies fixed into place, damage and scratches added.
-
Of all the things to use I am using a pair of scissors to just scrape back the beige to reveal the black underneath. Its a bit clumsy but it worked for me. I went too deep and in some of the pictures you can see where I have gone through the black layer. It is not a problem as I touched the chips up with black paint. A little wire wool here and there for some finer scratches and scuffs. The larger chips are the result of the silicone masks.
-
Shoretrooper Helmet Revisions After adding some corrections to the sculpt I have once again given the whole bucket a coating of black paint. This time I have used Halfords Wheel and Wheel Trim Paint Stealth Black. I am experimenting with this as it claims to be chip resistant and I figured I wanted a tough black undercoat. I have added the silicone liquid mask to areas again to create the larger paint chip effect however this time around I being much more subtle with it. The Montana Sahara Beige is added in light even coats allowing to dry properly inbetween. Halfords Toyota red is used for the emblem (I am assuming they used the same red as they did for colouring the right bicep) The Shoretrooper emblem mask is placed into position over the red. The whole helmet and the forehead is finished off with the sahara beige making sure all the red is covered thoroughly. Note the silicone masks appearing as lumps in this image. Once dried all of the masking is removed and I have painted in all the details. With more recent reference I believe there to be no grey on the Shoretrooper helmet. All the detailing is black including the snout.
-
I have been adding browns to my weather shroud to bring the colour in line with what is seen in the visual guide. It is now safe to say the roll is more brown than green and very dirty, heavily weathered too.
-
Rogue One Stormtrooper Back Pack part found
mr paul replied to Sly11's topic in Build Threads Requireing Maintenance
Field Pack, LC-2 large (NSN 8465-01-019-9103) are these the numbers? -
Lovely looking pack Bulldog. Really look forward to seeing the upgrades and alterations. Great work!
-
Watch out for your antenna on those branches great pics.
-
Both packs look fantastic. Well done on both builds. The alice packs look very well shaped and stuffed and it is obvious you have been following the thread very closely. Good work! I quite like the Nike's with the armour lol
-
Weathering the Field Pack There are many techniques that could be used to weather this field pack and achieve similar results to that seen on the CE version. I used a method I am most comfortable with and it involves only paints. The whole of my pack was weathered using acrylic paint. Acrylic paint is simply plastic particles suspended in water so when applied the water evaporates leaving a hardened plastic behind. Very similar consistency and texture to mud but more permanent which is ideal for what we are doing here. I have used the following selection of colours for my pack. It is important to use a wider range of tones when weathering to get a more authentic and realistic aged appearance. 1 or 2 colours run the risk of still looking like paint when its finished. The paint pot on the left is a water based emulsion paint tester pot from the local DIY store. This can also be quite effective. I painted mine outside because its going to get quite messy splashing paint around. I have printed some reference images so I can be careful not to stray too far away from what the original weathering looks like. Using an old container I mix a very thin mix of paint and water to mimic that of a muddy puddle. I have an old cloth to hand for wiping off excess paint and creating effects. I start with pretty much any of the colours. I am going to picture in my mind what the pack has been through on Jedha. By doing this I can imagine what angles mud and dust would hit the pack from. For example if stomping through a puddle it would splash from underneath. If it rains older dirt would run downwards and dry dust would settle on the upper facing areas. Its useful to take all this into consideration before applying weathering to the pack. It helps to tell a story and create a more convincing prop. I use 2 brushes. A larger one and a medium sized brush. Limiting how many tools I use restricts me from getting too complicated and getting too bogged down. I start by using the larger brush. I literally dunk it in the thin paint mix and splash the pack from appropriate angles, mainly from underneath and a little over the top. The CE pack is very dirty and so is the weather shroud. Do not be afraid to slap plenty on. I use the cloth to wipe off any undesired splats or runs smearing them into the fabric. The more damp the pack gets the more paint it soaks in. Build up the layers and splash different colours on. You can be quite random but keep an eye on the reference pictures at the same time. Make sure to hit all of the pack including the shoulder straps. The weathering needs to be all over the pack. The ammo box is treated in the same way. Here you can see how the paint has been applied then roughly wiping outwards with the cloth leaving the paint to sit in the recesses. When dry the acrylic particles will resemble dirt sitting in the places it would naturally be. You can also use the cloth to dab at the pack using the excess wiped off paint. Imagine the pack brushing against things and picking up dirt. Mix thicker paint for dry brushing. Simply load the large brush with paint and wipe most of it from the brush. When the brush is nearly dry apply it to the pack by roughly hitting all the high points. Do this all over the pack, shoulder straps, webbing, ammo box and weather shroud. Include the base of the antenna too without going too high up it. You can go in quite heavy as most of the paint will be absorbed by the fabric especially if it is already damp. This helps to build up layers of age to give the illusion of usage to the prop. After a first pass over and around the entire pack using these methods I let it dry. All the while I am weathering I am making sure that the pack retains its correct shape and webbing, straps and buckles are al still wear they should be. Although the CE pack looks well used it is still very tightly packed and neat as a military pack would be. Notice a lot of the "mud" so far is concentrated towards the bottom of the pack however with more subtle weathering over the upper parts it beginning to all tie together. I have a good look at it all, then start the same process again adding more layers of age to it. I am going to also use a bottom fed airbrush for the next stage to help add dusting effects to the pack. Using the light mud colour through the airbrush I hit the centre of the ammo box and inside the hollows. I am avoiding getting too much inside the ammo box on the black liner as the CE does not appear to be too dirty. I also point the airbrush downwards over the pack and dust all the upper facing surfaces including the weather shroud. The following images show the depth of dusting, spattering and dry brushing after 3-4 passes using all of the colours and techniques. The lighter shades are used on the edges of the flaps on the pouches imitating where the pack may have been stood down in the dirt. I have used a fine grade of sand paper to distress the surface of the fabric and damage the stitching on the pack. This also helps in ageing the prop. Do not forget to age the webbing. I used dry brushing here to knock the black webbing back. You can still see the frayed edge to the exposed webbing poking out from the ammo box as seen on the CE pack. Note how the build up of paint inside the grenade holders, it looks like a slow build up over time rather than a few quick splats of paint. Which is what we are aiming for once again too help this piece tell a story. Black thinned paint is used in the folds and creases to help the raised areas of the alice pack "pop" There is not much of the original black alice pack left showing. The pack is very dusty with many layers of paint effects on it. The following images are of my version 2 pack in different lighting conditions. I have not tried to replicate the CE pack exactly but hopefully I have come close to capturing the feel of the CE field pack. It really does look like it has been on a few patrols on Jedha. The frayed webbing, damaged edges, scratched buckles, distressed fabric of the weather shroud, Its aged, used dirty, dusty appearance is key to bringing this piece to life. .fe. My version 2 on the left and the CE pack on the right.
-
We are looking for an alternative rod for the antenna. We are looking for a rod of the same spec which should hopefully be possible. I am looking at the NGT float master 12ft 3 piece course rod at the moment. It looks good and seems to have everything in the right place in regards to the top section. The guides look to be a little shorter. The only other compromise will be the red thread in the line guide whipping. A small sacrifice if everything else is good. There are others out there however this one seems the closest so far from what I have found. Whether this is available stateside or if UK sellers will ship overseas I have not looked into yet. The Avanti Precision X has been on sale for the last 5-6 years. I spoke to the manufacturer and it looks like it will no longer be made and stocked in Sports Direct (its only outlet) you may find them on the secondary market from here onwards if you are lucky. Please post up alternatives if you find any. Ideally a black rod with the red whipping and the correct amount of line guides for the top section would be awesome. Importantly also is a rod in the same price bracket. The NGT sells on Amazon for £15.50gbp Let us know how you get on happy fishing. This rod looks like it could also be used to make the longer variant antenna as well as seen on the screen used packs.
-
I will be posting some links to alternative rods soon.
-
Nasty damage dude. Replace. Thats one part of the pack that needs to be strong so any repair on this part means it will still be weakened for future use. Its relatively inexpensive to replace as well. Just need to watch out for those ceilings in future.
-
Tee Hee yes it is not far off from being an AT-ACT driver. Loved that very quick shot of the driver in the film. I have been tempted to do that paint scheme as I now have another Shoretrooper bucket coming soon.
-
I have been looking very closely at the field pack in the Rogue one Visual Guide. I am very pleased notice that the slots cut into the ammo box for the weather shroud webbing are actually cut into the back of the box as I initially guessed. This allows for a wider spread of the weather shroud when pulled tight. This is wonderful as you can also see the slots look fairly dentical to how I have cut mine and hopefully how you have cut all of yours. According to this image it seems you can tuck your top 2 straps under instead of having them hanging like the CE if you wish. I imagine the right side would mirror the left.
-
Rogue One Stormtrooper Back Pack part found
mr paul replied to Sly11's topic in Build Threads Requireing Maintenance
Please PM if you require this part for your back pack build. I have some for sale. These are the genuine metal 2 part greeblies as seen displayed at Celebration Europe. -
Please PM if you require this part for your back pack build. I have some for sale. These are the genuine metal 2 part greeblies as seen displayed at Celebration Europe.
-
Hi, yes over the next 10 days I will have the weathering up Thanks for your patience.
-
Adding Missing Details to Helmet and Repainting. Now I know the official colour of the Shoretrooper helmet I can repaint it. Montana Gold Series Sahara Beige. This gives me an opportunity to add some details that I did not include before. I will not be dremelling the cut out details under the eyes, i fear this will be too problematic. The visor will be replaced by another and positioned higher on the forehead. I use 2mm HIPS/plasticard (black) to thicken the lower band and foam board (white) to add the stepped out upper band. The whole helmet is lightly sanded back ready for the revised paint job. Fortunately the cheek greeblies, snout and forehead could be removed by carefully breaking the glues seal. Visor is also removed.
-
Thank you Par_
