

mr paul
-
Posts
250 -
Joined
-
Last visited
-
Days Won
4
Content Type
Profiles
Forums
Gallery
Articles
Everything posted by mr paul
-
 Yes you need the forest LC-1 camo straps. Extra padded with a quick release on each strap. The straps identity was discovered a couple of months ago and you can find information on them on other threads here on white armour. Send me a PM and show me your straps and I will confirm if they are correct
 -
Regarding the antenna cable. Because of the nature of it it may be impossible to identify was used on screen however we certainly will be using a part that heavily resembles the CE part.
-
The cap is very difficult to identify because of poor reference images. We a pursuing a possible lead on where they came from and I am receiving some samples this week. The `tubing we are finalising what we think is the correct part.
-
Rogue One Stormtrooper Back Pack part found
mr paul replied to Sly11's topic in Build Threads Requireing Maintenance
For those that are interested we have just posted the found part for the R1 TK back pack antenna on the FISD site. It will be going up on Parts of Star Wars today. Cheap and available in the UK online at the moment. The Avanti Precision X 12Ft float rod. Available from http://www.sportsdirect.com/avanti-precision-x-12ft-float-rod-942037?colcode=94203703 http://us.sportsdirect.com/avanti-precision-x-12ft-float-rod-942037?colcode=94203703 For a more in depth analysis you can read ireachy's write up here http://www.whitearmor.net/forum/topic/39073-celebration-europe-2016-rogue-one-stormtrooper-back-pack-build/page-3 -
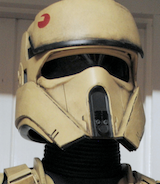
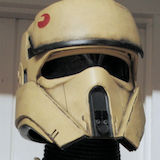
Now the helmet is black I am going to mask off the areas that I want to look like paint chips. I mix my own silicone to make a liquid mask. I ignore the mix ratios on the tin of 100 parts silicone to 5 parts catalyst and mix 50/50. This will cause the silicone to harden within 7 minutes. I do not want to apply the silicone too wet because it will run forming an unrealistic shaped paint chip. I wait until the silicone has half cured and is thicker. Using an old small paint brush I apply it to parts of the helmet where chips and wear would occur naturally. On the edges, around rims. I like to imagine the helmet being used so I think of it being dropped or debris hitting it then try to realise this damage onto the surface of the helmet. Apply to the forehead piece as well. Try not to over do it. If you have applied to much you can easily peel off mistakes or excess once it has cured. There are a lot of ideas out there regarding the colour of the Shoretrooper helmet and armour. In my opinion using the reference photography from Celebration Europe and San Diego Comicon are not reliable due to the lighting and saturation of the images. Thay are useful as a rough guide however I chose to colour match to a pop toys figure and the raw cast resin colour of the BSP helmet. The closest I could find was Valspar Shelley Light Gloss 21103. Valspar do not have RAL numbers but this is somewhere between 1014 and 1015 on the chart. It is not an exact match but it is close enough and light enough to take some knocking back with weathering later on. Before I paint the helmet I need to address the insignia on the forehead. I have saved the decal that came with the helmet for this part. I am going to apply a few light coats of Valspar Shelley Light to the forehead piece to cover the black. Once dry I am going to spray a large enough area in the corner of the forehead where the insignia is located using my airbrush. I colour matched the paint to the BSP decal. I used acrylic Vallejo 851 Bright Orange and Vallejo 947 Red. Mix ratio of 1/10 orange to red. The orange helps the red to "pop" and when mixed it resembles the colour I am seeing from my reference material. Add water to dilute a very thin mix of paint with the consistency of milk. Spray light thin coats until a flat colour is achieved. When dry spray with 2 coats of Humbrol Acrylic Satin Varnish 6135 and leave to stand for 30 minutes. This will serve to protect the acrylic paint. Rather than use a stencil for the insignia I am going to use the BSP decal as a mask. Take you time and place the decal in the correct position over the red area. Once in position stick down firmly. Using Valspar Shelley Light continue to spray the fore head in light, even coats until the red can no longer be seen. Now you can apply paint to the rest of the helmet. Spray the entire helmet covering all surfaces in light coats allowing to dry in-between. Once completely covered leave to dry for 2-3 days. This gloss paint can stay tacky for quite a while so be patient and allow to dry properly.
-
Thank you. The forehead is a very pleasing aesthetic in the design of this helmet. The coloured logo in the corner really sets it off. Painting it was fun and it is hard not to over do the scratches etc. I am pleased you appreciate it,, cheers.
-
I will try and get some more posted tomorrow.
-
I think (I may be wrong) the AT-ACT driver is not the same as the tank trooper. The AT-ACT driver is a black and white version of the Shoretrooper. I am sure I saw a toy of it somewhere.
-
Thank you...its great to have the option of another colour way.
-
Thank you. I shall check it out
-
thank you! whoever edited it..Brilliant cheers
-
No there is no option anywhere to edit the title. i need an admin to do it. Who are the admin please?
-
I have just started a thread in the Rogue One forum titled Shoretrooper painting Tutorial. By Paul Prentice. I need the small cap "p" in "painting" turned to a Capital "P". is that possible please?
-
Hi. How do you edit a thread title. There seems to be no option to do this in the editing facility.
-
Hi and thank you all for your kind comments. I will have some more to post up tomorrow. Thank for the interest
-
SKIP TO PAGE 6 FOR THE SHORETROOPER HELMET PAINT TUTORIAL.
-
Thank you for appreciating the write up by ireachy. I know that the hook part clips onto a metal d ring as I have one here that was used with the clip. However, what the D ring was attached to is another mystery. Research is ongoing. You are right about it being unrecognisable. I think that is why the prop makers were able to place it right up front on the TK's shoulder strap exactly for that reason. It looks functional but also the viewer would not know what on earth it was.
