

Thrawn's guard
-
Posts
479 -
Joined
-
Last visited
-
Days Won
9
Content Type
Profiles
Forums
Gallery
Articles
Everything posted by Thrawn's guard
-
Thanks for the mention in your thread and nice work so far on your build David. If you are intending to use the prisms in your scope and they are the same as the ones I used, (your monocular in your photo above looks the same), bear in mind that they only just fit so you will need to open up the scope carefully. If you have any questions on various aspects of your build I'm sure you will get lots of help from this forum and if I can help at all please feel free to let me know. By the way I'm sure that shiny red workstation will soon be covered with resin dust
-
I just wondered what peoples initial thoughts were regarding the different cross hairs I have been playing around with. Any feedback/thoughts would be much appreciated. I also have Twnbrother's cross hair to look at.
-
Joe's Doopy Doos Build with T-Jay's finishing kit
Thrawn's guard replied to JoeySaurusRex's topic in ANH BlasTech E11
This is a very interesting build Joe and I can't wait to see how the electronics work. -
I decided that whilst I waited for the transparent sheet to arrive for the cross hairs it would be nice to see some of the parts for this blaster start to come together. To that end I decided to look at connecting the trigger to the receiver. Firstly I placed the handle in the correct position on the receiver using the marks on the DD kit and then draw around using a sharp pencil. An additional line was then drawn to indicate the centreline of the handle. A hole was then drilled through the base of the handle, (Which will later be hidden using green stuff), and in to the receiver. 3 additional positions were marked off on the centreline of the handle and receiver at 30mm spacings where I intended to reinforce the joint by pinning it. The pins were formed by cutting 15mm lengths of steel bar (The small steel bars provided in the counter shown on the first page of this thread). Holes were then drilled in the handle and receiver and the holes in the receiver filled with green stuff. A screw was cut to 18mm long so that it could fix through the front hole in the handle and in to the receiver but wouldn't project in to the interior of the barrel. I also test fit the pins to make sure that the holes were deep enough so that once the pins are installed they wouldn't prevent the 2 sections from fitting together. Whilst the green stuff was still soft I pushed the pins halfway in to the holes in the handle and removed the spare green stuff that was pushed out of the hole. The idea of this is that it provides some tolerance to allow you to ensure that the holes in the handle and receiver line up and then once dried will provide a solid fix. I then lined up the pins with the holes in the receiver, pushed the two sections together and tightened the screw (I have not glued at this stage just in case of any issues that I come across later.
-
Nice work on the counter.
-
I am in the process of looking at the bolt and ejection port guard and have a couple of questions if anyone is able to help. 1) What is the width of the ejection port guard ? 2) What is the length of the ejection port guard ?
-
Thanks for the feedback on the weathering of the scope. I may tweak this a little later when I see how it relates to the blaster once painted.
-
Hi Richard and thanks for the mention on your thread above.<br> I like your idea of the wires to form your crosshairs and hope it works out well for you.<br> My idea at the moment is to print out on overhead projector transparent film. If this works out well and you are unhappy with the wire solution when it is finished I'm happy to print a selection off and post them to you.
-
Thanks very much Allan the scope has been a project in itself but one that I have enjoyed working on. Tonight's update is only a short one as I have visitors staying for the weekend so time is a little limited. I have tried my had at a little weathering. I have tried not to over do it so hopefully I have achieved a natural used look. This effect was done simply but lightly sanding off the flat black with a fine, (No 400), sandpaper at locations such as edges where I image the most wear and tear to occur. Can i ask for people's honest opinion ? I also need to get a white crayon for the scope text trick. I'm now just waiting for the overhead projector film to arrive so that I can print off a number of scope cross hairs and trial them to see which I think works best though I guess this is more a case of personal preference anyway. I will then glue on the front section, smooth the joint with green stuff and paint.
-
trooper96's E-11 Project
Thrawn's guard replied to trooper96's topic in Build Threads Requireing Maintenance
Hey Bryan you have posted some great reference pictures here of a real Sterling. What I particularily like is the fact that you have taken everything apart and provided photos of all the smaller less commonly photographed details. I can't wait to see what you do with these parts -
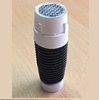
Thankfully I have made some good progress with the scope build today. Having applied 2 coats of flat black paint over the bronze and allowed it to dry I collected all of the pieces that I needed to put the scope together, cleaning the lenses and prisms in the process. The front lens housing was then glued in to the front section of the scope. I test fitted the front section of the scope on to the central section and marked through the 2 holes for the side screws. I then drilled in to the central section of the scope at these mark positions to allow me to drop the side screws through the end section and in to the central section of the scope (Doing this strengthens the joint between the two as the screws act as pins. After drilling I washed the central section to ensure that there was no resin residue inside and positioned the prisms in to the central section of the scope. I then dropped the front section in to position and inserted the screws. At this point one of the two small screws, (see the picture below), was fouling the edge of the top prism the therefore wouldn’t drop in to the recess. I used a Dremel with a cutting disc to shorten the screw. I then fitted the small front lens, glued the front and central sections together and also glued the 5 screws in to position. I was initially intending to place a small thin section of plastic between the front and central section of the scope to provide a gap but when I tried this I found that it looked better without. The front section of the scope is only pushed in to position, though it is a reasonably tight fit, at this stage as I still have to fit my scope cross hairs in to the lens. Once fitted I will glue the sections together, fill the gap with green stuff and paint. I have decided to try to print a selection of cross hairs on to the transparent film and see how they look whilst installed. Unfortunately it appears like I will have to buy 100 A4 sheets (Hopefully that will be a job for early next week). Anyway on to the fun stuff. Here are a couple of shots of the scope before weathering and a couple looking through the scope.
-
Rubie's Yet Again: Astyanax's E11 Conversion
Thrawn's guard replied to Astyanax's topic in ANH BlasTech E11
Nice work Bill. I look forward to reading your next build thread too. -
I am at last making some progress with the painting of the scope. After masking off the ends of the scope with masking tape I sprayed the scope with two coats of black primer before applying several coats of a metallic brass effect paint. The brass effect paint isn't quite what I was expecting but I think that it will serve it's purpose. I also need to better sand down the green stuff repairs on the feet. Tomorrow I will look to apply a flat black finish over the top before reassembling the scope i.e. inserting the prisms and lenses. With regard to reattaching of the front section of the scope to the middle section I am aware that there is supposed to be a very narrow recess. I will look to recreate this by gluing small strips of thin plastic, (Perhaps a spare margarine tube will be sacrificed), between the two sections before filling the gap around the edges with green stuff. Whilst the green stuff is still soft I will force a recess around the edge with some thin wire..........Unless anyone else has a better idea. I'm always open to suggestions.
-
Another small upgrade using a screw from Tino's completion set. Taking the counter I carefully drilled out the resin cast screw on the side of the counter and installed a real screw. I have one of Tino's real counters on the way so once this arrives I will remove the front section of the resin counter and connect it to this rear resin section. I also spotted that I have a couple of small resin bubbles to repair (See the last photo above). I'll do that the next time I have some green stuff to hand.
-
Rubie's Yet Again: Astyanax's E11 Conversion
Thrawn's guard replied to Astyanax's topic in ANH BlasTech E11
Brightly coloured removable barrel end.....ear plug -
The next task was to upgrade my front sight pin housing. Taking the smaller of the grub screws I Tino’s Completion Set I carefully installed these In to the side of the front pin housing that I produced with a 3D printer (See page 2 of this thread). I have a little tidying up to so but the photos give a good idea of how it all comes together.
-
Another small update on last night’s work (The scope is still in the process of being painted). Taking the larger grub screw included in Tino’s Completion Set the diameter was measured with callipers. The resin cast grub screw on the magazine housing was then drilled out with a 6mm diameter drill bit and any remaining flashing carefully removed with a fine file. The depth of the hole was increased gradually by test fitting the grub screw until a depth was achieved whereby the grub screw projected just above the resin. A small spot of glue was then placed in to the base of the hole and the grub screw pushed firmly in to position.
-
@ Aaron - I will need to check out Andy's power cylinders again but from what I seem to remember they may be a little out of my budget. Then again I do want to make the blaster as accurate as I can. I still however think that your designs for the cylinders are fantastic.
-
Good spot Michael I'll use flat black for the exterior of the scope and will also install the screws after painting. Whilst I wait for the paint to dry on my scope build, which has literally been like watching paint dry, I thought that I would keep busy by working on other areas of the blaster that I want to modify. I drilled the rear of the magazine housing in preparation to screwing it to the main body of the blaster. My magazine currently has a tight fit within the magazine housing however as I want the magazine to be removable and want to ensure that over time this fit doesn't become slack I decided to install small but strong magnets to hold things in place. What I also wanted however is that these magnets would be hidden from view when the magazine is removed. Therefore I used a drill to counter bore the internal face of the housing ensuring that the depth of the counter bore was slightly deeper than the thickness of the magnet. The magnet was then placed in the counter bore (This is to ensure everything fits flush later and to allow me to cover the magnets), I then measured to position of the magnet in the housing with some digital callipers and marked out the equivalent position on the end of the magazine. The same process was then used to counter bore a hole in the end of the magazine for a second magnet making sure that I had both magnets orientation the correct way. Both magnets were glued in to place using super glue and once dried covered with a thin layer of green stuff. Once painted both magnets should now be hidden from view. Once the green stiff had fully dried the magazine slotted in to the housing but also has a very reassuring feel as the magazine is pulled tightly in to position.
-
Aaron I have just come across this thread and am really impressed with what you have done here. It will certainly help with my own build when I get around to working on my own cylinders, fuses and capacitors. I particularily like the ends of the capacitors in your last photograph.
-
Michael - That you be great thanks very much (I'll send you a PM). I have not decided 100% what style of reticle to work with and may actually produce a few prototypes but your scope is definitely impressive.
-
I don;'t have too much to show in this update as much of my time yesterday was spent waiting for paint to dry (I did however do some further work on the magazine housing so will post that once I have completed posting details of the work done on the scope).. Having looked at the internals of the monocular I decided that I needed to coat the interior of the scope with a gloss black finish. Firstly the scope is masked off with masking tape. This tape is then removed with a sharp knife to allow the paint to be sprayed in to the internal sections of the scope that will be visible whilst looking through the scope. I applied 3 thin layers of black gloss allowing the paint to dry between each coat. The very front section of the scope does not require the gloss black finish as the large lens housing will be installed in to this section and therefore the interior of this section will not be visible. The next step will be to paint the exterior with brass paint before covering with a gloss black finish. I will then be able to lightly sand the black gloss paint off in area where I want a weathering effect so that the brass paint below shows through. I will look at doing this when I get home later today and should then be in a position to assemble the scope during the course of tomorrow. One quick question. Is it normal practice to install the screws in the scope prior to painting and to protect them or do the screws tend to be installed after painting ? I am tempted to leave them out and install after I have applied the black glass finish.
-
I've not been able to do too much with the scope today as I have spayed they inside gloss black and want to make sure that the paint has properly dried before I start putting the scope back together I also have to decide on the scope reticle I intend to use.
-
I love the scope effect Michael. You blaster as a whole is really progressing well. Is the recticle an official E11 design or is it one the you chose ? Is there even a screen used or official recticle ?
-
Wow great looking blaster build and stand Dan. The only minor comment that i have, and you may decide that it is not of concern to you, is that the fixings used to attach the folding stock to the main body near the trigger assembly are smooth domes on a real Sterling. If you do decide to tweak this you should be able to fill the screw heads in with some green stuff, smooth and apply a little paint. I think that the stand really presents the gun fantastically.
