

artimorty
-
Posts
289 -
Joined
-
Last visited
Content Type
Profiles
Forums
Gallery
Articles
Everything posted by artimorty
-
Then I glued a long stripe from a plastic "for sale" sing over the whole piece and tested on the ejection port. Hopefully, once painted it will sell the deal. Enviado desde mi iPhone utilizando Tapatalk
-
Ok. Here comes what I've done so far for the bolt piece. First I cut half of a pvc pipe section. Drew a rough line of the ejection port on it as reference for scale. Cut out a channel on the right side. Then glued a sintra leftover piece behind the channel and half a wood stick inside. Over the wood stick a rectangular piece of sintra. Enviado desde mi iPhone utilizando Tapatalk
-
wtf.. that´s terrible. My deep condolences.
-
Very little advance today. Clearly slowed by my real life on a work day, but I've managed to get enough time to start the rebuilding of the folding stock. I used white milliput to fill the gap. Once activated and in place, you can very easily smooth the surface with a wet plain object like any modeling tool. With the spare putty I'd left I started to remodel the front leg of the scope to get it closer to the images on the E11 blaster reference. I also cut the ejection port out and starting to play with pvc pipe to see if I make something like a bolt... may be I'm opening too many fronts at the same time... Enviado desde mi iPhone utilizando Tapatalk
-
Now sanding with minifiles, sand sticks and sand paper to get it smother. Next thing will be reconstructing the gap, probably with mililput and thinking to give it some support gluing sintra pieces from the inside.
-
Second I drilled around that line with the dremel and soften the area with files. Then, with a milling head on the dremel and wood carving tools made the new t track over there. Enviado desde mi iPhone utilizando Tapatalk
-
And since each half lay flat once you open the blaster, I saw the opportunity to rebuild the right side of the front of the blaster, where the folding stock meets the barrel. I don't know the reason but there is an excess of plastic there that breaks the continuity of the t tracks and annoys me very very much. First I cut off a triangle section making flat the area of the folding stock and trying to be parallel with the t track Then I freehanded the contour of my folding stock over there Enviado desde mi iPhone utilizando Tapatalk
-
With the thing open, i cleaned the screw ports on the inside of the scope and the barrel front, and made a custom piece from a half pvc pipe to cover the charging slot just in case I'm not going for the full spring mod. Enviado desde mi iPhone utilizando Tapatalk
-
That happened yesterday afternoon. Then i put the thing in the freezer overnight as advice by humperdingle (thanks very much for the tip!) and this afternoon forced the two halves apart. It took a good deal of force and sometimes I though I was going to rip it. Finally it went out well. Those rubies guys don't pay attention to where the ugly orange paint goes, but when it comes to gluing... they known their job. Enviado desde mi iPhone utilizando Tapatalk
-
After that I went all crazy and carved out the charging handle slot. Don't know yet if I'm going to put a spring there or just a tube. But the slot looks just fine. I used the templates on the e11 blaster reference, but had to shorten the length accordingly to the shorter rubies tube. It starts and ends where it's supposed to do, keeping the right distance to the ejection port and the rear cup, and reduced the length in the medium. You can notice that I've also drilled a bunch of holes under the scope and the rail for later taking the excess plastic out. Enviado desde mi iPhone utilizando Tapatalk
-
Then I roughly rounded the handle to get it a smother aspect on the area. Enviado desde mi iPhone utilizando Tapatalk
-
Then I went to thinner the trigger guard part. The rubies has a very "heavy" piece there and makes the whole look too much like a toy. The plastic is very soft and this mod can be easily overdone. Take care with it. Very happy with it. I think that after repairing and sanding this will make a huge difference in the general aspect of the gun. Enviado desde mi iPhone utilizando Tapatalk
-
Then I armed myself with a dremel tool and went crazy all around making holes: The barrel Since I'm planning to open the blaster for inserting an inner barrel, I also went for the scope to see if I can fit some lenses or something there Also the barrel exit and the sights And the the folding stock to see if I can provide some kind of fake aluminum rod. Enviado desde mi iPhone utilizando Tapatalk
-
Also took away the D ring and the piece that holds it. I'm planning to do one better myself. Enviado desde mi iPhone utilizando Tapatalk
-
First I had to get rid of those hideous t-tracks of the cartoonish Star Wars rebels troopers. Nothing bad about them, but not the look I'm looking for here. For that, I marked all the t-tracks on both sides with a permanent marker using as a guide a piece of a tamiya kamoi masking tape, to get a consistent width for all of them (0,5 cm). After that, I sanded down them on my bench grinder. And now it has a much better look
-
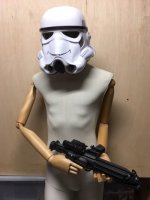
Let me introduce you all to "the Pal". My anovos armor will be displayed on him if I ever get the chance to start that build. On the meantime, I thought that a nice blaster would be great, but something not heavy, or expensive nor delicate. The Rubies e11 can be my answer. Enviado desde mi iPhone utilizando Tapatalk
-
Hello there.<br> While I take a break from my NN14 build I've decided to embark on a side project I've been thinking about for a time now.<br> Making my Rubies E11 look better. I think it's a good way to practice, cheap and can be taken to a higher level with some dedication.<br> I've been inspired by so many people here, just to mention a few, let's say:<br><br> Kawnr<br> <a data-ipb='nomediaparse' href='http://www.whitearmor.net/forum/topic/31747-kawnrs-rubies-e-11-conversion/?hl=%2Brubies+%2Be11'>http://www.whitearmor.net/forum/topic/31747-kawnrs-rubies-e-11-conversion/?hl=%2Brubies+%2Be11</a><br><br> Stratcat96<br> <a data-ipb='nomediaparse' href='http://www.whitearmor.net/forum/topic/36146-rubies-e-11-build/?hl=%20rubies%20%20e11'>http://www.whitearmor.net/forum/topic/36146-rubies-e-11-build/?hl=%20rubies%20%20e11</a><br><br> Humperdingle<br> <a data-ipb='nomediaparse' href='http://www.whitearmor.net/forum/topic/36146-rubies-e-11-build/?hl=%20rubies%20%20e11'>http://www.whitearmor.net/forum/topic/36146-rubies-e-11-build/?hl=%20rubies%20%20e11</a><br><br> AnjelRedemption<br> <a data-ipb='nomediaparse' href='http://www.whitearmor.net/forum/topic/31453-rubies-e-11-convertion/?hl=%2Brubies+%2Be11'>http://www.whitearmor.net/forum/topic/31453-rubies-e-11-convertion/?hl=%2Brubies+%2Be11</a><br><br> Astyanax<br> <a data-ipb='nomediaparse' href='http://www.whitearmor.net/forum/topic/31669-rubies-yet-again-astyanaxs-e11-conversion/?hl=%2Brubies+%2Be11#entry407652'>http://www.whitearmor.net/forum/topic/31669-rubies-yet-again-astyanaxs-e11-conversion/?hl=%2Brubies+%2Be11#entry407652</a><br><br> Order-66<br> <a data-ipb='nomediaparse' href='http://www.whitearmor.net/forum/topic/35039-my-addictive-e-11-build-1st-timer-possible-eibcenturion-approval/?hl=%2Brubies+%2Be11'>http://www.whitearmor.net/forum/topic/35039-my-addictive-e-11-build-1st-timer-possible-eibcenturion-approval/?hl=%2Brubies+%2Be11</a><br><br> BDWC<br> <a data-ipb='nomediaparse' href='http://www.whitearmor.net/forum/topic/36876-bdwcs-rubies-e-11-mod-wip/?hl=%2Brubies+%2Be11'>http://www.whitearmor.net/forum/topic/36876-bdwcs-rubies-e-11-mod-wip/?hl=%2Brubies+%2Be11</a><br><br> Hupspring<br> <a data-ipb='nomediaparse' href='http://www.whitearmor.net/forum/topic/31803-rubie%E2%80%99s-e11-blaster-test-build/?hl=%2Brubies+%2Be11'>http://www.whitearmor.net/forum/topic/31803-rubie’s-e11-blaster-test-build/?hl=%2Brubies+%2Be11</a><br><br> HappyTrooper<br> <a data-ipb='nomediaparse' href='http://www.whitearmor.net/forum/topic/37453-howto-customize-rubies-e-11-blaster/'>http://www.whitearmor.net/forum/topic/37453-howto-customize-rubies-e-11-blaster/</a><br><br> Although I'm taking great ideas from all of them, I'm making my way around this project.<br> Before all I would like to set down a couple of things. First: My main goal is to learn during the process, have fun with it and if possible, improve the toy a little. I'm not trying to make it perfect (I couldn't even if I tried), just to make it better. Second: I'm making all this without a previous plan and changing it as I go. Any feedback is welcome.
-

Rey's NN-14 blaster pistol child size from scratch
artimorty replied to artimorty's topic in Weapons of the First Order
Unfortunately, some splinters came loose here and there. Probably due to the soft wood used and how close are each cut to de next. Hopefully this can be solved with more putty now that the carving is done. Although this is only a partial succes I'm pretty happy how it's coming along. Better than expected. Thanks. Enviado desde mi iPhone utilizando Tapatalk -
Rey's NN-14 blaster pistol child size from scratch
artimorty replied to artimorty's topic in Weapons of the First Order
Detail on the carved lines... Enviado desde mi iPhone utilizando Tapatalk -
Rey's NN-14 blaster pistol child size from scratch
artimorty replied to artimorty's topic in Weapons of the First Order
Here a comparison between one done and the other. Enviado desde mi iPhone utilizando Tapatalk -
Rey's NN-14 blaster pistol child size from scratch
artimorty replied to artimorty's topic in Weapons of the First Order
So. Some progress done yesterday. After testing different saws and files on discarded pieces, those were the tools selected. The saw blade wasn't very flexible and allowed me cut over the marks fairly straight. The minifile is V shaped. Enviado desde mi iPhone utilizando Tapatalk -
Damm it! I went all crazy with your new thread that hit myself amazon and ordered one rubies e11 myself to follow along your build. Hope you don't mind...I guess you have already seen happytrooper's tutorial on the subject, but if you haven't let me dare to propose you visit his recent thread here with a link to his YouTube channel where he explains his modding. http://www.whitearmor.net/forum/topic/37453-howto-customize-rubies-e-11-blaster/ Thanks and keep us informed.
-
Ummm... strangely that "make sense". Thanks for sharing the tip.
-
Seriously? What's that for? Really curious about that!
-
Rey's NN-14 blaster pistol child size from scratch
artimorty replied to artimorty's topic in Weapons of the First Order
Once this is done and doble checked, carefully joined the marks on both sides using a stripe of a "for sale" plastic sign as a flexible ruler. It worked well. Next time I can, will start testing saws, wood files and different techniques on the discarded handles I left aside to see wich one suits better for the job. Thanks. Enviado desde mi iPhone utilizando Tapatalk