

Mutter
-
Posts
439 -
Joined
-
Last visited
Content Type
Profiles
Forums
Gallery
Articles
Everything posted by Mutter
-
TK-13058 Requesting ANH Stunt EIB Status [NE][443]
Mutter replied to Mutter's topic in Request Expert Infantry Status
OK, I replaced the two crotch snaps and the one side snap on the ab plate with nickel plated snaps. -
TK-13058 Requesting ANH Stunt EIB Status [NE][443]
Mutter replied to Mutter's topic in Request Expert Infantry Status
Thanks, guys. Steve (starsaber25), I see what you mean. They do face to the side but I can move the strapping on the forearms to rotate them a bit more. Hoping to add another Centurion too! Steve (Snaps), Forearm pic added. I'll remove the paint on the snaps. EDIT: I had placed the snaps in the biceps on the sides instead of the front. This turned the forearms 90 degrees outwards. Not sure how I missed it but thanks for pointing it out! I'll take new pics when the glue dries -
TK-13058 Requesting ANH Stunt EIB Status [NE][443]
Mutter replied to Mutter's topic in Request Expert Infantry Status
I know I need to: 1 - paint the latex hand guards and glue them on rubber chemical gloves (for Centurion) - DONE 2 - fix sniper plate/thigh overlap 3 - replace large ab button plate (aesthetics) - Glued and drying 4 - tighten up the ab/kidney plate join (for Centurion) Anything else I need to do? -
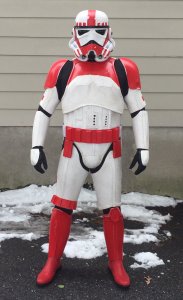
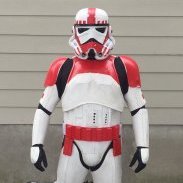
Name: Greg Babon TKID: 13058 Forum name: Mutter Garrison: Empire City Garrison Mandatory Information • Armor = NE • Helmet= NE • Blaster= DoopyDoos Optional • Height = 5’ 10†• Weight = 205 lbs. • Boots = Imperial • Canvas belt = Tkittel • Hand Plates = NE • Neck Seal = Darman • Holster = Darman Full Body Front Back Left - arm raised Right - arm raised Right detail (Side snap replaced) Left Detail Armor Details Forearms Abdomen Action Shot Cod/Butt plate (updated pic) Interior Strapping Helmet Details Front Sides Back Hovi Mic Tips Lens Color Blaster Details Blaster - Left Blaster - right Blaster - Rear Accessory Details Neck Seal Thermal Detonator Holster Attachment Updated to add more pictures: Drop Box Back Shoulder Bridges Thigh Pack Sniper Knee Plate Kidney Plate Notch S-Trim Flexible Hand Guards
-
TK13058 requesting access. http://www.501st.com/members/displaymemberdetails.php?userID=18221
-
Mutter's NE ANH Stunt Build
Mutter replied to Mutter's topic in Build Threads Requireing Maintenance
Ian, I'm glad my build thread was helpful. I've used an incredible number of others to guide me too. I've finished my build. I will need to make some adjustments as I move around more and remove a few bite points and adjust the strapping as well as add more padding behind the sniper plate. Pictures have been submitted and approved by my GML for membership. Waiting to hear from the Legion for a final nod and receive my TK ID. Here's how I look: Thank you, everyone, for all of the help and support your provided during my build. It was greatly appreciated! -
I'd recommend using E6000. Holds strong and easy to fix mistakes.
-
You look great, Walter! Outstanding job!
-
Mutter's NE ANH Stunt Build
Mutter replied to Mutter's topic in Build Threads Requireing Maintenance
So I haven't posted in a while but I've made quite a bit of progress. In the pics below, the thighs are not supported yet, the shins don't have a closure on the back and I hadn't widened the shoulder bells yet either. But here's the progress so far. I have the garter belt hooked up and supporting my thighs. I'm thinking I might need to trim the tops a bit to raise them. The backs are shoved in the crease between my buttocks and thighs. Thoughts? Opinions? Suggestions? -
That was some incredible work. Great job!
-
Mutter's NE ANH Stunt Build
Mutter replied to Mutter's topic in Build Threads Requireing Maintenance
Ty, shaky hands and painting fine lines don't go well together. There were a lot of touch-ups done, but I do appreciate the compliment! And thank you too, Scott! I've assembled the thighs and shins, added the sniper plate and began adding strapping. I'll add pictures as soon as I can. The belt is under progress now. I saw a thread somewhere that said the thickness of the drop boxes should be 12mm. Is this correct? Mine are 16mm and I need to know if I have to trim them down. -
This is so cool! Just picture fleets of x-wing and tie fighter drones battling in the open sky. http://hothardware.com/news/homemade-rc-millennium-falcon-is-the-drone-youre-looking-for
-
Mutter's NE ANH Stunt Build
Mutter replied to Mutter's topic in Build Threads Requireing Maintenance
Thanks, guys! Walter, you're a picture mad man, holy crap, talk about documenting your build. Nice! With the consensus on the shins, I moved forward with sizing. And the inside, front shims being glued I bought 50 magnets thinking that would be enough. Each magnet is doubled for extra pressing power. My advice to everyone out there, buy at least 100. I now have to wait 2-3 day to finish the shins before I can begin gluing the thighs. Sigh. So I went back to my bucket and decided to finish it. First off was to paint the teeth, cheeks and traps and the varcoder I realized I pretty much suck and hand painting. I waited until the paint was pretty dry to clean up the lines. A toothpick, paint thinner and a fine paint brush cleaned it up nicely. Then came hand painting the vent lines and outline trim on the rear traps and cheeks. Do NOT drink caffeine before doing this! I also added the blue stripes. These were not hand painted, I feel so ashamed And the helmet is finally done! -
Thanks guys, I'm going to reach out to the vendor. In the mean time, I'll prep this one just just in case.
-
I totally wasn't pay attention to what I was doing (damn SuperBowl!) and botched my ab button plate I assume this isn't salvageable. If not, does anyone sell replacement plates?
-
Mutter's NE ANH Stunt Build
Mutter replied to Mutter's topic in Build Threads Requireing Maintenance
Thanks for looking, Nick. I'll glue them together then! -
Mutter's NE ANH Stunt Build
Mutter replied to Mutter's topic in Build Threads Requireing Maintenance
I threw in the strapping for the butt, kidney and back plates this morning. I didn't want to wait for E6000 to cure so I used Zap-A-Gap to glue the snaps (made with ABS not webbing). It may have been how I used it but most of the snaps were popping off. Most came off the butt plate (no fat a$$ comments please ). I'm going to remove as many as I can and use E6000 instead and use it with the rest of the snaps. I also had to heat and reform the left shoulder tab on the back and chest piece. My left should is higher than my right and it hasn't been sitting properly. If sits great now. This is how it looked before reforming (again) My kidney plate seems to flare out a little more than the back plate on the left side, not so much on the right side. I haven't cut the kidney to size yet. Hopefully, this will resolve the flaring. If not, more heat gun. Thoughts? comments? -
Mutter's NE ANH Stunt Build
Mutter replied to Mutter's topic in Build Threads Requireing Maintenance
Oh, one other question. On NE armor, are there a left and a right shin or is it the same for both legs? I'm looking at these and it seems like I have 2 left shins. The "larger" piece belongs on the inside of the calf. Am I crazy? The tops of the shins are uneven. I would have assumed the low side would be on the outside and the high side would be on the inside (or vice versa) but I could be totally incorrect. -
Mutter's NE ANH Stunt Build
Mutter replied to Mutter's topic in Build Threads Requireing Maintenance
I spent some more time working on the armor this afternoon and cut the side returns on the back plate. I hadn't sanded the return on this one yet. I'm quite happy how they came out. Huge thanks to Nick (SCTrooper) who provided the guidance for the cut lines. They would not have come out as well if not for him. Now I'm working on the shins and strapping system. I'm hoping to provide an update again tomorrow. -
Mutter's NE ANH Stunt Build
Mutter replied to Mutter's topic in Build Threads Requireing Maintenance
Thanks, Anthony. I'm hoping to make the ECG proud of their new recruit Removing the curve in the shoulder tab made a world of difference in how the back plate fit and hugged my back. I highly recommend it! Thank you, Ron. I don't know about braver, perhaps more foolish or naive . As I said earlier, I probably wouldn't do it again. As I feared, because the butt plate was raised about 3/4 inch, the bottom of my butt is hanging out slightly (not a sight to see, trust me!). Oh well, I'll figure it out later. I have been wearing the undersuit each time I fit the armor. I take it off though when I'm working so it doesn't get cut or covered in plastic dust. I'm done now with the torso section until I get the strapping together for the exact reason you mentioned. Onto the shins. AND they have ridge lines, WOOHOO!!!! The left shoulder tab was lower. Thanks for pointing that out. I've addressed the issue via heat gun. Unfortunately, the shoulder tabs on the back plate don't reach as high as yours. The curve in your tabs fit nicely on your shoulders. Lucky! I guess my torso is a bit longer. I'm waiting to see how it all fits together once the strapping is in place then I'll take it from there. -
Mutter's NE ANH Stunt Build
Mutter replied to Mutter's topic in Build Threads Requireing Maintenance
You can notice in the pic above, that at the top of the back plate where it meets the chest plate at the shoulder, there is a bit too much of a curve and doesn't allow it to sit cleanly. Out came the trusty heat gun. Before After Before After Sits much better now The butt plate was also flaring out a bit on the sides. Used the heat gun on that too. That's it for today. Off to Tandy Leather for some supplies for my daughter's Jawa costume. -
Mutter's NE ANH Stunt Build
Mutter replied to Mutter's topic in Build Threads Requireing Maintenance
OK, so here is the new line I'm going to cut for the back plate. Removing some of the extra return edge should allow it to sit better on my back. You can see this in one of the below pics I'll make sure the return edge is even, it looks a little off to me. I did a dry fit on the armor made so far. Here are the pics (excuse the morning hair please ) So, what do you guys think? -
Mutter's NE ANH Stunt Build
Mutter replied to Mutter's topic in Build Threads Requireing Maintenance
I appreciate the compliment, Ty. Go for it! Thanks, Nick. I thought about trimming the lower portion of the ab instead and yes, it would have been a lot less work to do, but the notch in the kidney is suppose to align with the crease in the ab. I'm attempting to make this accurate but perhaps it's a case of new guy enthusiasm. Besides, it's all covered by the belt anyways. Next time, I'd probably go with trimming the ab instead. The red line you drew is very helpful. Looking at more reference pics/screen shots, the back does need to have that slight curve to it. Just to make sure, that's the cut line you drew, correct? -
Mutter's NE ANH Stunt Build
Mutter replied to Mutter's topic in Build Threads Requireing Maintenance
And I trimmed the butt piece I may need to uncurl this a bit, lol. It does look a little, um, say, extreme? That about wraps up my progress to date. As always, your feedback is eagerly welcomed. -
Mutter's NE ANH Stunt Build
Mutter replied to Mutter's topic in Build Threads Requireing Maintenance
The back plate has some "extra' curves and flares I'm not too fond of. My plan was to remove the areas that are shaded in pencil. The dotted lines represent where the new return edges would be placed.
