

bearings
-
Posts
354 -
Joined
-
Last visited
Content Type
Profiles
Forums
Gallery
Articles
Everything posted by bearings
-
I just did this myself, the material was called "headliner". It's kind of a foam like fabric, black on the good side and grey on the underside. I found it in the section with the bigger rolls of heavier materials.
-
Nope, no padding at all right now.. I'll see if I can work on improving my posture or shortening my neck I just finished re-doing my shin elastics, this time with size 3 hook-and-eyes instead of size 2. I had a hell of a time trying to get them on and off with size 2.. this should be better. I also think I'm going to make some inner elastic stirrups to keep my shins from popping off of my boots.
-
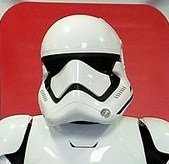
Yep, thanks for the heads up Q! I got a holster with black loops with my AP kit that I plan to use for the ESB version. Not yet, but I understand that ATA and TM might have them. I'm going to do my best to focus on the ANH build first, very close now! Speaking of that, my plan was to do the AP helmet in ESB style.. but I'm not sure the ATA helmet looks right on me with armor on. I guess I have a long neck, but I don't want to look like a bobble head if I can help it.. seems that the AP helmet looks better. Here are 2 pics for comparison, unpainted is AP and the painted one is ATA.
-
-
Next thing on my list was to finish up the sniper plate attachment. I recently discovered Sugru, which is stuff that you can mold like putty and then after 24 hours it cures into rubber. It sticks really well to ABS plastic too! So, I figured I'd jam some Sugru into the sniper plate gap to make it hold better. As you can see, I'm also getting my shin hooks glued in place today. Another great place I found to use Sugru is attaching the green lenses to the inside of the helmet. It's not pretty, but I think this will work!
-
Following roughly along with Pandatrooper's Neckseal tutorial (http://www.whitearmor.net/forum/topic/8402-howto-create-a-neckseal/) I bought some "headliner" material and through some trial and error, I ended up with an ok looking neck seal. I had to use some interfacing on the side parts, otherwise the inner material was too sticky to go through the machine without bunching up and getting weird. I cut a piece twice as tall as I needed, folded over at the top and sewed up the sides, then flipped the whole thing inside out to hide the interfacing. Lots of straight lines were sewed and then I attached to an old black t-shirt to create the bib.
-
I just sewed mine using several folds, so there are no raw edges visible. I don't think its a problem to have clean edges.
-
Today I finally started on my belt, using some white denim 4 layers thick + some interfacing for a little added regidity. Started with the correct length (48" x 12") cut out. Folded over so that there were 4 layers, 3" wide each. Ironed everything smooth. Watched my wife sew things. She let me sew on the velcro at least, all done with that part! Applied some heat to get a better natural bend. Attached snaps to connect to ab plate (also attached snaps to ab plate). Riveted cloth belt to plastic ammo belt. Currently have my rivet covers and drop boxes glued and curing. I ordered some extra parts from Mark/AP so that I can make a second belt, I want to be able to swap between ANH and ESB looks sorta easily. My AP helmet is still unpainted, so I think I'll end up going ESB style on that one. ESB decals are on the way from trooper bay. What's the best source for ESB style hand plates, since there aren't any available from AP?
-
Pretty crazy: http://www.abc.net.au/news/2015-01-15/star-wars-stormtrooper-scott-loxley-saved-from-snake-bite/6018338
-

Current list of EIB requirements
bearings replied to carcouette's topic in FISD Expert Infantry Badge (EIB) Requirements
Yep, missed the part about photo requirements. My bad, thanks for the link -
Current list of EIB requirements
bearings replied to carcouette's topic in FISD Expert Infantry Badge (EIB) Requirements
This should be what you're looking for, level 2 (EIB) requirements are in blue http://www.501st.com/databank/Costuming:FISD_CRL -
Ah, I see now why he wanted to update them! Very helpful, thanks
-
I'm totally happy with the one I got, but I'm curious about the new one and what it looks like. Any pics of that?
-
So, I wasn't super happy with my AP TD and was considering buying one from Troopermaster. Then I saw one in the for sale section and jumped on it! (Thanks Reza). I'll still finish the one that came with my AP kit, but man the TM one looks so much better.
-
It's pretty fun now that I have most of the right strapping in place, the forearm to bicep elastic and the "han hooks" really help keep things where they're supposed to be. I made a garter belt out of webbing and attached it to the thighs via black elastic, as per the originals as well (as far as I know!). I can move around most ways fairly easily, but bending over and looking down makes the chest hit my neck.
-
Yep! They'll get painted white and some covered by the belt as well. I like the original strapping so far, need to make some small adjustments in the elastic length on the kidney/butt so it's not so tight. I shortened them because they hung too low causing a big gap, but I think I might come back the other way just a little bit. Might need to adjust the kidney/back elastic as well to close that gap a little bit more. Thanks for all the feedback, let me know where if I goofed anything up!
-
I kind of have legs now, so time for some test fitting! Notes: Sniper plate isn't fully attached on the sides Boots need some paint on the fabric sides I don't have a belt yet or neck seal yet, but I bought fabric for both.. so that should be soon! Having a belt will help close up the gap on my side easily No shoulder bridges attached yet Shins aren't closed properly in the back Back/bottom of thighs need to be cut out a bit for comfort I'm wearing my ATA helmet in the pics, which has too much padding and seems slightly shorter than the AP one. Shouldn't look as weird with the AP helmet I hope! My AP helmet isn't painted yet. Thinking about loosening/lengthening the elastic on my shoulders to allow the back/chest to hang a bit lower.
-
Here's some more random progress photos.. waiting for E6000 to cure on my thighs and shins. Still haven't started on my belt or neck seal, which is going to be a limiting factor pretty soon.. so I guess I better go buy some fabric!
-
One more pic with some added PVC support inside: My dog totally freaked out at it, so I guess that means it's pretty scary and real looking
-
Updates from after the Thanksgiving break: Got my replacement mic tips from Keith, they're awesome: Started on strapping, here's a quick test fit with the shoulder/bicep/arms just loosely hanging with some tape. My left side was adjusted a little better than my right. My wife is pretty patient and helpful, but I wanted to be able to test fit things more quickly without waiting for her.. so I had her wrap me in duct tape to make a mannequin instead Which looks like this right now, I want to add in some more support structure. It stands on it's own without armor, but not with armor:
-
Looks awesome!
-
Yes, I'm just brave/stupid enough to Dremel the heck out of my kit What's the inner diameter of your pipe kits? Maybe I'll use that for my next build if I can more easily hide things in the barrel!
-
The sound board I'm using requires no code, so it's got some limitations. Basically it will play a sound based on what button/pin was pressed and the file name. So, the wav/ogg for pin #0 is "T00.wav". For Pin 1, it would be "T01.wav".. and so on up to "T10.wav". You just name the files based on what button you want to associate it with. For a different sound when holding the button down for longer periods, you can have a file named "T00HOLDL.wav". If you want to loop through a sequence of sounds on subsequent button presses, you name the files like "T00NEXT0.wav", "T00NEXT1.wav", ... "T00NEXT9.wav". Another option is to play a random sound on each button press, where you name the files like "T00RAND0.wav", "T00RAND1.wav", ... "T00RAND9.wav". Since the sounds are based on which pin/button are pressed, maybe I could find some kind of rotary/toggle thing to switch what pin the trigger button is connected to.. but outside of that I don't think it's easy to do with this board. I'll document the whole thing so you guys can see how it all comes together.. maybe after I'm done with this and my armor I'll do a more advanced build like I was originally planning.
-
Small update on my E11 build, I was out of town for a bit and then my armor arrived.. so I've been neglecting it. I'm using this type of switch for the trigger, it seems to work pretty well. I used a small piece of wire for the trigger pin, but the switch itself is the "spring" mechanism. I've included a spare one in the photo so you can see what it looks like on the inside, behind the trigger. Finally, I'm using an even newer version of the sound board I linked to before.. this one has an amplifier built in, so it saves even more space! They come in 2 MB and 16 MB sizes, I went with 2 MB.. should be more than enough: http://www.adafruit.com/products/2210 Basically add in a LiPoly battery and this is the whole setup. I'll probably add some kind of LED at the barrel end... unsure.
-
My MTK build thread.( ANH Stunt)
bearings replied to Polar's topic in Build Threads Requireing Maintenance
I've definitely thought about taking a "sick" day a few times! How's the trimming going?
