

bpoodoo
-
Posts
175 -
Joined
-
Last visited
Content Type
Profiles
Forums
Gallery
Articles
Everything posted by bpoodoo
-
Well, I wouldn't put it past Ben, that strange old hermit, to invoke irony at a most inappropriate time. He just may have been miffed that he wasn't invited to the barbeque over at Owen and Beru's.
-
I see what you're saying pandatrooper. I'd installed mine with the ends more flush and not pushing against each other. Leaving that extra bit of length creates compression along the length of the s-trim and causes it to push out on the edge of the helmet helping to keep it in place. I found i could push the together my s-trim about an extra 1 inch under moderate pressure. From leftover s-trim scraps I've put in a spacer of that length. It seems more stable now and less likely to fall out if the helmet is flexed or if the s-trim is nudged. Of course too much compression could run a risk of the s-trim bowing or popping out. Build experience certainly comes into play to know how much is the right amount. But I'll give this a try and see if it works for my helmet. Thanks!
-
Ah, thanks for the pointer. I've conducted some business with troopermaster recently. Definitely first class quality and service.
-
When taking the helmet on or off you should turn your head 90 degrees where you helmet is wider. Installing a chin strap will help keep the bottom front of the helmet from hitting your neck. I'd recommend the trooperbay chin strap / foam pad combo for both comfort and bobblehead avoidance.
-
I have a painted HDPE helmet with a Trooperbay s-trim (about 1 cm wide) which does not stay on. I have an ABS helmet (SDS Battle Spec) which came with a larger s-trim (about 2 cm wide) which stays on with no adhesive. On this one item, it could be that AA actually got it right. Trooperbay on left; SDS on right: The Trooperbay S-trim is flimsier while the SDS S-trim is stiffer: When installed, the SDS trim doesn't touch at the cut ends, so it's not just the pressure around the trim that keeps it in place. Keeping it in place are several factors which not all S-trim and helmet combinations will have. It essentially comes down to force and friction. Greater stiffness in the S-trim means it will push against the outside of the helmet more as it is fitted around the helmet thereby holding it in place more firmly. Greater stiffness also means greater force between the surfaces, especially when making vertical turns in the undercut, which increases friction keeping it from slipping. And a wider trim provides a more secure fit against the helmet edge. I suspect silicone is slicker than rubber on s-trim, and I know painted or HDPE surfaces are slicker than ABS. Slicker surfaces = less friction. Flimsier S-trim = less force = less friction. Less friction = need adhesive. I suspect going to a 2cm wide rubber S-trim would provide an adhesive-free option for many, if we could find a supplier.
-
My First Armor Build Thread ANH-S CAP Armor.
bpoodoo replied to Stormy1992's topic in Build Threads Requireing Maintenance
Congrats on completing your build, and I hope your approval goes smoothly. Did you end up separating the cod/ab plate or did you leave it as a single piece? -
Bubble lenses are hard to find. I was recently trying to "heroize" one of my helmets and came up with a cheap homemade option. It won't look all that great, but for a play helmet should be fine. You'll need a 2-liter plastic bottle of 7-up or Seagrams Ginger Ale (anything green). Near the bottom you will find areas to cut that mimic the curvature of the lens you'd want. Be mindful that the edges of the plastic you cut can be sharp. I'd suggest taping / securing it to the inside of the helmet rather than the outside. Here's what it looked like on one side of my Classic Action stormtrooper, similar in design to the standard helmet you have. (Its left lens popped off and I haven't glued it back on yet): Alternatively, you could go with a flat lens available from trooperbay which would look something like this: But please do both eyes the same way, not mixed-and-matched like I have shown
-
My First Armor Build Thread ANH-S CAP Armor.
bpoodoo replied to Stormy1992's topic in Build Threads Requireing Maintenance
So that's what an Ewok would look like in a stormtrooper costume! Hey that's cool mom was game to try it on. Though you might have her check the CRL regarding the shoes. Sent from my iPhone using Tapatalk -
Yes I'm getting chips also at the end of the brow trim plus near the right mic tip ( below and to the side ) which is usually where I grab it to pick it up. I touch it up occasionally with a sponge brush spray-painted with a bit of the base white, blotting at the chipped spots. Sent from my iPhone using Tapatalk
-
Looking good! You've completed what I found the toughest part of the detail painting (tube stripes). Have fun finishing up this nice helmet.
-
Helmet make? Also where to get replacement ears
bpoodoo replied to Dark_Trooper's topic in Hard Armor (General Discussion)
I recently built this helmet and yes the ears are tricky. You might want to request a couple of pairs (one for practice and one for the helmet). These ears are molded from the DavidM or Set for Stun helmet. But the tubes on this helmet are not as wide as the Set for Stun helmet. For this reason the ears may need to be wider than what you'd expect. If you cut along the mold line of the ear you may overtrim. The contour of the helmet where you will attach the ears essentially defines how the ear needs to be trimmed. Based on my experience with ear trimming I wrote this How To you might want to check out: http://www.whitearmor.net/forum/index.php?/topic/27375-HOWTO%3A-Draw-an-approximate-ear-trim-line-with-no-gaps Sent from my iPhone using Tapatalk -
GF Type 2 (derived)?
-
$80 would be a too-good-to-be-true price even for a Rubies. And it is. This and similar listings from China were ebay scams. Check the recent negative reviews. The seller apparently front-loaded all positive reviews with small sales and then attempted to perpetrate this scam selling lots of nonexistent costumes before the negative reviews came in.
-
Dan laws white HDPE helmet build
bpoodoo replied to bpoodoo's topic in Build Threads Requireing Maintenance
Thanks guys - I appreciate your comments and suggestions for improvement. I will admit to liking a shiny look for TKs. I've exaggerated the shine by my choice of lighting and angle in most of the pictures I've taken. Under ambient light the shine isn't as great (such as the next 3 pictures). I did try a wet sand using gray scotch brite on a small spot and it did work to remove the gloss but converted it essentially into a matte finish. But that's not really the look I want. As my painting / sanding skills are beginner level, I'm not sure I could finesse the sanding into just reducing some of the shine. While the CRL doesn't require the rank bars on the ears as a basic requirement, that's not a reason to leave them off - especially if they are present on all on the screen used helmets. It's so easy to add anyway. Thanks for suggesting I do it. I gave the guy one rank bar at the rear of each ear. <fan fiction> The real reason this trooper didn't have an ear rank bar is because a long time ago he was stripped of all rank after letting go a couple of droids the Empire was looking for on Tatooine. I'm happy to report that now under the Republic's Hire-A-Trooper program, this trooper has a new job. In consideration of his lengthy and loyal time served under the Empire, he has been placed in a very high level position. Starting today, his rank has been reinstated, and he will be assigned Head of Personal Security for Senator Jar-Jar Binks Jr. <fan fiction> -
Dan laws white HDPE helmet build
bpoodoo replied to bpoodoo's topic in Build Threads Requireing Maintenance
Well, never say "final pics". The thickness of the right ear (as you wear it) was really bugging me. WIth a bit more confidence in drawing an ear trim line, I trimmed it down just a few millimeters. I couldn't go much thinner without running out of ear in the circular part at the top. But now I can sleep at night -
HOWTO: Draw an approximate ear trim line with no gaps
bpoodoo replied to bpoodoo's topic in Tutorials, Tips and HOWTOs
Good call on using a compass I had to give it a try. I found my old engineering drawing set which also had a compass with removable pin. When I used it the trim line traces tightened up nicely. -
HOWTO: Draw an approximate ear trim line with no gaps
bpoodoo replied to bpoodoo's topic in Tutorials, Tips and HOWTOs
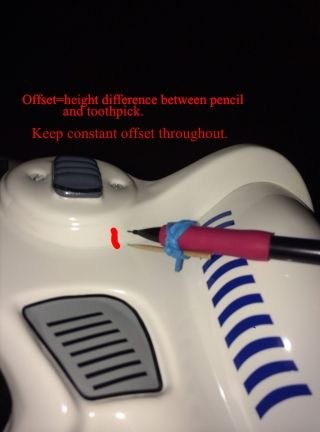
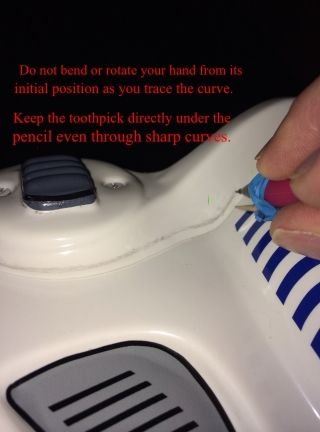
Here's a quick example with an untrimmed ear. The ear should be placed level with how it will lay on the helmet. For that I used some non-stick putty. The offset between pencil and toothpick will be greater since the ear is higher, but otherwise the procedure is the same. And again, this technique is not a "one and done" method. It gives an approximate trim line only. It's always a good idea to go with a thicker ear cut initially. The helmet contour will change a bit when the ear is installed with screws, and precision cutting and/or sanding will still be needed. I traced this several times, and as you can see there is plenty of variance. Lots of sources of error including the toothpick moving, not keeping it directly under the pencil, and my hand changing angle. It would be great to see suggestions how to tighten this up and reduce these correctable sources of error (for example, place the pencil and toothpick on a clamp to ensure the offset remains fixed). -
HOWTO: Draw an approximate ear trim line with no gaps
bpoodoo replied to bpoodoo's topic in Tutorials, Tips and HOWTOs
Yeah it looks too easy when the ear is already trimmed... But the technique works for untrimmed also. I have one set of untrimmed ears. I can add pictures showing how the ear trim line would be drawn for those; I agree that would be more relevant. Sent from my iPhone using Tapatalk -
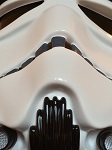
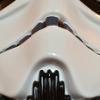
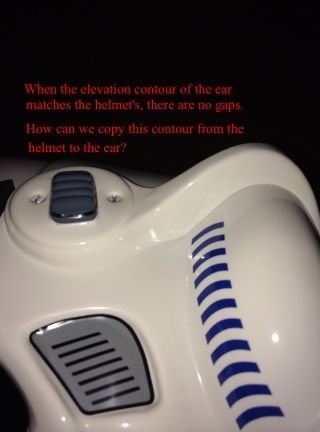
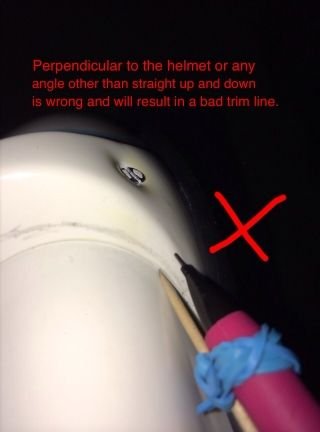
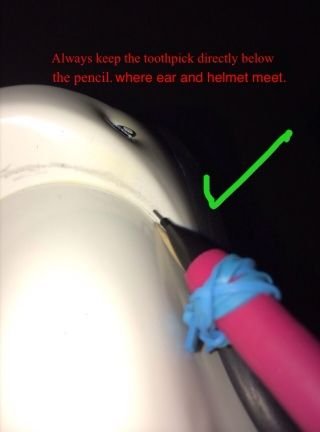
Those darned ears. I've overtrimmed my share and had to start with new ones a number of times. Cutting along the mold line how the ears were trimmed originally may not be the correct line. A beginner's error is just to trim a fixed amount relative to the outside of the ear for a consistent thickness. This often results in overtrimming. (The outside of the ear actually plays no part in determining the appropriate trim line except for determining how much ear you have to work with.) And once you've overtrimmed in just one section, you either live with the gap or buy new ears. As I thought more about what makes a proper ear trim line I realized it's not a trait of the ear, it's a trait of the helmet. It's the width contour of the helmet along the points where the edges of the ear touch the helmet that defines the ear trim curve for no gaps. The trick is how to copy this contour onto the ear. Here I show a simple method for creating what should be a gap-free trim line, using a pencil, a toothpick, and a rubber band. In my trials with this method, it usually gets within +/- 2mm or so around front and back of the desired trim line; it's not perfectly accurate. Some additional fine cutting or sanding is also needed to finish the trim. As a minimum, this technique can be used to get a general idea of what the trim line should look like and to show where the various inflection points are, and where the sections are such that if you trim too aggressively there, you may run out of ear elsewhere. I show an example where I'm using an ear already on a helmet for which I may want to reduce its thickness, but the same technique can be done a new untrimmed ear. The prerequisites are that the helmet's faceplate and cap-and-back have been assembled together and that you've decided where the ear will be placed on the helmet to establish the location where the ear's bottom edges will meet the helmet. The untrimmed ear then needs to be held or secured level in that location on the helmet as the front and back contour lines are traced. While I only show the front half of the ear in these pictures, it's necessary to trace the helmet contour on the entire ear, front and back, using the same vertical offset throughout.


-
Dyeing My Deer Stags Nolitas White
bpoodoo replied to Grimez's topic in Build Threads Requireing Maintenance
I bought the Tulip dimensional paint for fabric and I'm wondering whether it's a good choice. Dimensional paint as I understand it is designed to expand as it dries, and that could be what's causing the raised paint lines in the elastic. I noticed that someone else didn't use special fabric paint and instead just used the same white leather paint as was used on the rest of the shoe with good results. -
My First Armor Build Thread ANH-S CAP Armor.
bpoodoo replied to Stormy1992's topic in Build Threads Requireing Maintenance
Looking good! And it's the correct color (black) for the bicep strap. You'd asked about whether to cut the cod part from the ab piece. Very few of the EIB applicants do. On one it caused the belt to sag in front. Some advise waiting til the end to see how things fit and only cut it then if fit absolutely requires it. Sent from my iPhone using Tapatalk -
My First Armor Build Thread ANH-S CAP Armor.
bpoodoo replied to Stormy1992's topic in Build Threads Requireing Maintenance
Tkboots.com is sold out and I hear has a waiting list. That's pretty much why so many are getting black boots nowadays. (Wow I didn't write a novel!) Sent from my iPhone using Tapatalk -
My First Armor Build Thread ANH-S CAP Armor.
bpoodoo replied to Stormy1992's topic in Build Threads Requireing Maintenance
Regarding the canvas belt, yes they are thick. And there's a CRL item for that! "The soft belt proper is made of canvas, or material with a canvas covering. Size must be 2.75†(70 mm) to 3.25â€(83 mm) wide and not wider than the plastic portion of the belt. The color is be white to off-white." White leather boots that meet requirements are hard to find, and if you can they can be pricey. Many are buying black boots expected to meet CRL requirements and painting them white. There are several build threads just for the boots how to do this. Expect to pay $55-$80 for the black boots plus another $20 or so for supplies to paint them white (deglazing, white leather paint, white fabric paint, acrylic finisher, brushes). I just got some black Bass Amsterdams from amazon.com for $65 which is on the approved list at least to pass basic requirement per this thread: http://www.whitearmor.net/forum/topic/24742-trooper-boots-a-list-of-suitable-candidates/ On the holster, be sure you get the right variant for your build (ANH). And install it on the correct side the correct way. I purchased preowned armor last week (my first set) and will be figuring out how to correct two CRL basic ANH deficiencies: holster being on the wrong side with loops... and the elastic being the wrong color under the bicep (should be black for ANH). Or, I may transform this from ANH to ESB by getting some clam shell hand plates and build this CAP helmet kit sitting in a box beside me as ESB. I love an excuse to build a new bucket! -
My First Armor Build Thread ANH-S CAP Armor.
bpoodoo replied to Stormy1992's topic in Build Threads Requireing Maintenance
Looking good! Get this man some butter cause he's on a roll ! You asked in an earlier message for a link to the CRL. Here's the one for ANH Stunt: http://www.501st.com/databank/Costuming:TK_anh_stunt. If you're using a browser there are links on the left hand side of the Home page to these CRLs under "Film Canon CRLs" and at the top "Costume Requirements". However, using Tapatalk neither of these sections appear. These are so important I really think a Stickie ought to be added under the Recruits Getting Started - Read this First section which highlights the significance of the CRL with links to them. It's important early on for a recruit (myself included) to be able to understand and distinguish between what is a requirement for approval and what is unspecified (not in the CRL). -
AlderaanDroids - My RS Build
bpoodoo replied to AlderaanDroids's topic in Build Threads Requireing Maintenance
Sounds like the Deer Stags were a good choice. I ordered a pair of Bass Amsterdams that should arrive tomorrow. It was a coin flip between the two.