

bpoodoo
-
Posts
175 -
Joined
-
Last visited
Content Type
Profiles
Forums
Gallery
Articles
Everything posted by bpoodoo
-
Anovos ANH TK Helmet only $100.00 USD.
bpoodoo replied to PGHtrooper21's topic in Hard Armor (General Discussion)
FYI I submitted a customer support request to Anovos asking whether the Hovi Mic tips and brow trim are included in the helmet kit. They are: 05/31/2015 10:48 am Joe Beaudoin Yes, the mic tips and brow trim are included. -
Anovos ANH TK Helmet only $100.00 USD.
bpoodoo replied to PGHtrooper21's topic in Hard Armor (General Discussion)
Here is a screenshot from ANH that does show one example of a TD helmet with a slight droop on the back left side (the trooper on the far right). It could be due to slipping of the S-trim or how it was trimmed. -
Anovos ANH TK Helmet only $100.00 USD.
bpoodoo replied to PGHtrooper21's topic in Hard Armor (General Discussion)
Indeed every on-screen helmet will have idiosyncrasies that make each one unique. From "battle damage" dents nicks and scrapes, to differences in trimming assembly and painting, and I believe even how each helmet piece was pulled from the buck (sometimes pryed or or even cut) which could alter the shape a bit. A couple of things I see missing from the kit components are the brow trim and the Hovi Mic tips. I presume these are inadvertent omission's but if not it could raise the price to the buyer by about $30 to get those parts. If I read that right decals for ear details and frown? That's something novel. But I suspect many who would get the kit would end up painting the details if going for a more accurate ANH bucket. -
White paint of screen used helmets
bpoodoo replied to Sonnenschein's topic in Assembly, Mods, and Painting
Rustoleum sells a "Specialty Appliance Epoxy Paint" in various colors including white. It is an "ultra-hard moisture-resistant enamel...for indoor appliances with metal surfaces". But an ultra-hard paint would not work well on HDPE since when it flexes the paint would crack. Which of course we know the screen helmets' paint did . But would I be correct that "appliance white" in the context of this thread is defining the color shade and not that it's a paint intended particularly for appliances? -
Dan Laws ANH "Move Along" Trooper WIP
bpoodoo replied to BobasBounty's topic in ANH (Stunt and Hero)
My first try painting a white HDPE helmet, I used a Rustoleum Primer for Plastic followed by Krylon Paint for Plastic. I didn't get good results with the Krylon; the spray splattered, the paint rippled, and tended to run easily. It may have been a bad can or a consequence of mixing brands with incompatible ingredients; I'm sure it wasn't the lack of skills of the painter . But a good thing was the paint was easily removed so I could start over, using the combination of adhesion promoter followed by gloss protective enamel, the same as I did the for the beige helmet shown below. For the painted helmet here I used Rustoleum Adhesion Promoter in 2 light coats followed within 10 minutes by 1 light coat of Rustoleum Gloss Protective Enamel and about 10 minutes later another light coat of the Enamel. If the paint coats are applied too close together the gloss look is reduced (thinners in the paint not allowed sufficient time to evaporate, so I read), I found that this paint gave the best long term results in terms of adhesion and look than either of the other two shown even though they were specifically formulated for plastics. Lower left is 1 day after painting; lower right is the "finished" helmet 1 month later. This I hope is useful to see the gloss level, color, and overall look of using this particular paint. To me the gloss and color is very close to an unpainted ABS helmet. ------ And this is after 2 months when I decided I wanted to change the assembly and reposition the ear. This is what can happen if you don't paint the faceplate and cap&back separately. Lesson learned! I've since retrimmed and repainted it, noting also what you saw inside the ESB patch helmet. I was bewildered by that picture, and still am to a degree, wondering what is that upside-down V trim near the top of the ear. It almost looks like a notch to assist in connecting the faceplate and dome at that point. ----- One additional note - the adhesion promoter can only be applied to the plastic and can't be applied to paint. I tried it anyway to see what it does on a test piece, and sure enough the paint curled up after applying the adhesion promoter on top of it. Anyway, good luck with the painting. Looking forward to seeing the results! -
Dan Laws ANH "Move Along" Trooper WIP
bpoodoo replied to BobasBounty's topic in ANH (Stunt and Hero)
Excellent work! I've got a couple of Dan Laws kits I've been sitting on for a while as I contemplate which screen helmets to mimic. Some complain that the DL helmet is too wide, but I think it's just a matter of how you orient the pairing of the faceplate to the dome as you have done here to recreate the Move Along look. It takes some fiddling to get it to look just how you want (trust me, I've spent hours doing it - and it's fun actually). One of the good traits of HDPE is its flexibility and not needing to be concerned about it cracking the plastic it as you might with harder plastics if you apply stress in your assembly to coerce it into the shape you want. I've implemented subtle shape change by having the ears stretch or compress the tubes to be higher or flatter. I've also applied a removable spacer held in place by velcro at the seam between the faceplate and dome behind the forehead to increase the height/width ratio in the front view. How did you accomplish your shape changes to this helmet, and what will be your paint / paint technique? I'm using spray adhesion promoter followed by Rustoleum Protective Enamel. I find this basic Rustoleum topcoat works better than some of the paints specifically made for plastic in terms of uniformity and adhesion. -
First Build. A lot of Questions...
bpoodoo replied to #RaveTrooper's topic in Build Threads Requireing Maintenance
If you do find that you have a large gap between faceplate and cap&back you might be able to use the bottom of the ear as a "bridge" between them. http://www.whitearmor.net/forum/index.php?/topic/22532-Adhesive-for-%27S%27-neck-trim/page__view__findpost__p__354993 -
ANOVOS posted this FAQ about this item on their web site: http://www.anovos.com/pages/classic-stormtrooper-faqs
-
From "Move Along" to "Braaaaaaains!" Reminds me of another character. You should name him Gus
-
FYI when you see numbers for plastic thickness like .09 etc. that's typically in inches. I presume that's what AVONOS meant, not 0.9. To convert inches to millimeters multiply by 25.4: 0.09 in X 2.54 cm/in X 10 mm/cm = 2.286 mm The original ABS armor, according to starwarshelmets.com, was 1.5 mm. Thicker plastic is harder and stronger, but thinner has the advantage of showing more detail and sharper edges, if those details are also present in the mold.
-
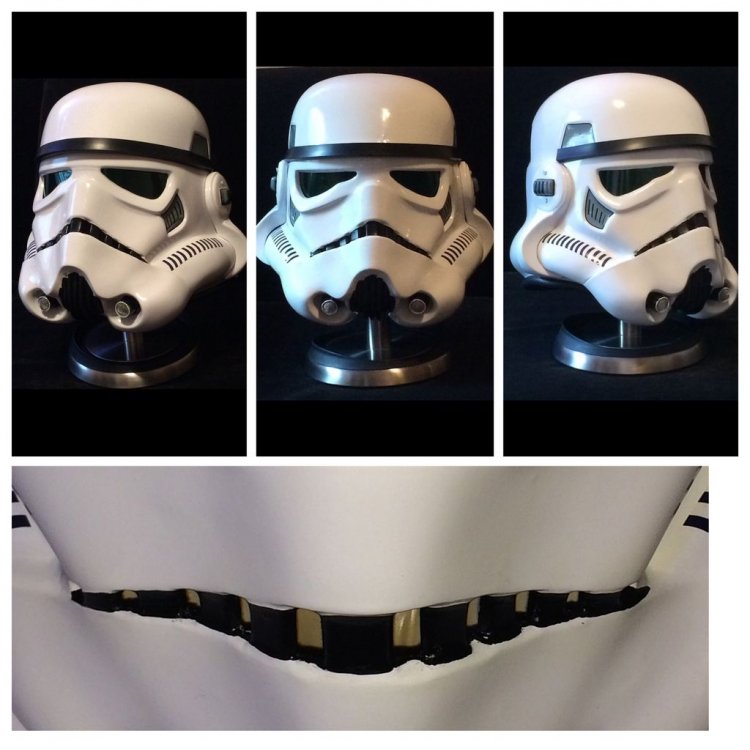
I'm glad to see what appears to be a reasonably accurate stormtrooper costume from a licensed vendor. Put the Rubies days behind us please! If you're going to C7 and AVONOS does show this in Anaheim, take lots of pictures!!! I'm in on the $350 preorder as well. This duration of this initial lowest-priced tier is longer than for other AVONOS products, which tells me they want and expect a lot of orders. I've been mulling over the possible reasons for the relatively low price. Speculation abounds, and here's mine: 1) To generate momentum for AVONOS as an approvable 501st licensed costuming vendor 2) To undercut RS and displace at least some of their #1 market share (and not by revisiting copyright enforcement) 3) To generate capital for ramping up production capability of thermoformed ABS costumes. And relating to 3), I would not be surprised if within days after the opening of The Force Awakens that AVONOS offers ready-to-ship Ep VII stormtrooper costumes. There will surely be high demand for it. Reasons for concern: 1) While I suspect it would meet basic CRL requirements, we won't know for sure until it's in-hand and submitted for approval. 2) Why is the helmet only being provided in completed form and not as a kit? It could be that parts of it are constructed in a nonstandard way. If the design is optimized for production (something like the MRCE / eFx PCR helmets), then modifying/customizing the helmet may be difficult. Is it 2-piece? 3-piece? Can the faceplate/cap&back assembly be adjusted? The trim at the bottom doesn't look like S-trim, and if it's like MRCE/eFx PCR it and the brow trim may be glued on. 3) Risk in pre-ordering. Even though the $350 is refundable up until it ships, your credit card is charged upon ordering. We may not even see the final version until it ships. For example, the AVONOS site still shows prototype pics of Darth Vader with shipping scheduled to commence next month.
-
Boomer's Bucket Build (ATA)
bpoodoo replied to boomer75's topic in Build Threads Requireing Maintenance
Finished helmet looks very nice. Great job! Thanks for the details of your process for the tube stripes. I've only used Humbrol paint for the tube stripes and kept a toothpick in the tinlet to stir it every few minutes. I still got bleed through using Trooperbay templates (I had first painting a base white as suggested in a TIP/HOWTO topic). But nothing a bit of cleanup couldn't fix. Humbrol taking longer to set may have the disadvantage of tending to run a bit more compared to using Testor. -
Boomer's Bucket Build (ATA)
bpoodoo replied to boomer75's topic in Build Threads Requireing Maintenance
Ah hah thanks for describing your technique. I had been painting the gray area first then the black outline. But I had some trouble keeping the outline thickness consistent. I now get it why painting the rough black outline first makes it easier. You only have to pay attention to the outside path of the paint stroke for both the gray and black. Thanks! -
Boomer's Bucket Build (ATA)
bpoodoo replied to boomer75's topic in Build Threads Requireing Maintenance
Nice job on the detailing. You definitely have a steady hand. The black outlines and lines within the tears and traps are superb and especially impressive if done freehand. Do you recall what size paintbrush you used for them? -
SDS Battle spec armour and paint.
bpoodoo replied to tomnewdelhi's topic in Assembly, Mods, and Painting
I don't think painting your helmet on the inside affects the outside look at all, assuming there's no light source inside the helmet. Painting black on the inside is just for the look of the inside. I'd be very hesitant about using a lacquer coat to shine ABS. From what I've read there's a possibility that at least lacquer thinner which may be in the paint can cause ABS to melt or go brittle over time. A better alternative to shine ABS would be to use a plastic polish like NOVUS. -
For stunt I've seen more examples of the S-Trim just below the ear, not overlapping onto it. In my experience the S-trim stays in place better when just below the ear. It looks like you're matching the SFS screen helmet in this build; the best photos I've seen close-up of it are at http://www.starwarshelmets.com/original-ANH-Stunt-Stormtrooper-armor-helmets.htm
-
SDS Battle spec armour and paint.
bpoodoo replied to tomnewdelhi's topic in Assembly, Mods, and Painting
1, does the paint affect adhesion for things like velcro pads etc? (the finish is slightly textured) Yes, it can reduce adhesion. The "peel off" side of the velcro should be placed onto a smooth surface ideally. Textured or rubbery is not ideal. -
Looks nice! I've been looking forward to your updates. This could be how SFS looked before the princess blasted him Leaving the bottom untrimmed til the last part of the build is a good idea. Trim only what's necessary when it's necessary a good rule of thumb in my book. By doing so you can ensure there's sufficient material below each ear to allow a good fit for the S-trim (assuming you do not choose to overlap the bottom of the ear with the S-trim). And you can leave plenty of undercut, trimming just enough to be able to comfortably take the helmet on and off. After trimming be sure to leave about an inch extra length on the S-trim so that the tension will keep it in place. Have fun at celebration 2015!
-
Boomer's Bucket Build (ATA)
bpoodoo replied to boomer75's topic in Build Threads Requireing Maintenance
I believe satin black. Definitely for ESB and preferred for ANH. See http://www.whitearmor.net/forum/topic/29696-vocoder-paint/ -
Adding a chin strap in addition to the padding could work. From my experience the chin strap will tend to rotate the helmet forward a bit such that even with padding you should be able to retain your sight line through the lenses. The chin strap will pull your chin diagonally towards the top rear of the helmet. If you have padding already, you can simulate what the chin strap would do by pushing from the top rear of the helmet down and forward toward your chin.
-
Thanks for the replies gentlemen. I want to be sure it will be OK. I will remove the black paint between the teeth such that it's like ANH frown except painted black (I'm using Humbrol 85). I'm curious whether it will change the look. If I don't notice the black now between the teeth, then it shouldn't look different. On the other hand, perhaps the reason I don't notice it is because it's black. Time to break out the mineral spirits and lint-free cloth!
-
Sure here's a pic. From a distance and from normal viewing angles it's not noticeable. It is visible from closeup high or low vertical angles. It's not the broad ROTJ-style, but it's not strictly ANH-style either.
-
A striking and distinguishing trait an ESB helmet has compared to the ANH helmet is the ESB's black frown. Visually it matches the more silent, ominous, strictly-business attitude of the ESB troopers. I'm working on my first ESB helmet, and I wanted to be sure to highlight this feature, but I may have overdone it and violated the CRL for tk_esb which states: "Frown is painted black and does not leave the teeth area." I painted not just the teeth black but also some in the area between the teeth too, typically starting at a depth halfway behind the front of the tooth line to the back. Each tooth still appears distinct, and the frown area is darkened more generally, without using a frown mesh. The screen-used "patch" helmet has some black paint between the teeth on its left bottom side of the frown: http://www.whitearmor.net/forum/gallery/image/2030-2020-0001c/ Am I interpreting the CRL correctly that the space between the teeth is not part of the "teeth area" and therefore not allowed for basic approval? Not trying to stir up a CRL debate, but would like clarification. Thanks! B. Poodoo
-
Did I trim the opening of my helmet too much?
bpoodoo replied to XiliX's topic in Assembly, Mods, and Painting
You will find screen-used helmets where the bottom of the ear is within the S-trim and where it is above it, so either is fine. Be sure you leave the S-trim a bit longer than the circumference of the opening (perhaps 1 inch) to allow compression force to help keep it in place. -
Was it just the difference in lighting?
bpoodoo replied to BoomerTrooper's topic in Build Threads Requireing Maintenance
The ESB CRL does have an allowance for the color to be ANH gray or slightly bluer than ANH gray. Whichever you choose, be sure the paint color you use on the ears matches those of the decals.

