

bpoodoo
-
Posts
175 -
Joined
-
Last visited
Content Type
Profiles
Forums
Gallery
Articles
Everything posted by bpoodoo
-
Thanks Steve for the lead regarding Gas Pump Heaven. It's priced $2/ft. I purchased 12 ft for $24 plus $7.06 for actual postage cost. So for $31 I have enough S-trim for 5 helmets ($6.20 per helmet not bad!). It's the standard S-trim you find in most kits (1 cm wide) not the larger RS style S-trim.
-
Always great to have a tutorial contributed by an experienced builder to help out us newbies - thanks Steve! The tracing methods using a compass, armature wire, or toothpick-pencil-and-rubber-band work, but at some point you still need to be able to fine tune using the essential "trim where it touches" technique. I've learned that the rotation, as well as the position, of the ear is important to get the desired look. For example, if the ear is oriented such that it leans in slightly from bottom to top, while it may be gap-free, it can result in a thick ear at the bottom. This can be fixed (or avoided) by rotating the top of the ear straight up-and-down or even outwards slightly so that the bottom of the ear can be angled inwards and trimmed more aggressively. This is particularly effective when the top part of the ear is already trimmed as much as you want it to be. Left photo: Initial trim Center photo: Screen capture reference Right photo: Adjusted trim after rotating ear
-
My 2mm TM Hero helmet build 8/2014
bpoodoo replied to DarSec's topic in Build Threads Requireing Maintenance
Yes leaving the helmet assembled you definitely would need to take off the brow trim to paint the front traps. But assembled or unassembled, whichever you feel gives you more control and stability. I left mine assembled and typically had it on an elevated stand (a paper towel holder) so I could easily rotate and angle the helmet. I held the helmet steady with my left hand and painted with my right hand. For the lines in the rear traps and in the tears you might consider using templates available from trooperbay. Though they were a little messy, that's what I used and they helped get the job done. Be sure to have a good set of detail paint brushes which includes the thin 00, 0, 1 sizes. -
My 2mm TM Hero helmet build 8/2014
bpoodoo replied to DarSec's topic in Build Threads Requireing Maintenance
I must admit I suffer from the same affliction / obsession - not being quite satisfied with how my ears looked either. I have fine-tuned and replaced them a couple of times. And as you know it just takes one "oopsie" and you end up making it too thin or inducing big gaps. I would highly advise that you hold off on trimming the ears until you see how the finished helmet looks. There are techniques where you can reduce the width at the bottom of the ear without trimming the top as much by rotating the top of the ear outwards slightly. But this can be done after you've done the detail painting. And of course you're not going to paint the entire helmet and ear, just the details correct? I'm far from being a an experienced builder, but is it necessary to disassemble the helmet to do the detail painting? -
Yep very nice. Painting tube stripes freehand involves too high a degree-of-difficulty for me! Some variation in spacing in thickness is expected and is typical in the ANH movie helmets.
-
Can you identify left vs right ears?
bpoodoo replied to LaserBrain99's topic in Hard Armor (General Discussion)
Yet another way to determine which side of the helmet an ear goes on is to hold up the ear in front of you with the outside of the ear facing you and level so that the ear rank bars are straight up and down. Note on which side you find more of the lower part of the ear (below the circular part). More of the lower part to the right means it goes on the right side of the helmet as you look at it. More of the lower part on the left means it goes on the left side of the helmet as you look at it. -
My 2mm TM Hero helmet build 8/2014
bpoodoo replied to DarSec's topic in Build Threads Requireing Maintenance
Those will work. Good job! -
Dare to idealize! I think it looks great.
-
My 2mm TM Hero helmet build 8/2014
bpoodoo replied to DarSec's topic in Build Threads Requireing Maintenance
I've got a box full of "practice ears" myself! Have a look at http://www.whitearmor.net/forum/topic/27375-howto-draw-an-approximate-ear-trim-line-with-no-gaps/ for a discussion on a technique that uses a compass to draw the ear trim line. You are on the right track towards developing an innovative way to obtain a trim line. Trimming the ear is definitely a 3-dimensional problem. If you modify your method to remain in the 3 dimensional space entirely I think you'll have something that will work. So skip the 2-D curve paper trace and instead fit the thin aluminum rod all the way around front and back at the same time along the contour of the helmet where the ear will meet it. Then you can use the formed rod directly on the ear held steadily in place to create a trace all the way around the ear at whatever thickness you want. Definitely start with a very thick ear trace to make sure it settles on the helmet correctly before trimming more aggressively. Baby steps - incremental trimming - using a drawn trim line (resist the urge to "eye it"), and you will get you the right fit. Something like this. (I found the only remaining old wire hanger in my house, and it was a bit too thick for me to shape it well. This was about as good as I could get it without risking tetanus). To avoid gaps at the top, you will likely want to have a notch (or "stairstep"). This should be part of the trace of the helmet contour, but the aluminum rod may not be sufficiently workable to pick it up. But you will see how at that location there is a drop-off where the cap&back ends and the faceplate begins. There the front of the ear will thicker than the back of the ear by about 2mm (the ABS thickness). -
Outstanding job on both the helmet and the paint work. I didn't think it would be possible to make such a convincing hero from the stunt helmet but you pretty much nailed it.
-
Possible screen match of RS Propmasters helmet?
bpoodoo replied to bpoodoo's topic in Hard Armor (General Discussion)
My spotting it was mostly luck. I was actually trying to find helmets that had different characteristics than the RS. Instead I found one that looked a lot like it. While I appreciate it's not 100% percent positive match, it's exciting that we independently homed in on this particular helmet. And I actually admire that RS didn't come out and promote "the screen match has been found" after you discussed this possibility with them. The confidence level does need to be close to 100% to make that claim publicly and it's clear they appreciate that. -
Possible screen match of RS Propmasters helmet?
bpoodoo replied to bpoodoo's topic in Hard Armor (General Discussion)
I recall reading thread where the holster and certain individual armor parts were identified on-screen as being part of the RS suit. I didn't think the RS helmet itself has been identified in any specific scene. If it has, I missed that thread! -
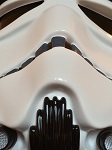
The RS Propmasters stunt helmet has some features that are distinct and unique from other helmets. The contour of the undercut along the right hand side of the faceplate has some particularly interesting features. Just in front of the bottom of the ear you'll find a parallelogram-like shape; then where the line of the mouth meets the undercut there is a triangular-shaped divot and a sharp angle turn downwards; and finally the distinctive "crater" about 1 inch beneath and behind the tube opening. These could be a basis for screen identification if other helmets do not also have these features (this I have not verified). While looking at screen captures from ANH, I ran across one specific helmet that appears to match closely these faceplate undercut features. Consider the first trooper in the front row. Compare the undercut features along the right side of the faceplate with those of the RS archival helmet: Could this be the RS helmet?
-
And I'm the same way about detail painting. I have several helmet kits but only 1 completed (the Dan Laws). And that involved lots of mineral spirits and lint-free tissue to fix my mistakes as I went along. But it helped figuring out how to erase my mistakes on a top detail application of paint and not have it interfere with dried paint underneath (e.g. the base white or gray trap). Helmet is looking good. One of the views of your heroized helmet looks at lot like this screen cap (link from starwarshelmets.com): I had the idea of making one "convertible" helmet that could be a stunt or a hero with a quick switch out of parts and some adjustments. One of the difficult aspects is that the actual shape of the helmets differ between stunt and hero. The hero is wider and shorter. The general impression I get is someone took it out of the thermoformer, quickly assembled it, and then sat on it. I'd made this animated GIF of helmets in the LFL archives to help visualize the difference between the shapes of a Hero and two Stunts: https://drive.google.com/file/d/0B13YyeojRHKeLUxmUFNFY0Z6eWc/edit?usp=sharing Troopermaster has good photo comparisons of his Stunt and Hero as well as photos from a Hero in the LFL archives: https://www.facebook.com/trooper.master.37/photos_albums One trick I use to change the shape of a helmet is to slightly push together or pull apart the faceplate and cap&back at the seam where they meet behind the forehead. Pulling apart gives a higher brow but also makes the helmet taller. Pushing together gives a lower brow but also makes the helmet wider, which is more like a hero. I afix two fuzzy pieces of velcro to the helmet, one on the faceplate and one on the cap&back. And I put a bracing material (e.g. hardened instamorph) on the back of a sticky piece of velcro which I press onto the other two pieces to maintain the desired separation. This works better on more flexible materials (e.g. HDPE) but can make subtle changes in more rigid materials (e.g. ABS). What you have looks really good. The only other thing I might suggest is trimming a bit more of the undercut on the sides to add to the impression of greater width. But that would probably mean retrimming the ears, and you've done a great job on those.
-
I have jb weld for plastic. I've used it to seal and reinforce ABS cracks. It could work in a pinch for the s trim but may not be optimal. When workable it has a clay like consistency and dries hard and brittle for thin applications like between s trim and helmet. An adhesive and/or sealant that can be applied thinly and is flexible when dry would probably be a better choice.
-
Mr no stripes so all my friends could spot me on screen and cheer!
-
Yeah, I agree. I'd trimmed and installed this ear on the other side initially which turned out to be the wrong side. After trimming to make it flush on this side there wasn't much ear left. I do have 1 spare pair of ATA ears I got from Darth Voorhees back in April.
-
Reshaped the bottom of the ear to make it more flush with the helmet so I could use it as a bridge between the helmet sections and apply the s-trim:
-
HOWTO: Draw an approximate ear trim line with no gaps
bpoodoo replied to bpoodoo's topic in Tutorials, Tips and HOWTOs
Scott - I think it was just the angle of the picture. At the top there was about 5 mm ear thickness as I drew the line though it looks like it was diminishing to no ear thickness! Which is exactly how I think this method can be truly useful - particularly for beginners - to see where the thin spots will be and adjust the trimline accordingly BEFORE CUTTING. My heart sinks when I see that someone's overtrimmed an ear on the first try, though our fine members and armorers are quick to assist. And you're right until you install the ears with tightened screws you won't know for sure how it will lie exactly. Tightening the screws in itself will change the profile of the helmet, so the detailed fine-tuning will be needed. I have used this technique successfully with a new untrimmed ear with good results following conservative, incremental steps: 1) Starting point is you have the front and back of the helmet assembled with at least 2 rivets or screws installed at the ear location. 2) Using an untrimmed ear, secure it level in some way (e.g. putty, tape, etc.) level above the helmet. 3) Set the compass to an offset that provides a very conservative, thick trim line; perhaps 10 mm thicker than you'd ultimately want. 4) Trace all around the ear with this constant offset. Do not press the ear against the helmet as this can result in a incorrect trim line, especially near the bottom of the ear. 5) Remove the ear and trim it along the drawn trim line. 6) Install the ear onto the helmet, including drilling and tightening of all screws attaching ear to helmet. Now you should have a true helmet profile. 7) Set the compass with an offset that would result in a trim line for an ear perhaps 3-5 mm thicker than what you'll ultimately want. 8) Trace all around the ear with this constant offset. 9) Remove the ear and trim it along the drawn trim line. 10) Install the ear. Now the ear should be flush against the helmet (or "close enough"), just 3-5 mm thicker than you want. But you have confidence in the method (and some practice). If it didn't work, you should still have a viable ear you can complete trimming using other methods. 11) If it worked, draw a final trim line to the desired ear thickness; remove ear; trim ear; cross fingers; install ear. 12) Manual fine-tuning / sanding -
HOWTO: Draw an approximate ear trim line with no gaps
bpoodoo replied to bpoodoo's topic in Tutorials, Tips and HOWTOs
I've been tempted to buy this item "FastCap Accuscribe Scribing Tool $13.99" to see if it would work any better than a compass: http://amzn.com/B0001GUDT6. The same basic concept as using a compass, but the articulating arm might provide a bit more flexibility in tracing the the trim line. UPDATE: I did buy the Accuscribe to try it out, but I can't recommend it. For our purpose it really needs articulation for the arm that is tracing the contour, not just the arm with the pencil. I've read of some using a contour gauge such as this http://amzn.com/B00004T7RA. But I'm not sure how well that would work because it only picks up a contour along a straight line, when you really need to pick up the contour along the perimeter of the ear. So a good quality compass seems to be the best bet so far. -
When the front and rear halves of the helmet don't match up well at the bottom, and a reasonable amount of trimming won't fix it, the ear might be used to bridge the gap or sharp angle and provide a smooth routing path for the s-trim. This would be a case where you would have the ear within the s-trim rather than above it. For example, if you have something like this at the bottom where the two halves meet (hopefully not as jagged and not as riddled with drill holes): Then you may be able to trim the bottom of the ear to cover the gap: After installing s-trim: For the thinner s-trim as above and/or thicker plastic, you probably would not want all 3 surfaces within the s-trim at any given point. You'd want back+ear, then just ear, then front+ear, and the surfaces should be mostly flush together. Some shaping of the plastic at the bottom of the ear might be needed to achieve this. I'll need to do this for one helmet I have made of thick ABS as I don't think the following is acceptable. I need go boil some water. and replace my current ABS trimming tool:
-
That trim line looks about right for a smooth oval shape, with the helmet edges pointing inward toward the center if possible. This helps I think to keep the s-trim secure when using compression (which is working for my helmet so far). The challenge will of course be around the ears. It looks like the front and back of the helmet will pull closer together once you screw in the ear at the bottom. If you have the thinner s-trim, you probably won't be able to include all 3 surfaces (front and back of helmet plus the bottom of the ear) within the s-trim. Often the ear is trimmed above the s-trim out of the way with the front and back of the helmet where they join within the s-trim. But if there's too much of a gap between the helmet halves there, you could possibly shape the bottom of the ear so that it dips down in the center to provide a "bridge" between them. Whatever works to provide as smooth and continuous a transition as possible.
-
HOWTO: Draw an approximate ear trim line with no gaps
bpoodoo replied to bpoodoo's topic in Tutorials, Tips and HOWTOs
The trimline in the above picture was what I traced with the compass at that angle all the way around. What you might do is use this technique to draw very conservative trimline that would result in a much thicker ear than you ultimately want so you can first be confident that the technique works. Pay close attention to the section just above the tube with a sharp turn and also at the very bottom following the undercut. It's easy if you don't follow the contour exactly to draw trimline a few millimeters too high which will cause you to have a gap there. -
My First Armor Build Thread ANH-S CAP Armor.
bpoodoo replied to Stormy1992's topic in Build Threads Requireing Maintenance
Good call on the new brow trim. Looks to be the right size. Makes the helmet look more stormtroopery. -
AFAIK there was one original "sculpt" by Liz Moore which looks very much like the original ANH stunt helmet. I don't think there was a separate sculpt done for the hero helmet. But there are clearly differences in the size, shape, and curvature between the original stunt and original hero helmets. The general belief is that one "buck" was used to vacuum form the stunt and hero faceplates, but in the time between when the stunts were pulled (earlier) and when the heroes were pulled (later), that the buck either degraded or was intentionally modified in a way that produced the hero look. Bottom line is today if you wanted to make a stunt helmet and a hero helmet accurately, you'd need to use separate forming bucks because the shapes are different. Here's an animated gif comparing the front view of a hero helmet to 2 different stunt helmets: -------------
