Bulldog44
-
Posts
2,187 -
Joined
-
Last visited
-
Days Won
5
Content Type
Profiles
Forums
Gallery
Articles
Everything posted by Bulldog44
-
Just picked this up yesterday at the dollar shop and thought it might be a cheap alternative to a rotary switch for the selector. The ruler parts can be trimmed off. The central circular part clicks nicely. Its relatively small and flat (about 19 mm in diameter/ 5 mm thick). It would still require a good chunk of resin to get it into position but possible for sure. My only concern would be that the internal plastic part that locks the wheel would eventually wear down. Dollar store stuff is usually a dollar for a reason. I will be venturing into Tokyo this weekend and drop by some small shops that sell tons of switches and electronic parts. Hoping they have some smaller rotary switches that require less carving out of the grip area. Update you all if I find any.
-
Wow! That is an awesome pack. Such detail. Work of art! I think other troopers will be looking at your pack now and want to build one. My favorite part is the old gas heater. Fantastic!
-

Episode 7 Stormtrooper Helmet, WIP
Bulldog44 replied to Dday's topic in Build Threads Requireing Maintenance
Nice! LOL. -
Aaron, again can't thank you enough. Thanks for going through all the time and trouble to make this template. Looks awesome! Going to see how I can use it tonight to get those additional circle marks next to the selector switch. This will be even more useful when I get to my DVH kit. I am glad you also putout there for others to use too. You are a legend!
-
Episode 7 Stormtrooper Helmet, WIP
Bulldog44 replied to Dday's topic in Build Threads Requireing Maintenance
Cool. Thanks for explaining this. You should be working for the Star Wars prop department! -
Episode 7 Stormtrooper Helmet, WIP
Bulldog44 replied to Dday's topic in Build Threads Requireing Maintenance
Thanks for the reply on this. The single piece sounds better as you have explained. I am just intrigued by 3D printing but I am slowly learning the limitations involved. Based on the few photos we have seen of the new trooper helmets, what process do you think the prop guys used in creating the helmets? Wondering if they use some sort of injection molding/casting process kinda like car parts are made as suggested by Nick. -
Thanks Mark again for the lock! Great idea and think you can offer those up for sale too. I love the idea as well of having moving parts. Just adds the extra bit of realism. I may never actually own or even hold a real Sterling but with fun little mod like this, I can enjoy pretending! Hoping not to disappoint on my build.
-
Stick with what works. The saw is not worth it if costs too much. I am just liking it cause I am not great at controlling my dremel well enough to do the same job. I have even thinner circular blades for the dremel and it cuts so quick and easy but I never get the cuts straight enough. The saw is certainly not deadly accurate, just slow and easy to control. Hobby shops are expensive. If its cheaper for me to send you one than prices near you., let me know. Happy to help.
-
RS PVC Kit / ANH TK Stunt Build / Bulldog44
Bulldog44 replied to Bulldog44's topic in Build Threads Requireing Maintenance
Thanks Steve. I struggled to see which arm those shoulder bells should go on and one thing that made me choose the right side was that the right bell had a very hard vertical edge that I could not rectify when I trimmed it ,just like you said. So i thought it looked better with the curved edge on the front. For a lot of this build I used reference photos but at times I just went with what looked better. Got lucky I guess. Thanks on the paint job. There are some imperfections I notice now but as Ian sad these were originally painted by hand and far from perfectly round. Happy to hear I have your vote of approval on the armor. Hoping to have that TK number soon, just applied tonight for membership. EIB application will have to wait until I get my blaster finished. -
DVH Pipe Build with Extras
Bulldog44 replied to I'm Batman's topic in Build Threads Requireing Maintenance
Loving that drilled aluminium receiver. Use a drill press for the holes? Looks really sharp and all your lines super straight. -
Episode 7 Stormtrooper Helmet, WIP
Bulldog44 replied to Dday's topic in Build Threads Requireing Maintenance
Great start to an awesome project. Sorry I don't know enough about 3d printing limitations but would it be possible to 3D print the helmet in parts? Thank you Derrek and Roy for working on making these helmets a reality for the community. -
RS PVC Kit / ANH TK Stunt Build / Bulldog44
Bulldog44 replied to Bulldog44's topic in Build Threads Requireing Maintenance
Thanks again Germain for your help. With the photo you posted I compared it to the bell I have attached on my left and it is the same so that is all good. Do you think I need to trim them in more? I probably shouldn't have made my arms so slim but I worried they would just dangle and move around too much if they were any bigger. The bells and arms do look disproportional as Ian has mentioned. Skinny trooper. -
RS PVC Kit / ANH TK Stunt Build / Bulldog44
Bulldog44 replied to Bulldog44's topic in Build Threads Requireing Maintenance
Hi Germain. Thanks for your comments. Wish it were perfect but there are something's still lacking. I am still not sure which shoulder bell is the correct for each arm. I just went with what looked best according to how I trimmed it. I think I did decide a while back that the bell with the centered line that curves off to the side goes on my right shoulder.cant remember. If mine look incorrect I will fix it. I will try to add some side view pics so you can see better. The part that looks like the backplate overriding the bridge is actually the thin elastics. I need to add new ones that are not so loose. They seemed tight but they just kept popping up. -
TK-11409 Requesting ANH Stunt EIB Status[MTK][424]
Bulldog44 replied to I'm Batman's topic in Request Expert Infantry Status
Helmet paint job is great! Good luck! Nice looking armor. -
Had a short chance last night to test the limits on my new mini saw and started by removing the number display face off my resin counter. The counter face is not perfectly flat so it sort of sinks in toward the number splay box. I wanted to keep the imprinted "Hengstler" logo so I opted not to sand the entire side flat. I might cut the counter in half along the middle seam where the two parts meet. Then try and hollow out the insides, add some real counter digits / and clear display plus the reset button. If I can make enough space inside, I will try to use it as a battery holder or a speaker box. Next thing I tried the saw on was the end cap lock. I shouldn't have done this but my curiosity got the best of me. I was inspired to try this after I received a cool moveable end cap lock from Triumphmark. I thought if my little saw could surgically cut off one wall of the lock, I could carefully remove the inner see saw part without too much trouble. Well the saw bit off a little bit too much so I will need to use some epoxy to get the wall thickness back to normal. So far I cut almost the whole side off of the lock. Not a great picture to illustrated this but hope you can kind of see what I am trying to do:
-
RS PVC Kit / ANH TK Stunt Build / Bulldog44
Bulldog44 replied to Bulldog44's topic in Build Threads Requireing Maintenance
Thanks Ian. I saw your EIB application and it looks great too. I was actually using your photos to see what details I am missing. Best of luck on your application. Yes, the shoulder bells are probably too big or trimmed unevenly front & back. These were the first parts I trimmed so I was really holding back on them. They did feel like they stuck out too. My arms are trimmed to fit really thin cause my arms are twigs. So maybe there will always be some strange balance. Your input is highly appreciated and feel free to add more feedback if you see something off. -
RS PVC Kit / ANH TK Stunt Build / Bulldog44
Bulldog44 replied to Bulldog44's topic in Build Threads Requireing Maintenance
Last push to get this done. Finally got those darn shoulder bridges glued in place. Had to resort to stronger glue for areas that would hold with E6000. Some minor glue damage along the seams but shaded and buffed them out as best as possible. Sorry no detailed photos taken yet of this. shoulder bridges in place shoulder bridge thin elastics added AB plate control panel buttons painted Belt rivet covers glued in place hand guards temporarily stuck on gloves. Bely rivet cover close up: I used some strong double sided tape in the center recessed area to keep them from coming off if the glue fails. AB buttons: my hands were asking doing these. I majored in art/painting but this was somehow entirely a nerve-racking experience. Masked the buttons off first but had lots of bleeding edges, Then I just went free hand on them and used paint thinner to on a clean brush to clean up the edges. I had a large cleanup on the lowest blue button and there still is a light blue haze around the button I cannot remove. Otherwise, i am glad I got it done, finally. Just a quick test fitting. Felt great to get to this point. Just working on applying now and hopefully get my TK ID.Wish me luck! -
Thanks Tim for pointing me in the right direction for the hardware. The idea to just fill the plus screw indents will work well then. I get lost remembering all the info on previous build threads. Dustin, good luck with this. Tim, usaett2 or Dday have real stocks and should be able to tell you the exact diameter of the real sterling rivet head. Sometimes the sterling hardware is just a bit off in size from what is available as a replacement but just a little.
-
Just wondering, will you replace the rounded bubble areas you sanded off from your stock with similar screw or bolt heads? On the real sterling stock those bubbled shapes are the heads of the pins/rivet that hold the stock wishbone forks to the hinge bracket( forgot what that is really called). Thought about doing something similar but can't find a suitable replacement for those rounded pin head shapes.
-
No worries on the template, only if you have time. Yeah , you re probably right about the insane part to drill out for the trigger grouping. But if it can be done, then I might try it someday. My real wish would be for a company like Tamiya to create a 1:1 scale plastic model of a sterling that can be put together with all the fun tiny parts. It might not be super durable but then again, you can just buy another kit for a relatively cheap price. It would be super light too! The customizing build doc is a great way to go. It would go a longway to shorten the research for builders to pick and choose mods they want to add to their blasters. You and Tino have listed some great ideas on how to approach this. I am in to help in whatever, way I can. Gotta get my blaster finished first! Sorry back to your build..... Photos look great compared to my sad ipad photos. I gave up on that and went bak to my camera, takes more time to get the photo up on line but clarity is better.
-
You got the holes on the bottom of the folding stock drilled out nicely. That is not easy to do uniformly but you did it with success. I like your idea to make the folding stock semi functional. As Tim said paint the inner barrel separate.
-
Suggestion? ...............none. Completely amazing. Actually insane! You have taken the carving out mod to a whole new level. The time it took to get it all carved out really paid off. The plate is brilliant and please scan & send a copy of the template for me when you get a chance& if you don't mind. Useful for my next blaster build. Don't think I can pull that kind of craftsmanship off but since I have seen it done, there is no other choice than to try. It would be cool to see if you can just create an entire metal trigger group piece tht can be installed after removing all the resin trigger group. I wouldn't worry about the walls of the trigger area. Can't even tell, wouldn't have notice if you didn't mention it. But I know that feeling when things are not just the way you want them. Hope you find a solution to get it where you want things. But seriously, the whole metal plate insert looks out of this world. Love how you added the exact holes too. Something I want to add but afraid to screw things up. You are truly a master at capturing the details. The grip bolt & tapping the hole is another great example of that. Love it! Can't wait to see what you have in the works next!
-
DVH Pipe Build with Extras
Bulldog44 replied to I'm Batman's topic in Build Threads Requireing Maintenance
Awesome Ian. That is totally a super mod! Nice idea on how to fit it in there. I will try that on my DVH kit when I get to it. Another leap ahead for customizing these kits. Keep up the great work! -
Glad you can get the pics up. The size looks fine, easier to see the details. Try clicking the cursor after the photo and see if you get a blinking text cursor, if so just hit return and you should be able to add text underneath the photo. I usually add some text, hit return twice to make some space and then add my photo and then hit return twice again between texts and photos. It is strange if it doesn't allow you to add both in one reply box. But no worries, your posts are now up with photos and descriptions, good start! Your build is looking good too. Drilling those receiver holes can be a scary first time experience especially if the drill bit gets jammed and starts chipping away the edges, But from the looks of your receiver holes, you did a great job. Hex bolt looks nice and snug in the grip too. The nozzle holes are tough to drill without some chipping. The front sight on the Doopy kit is a tough one since the details are so muddled. Looks good how you filed out the line at the base. Just patch up the air hole like you mentioned and use some small metal files to clean up the lines. Keep up the great work!
-
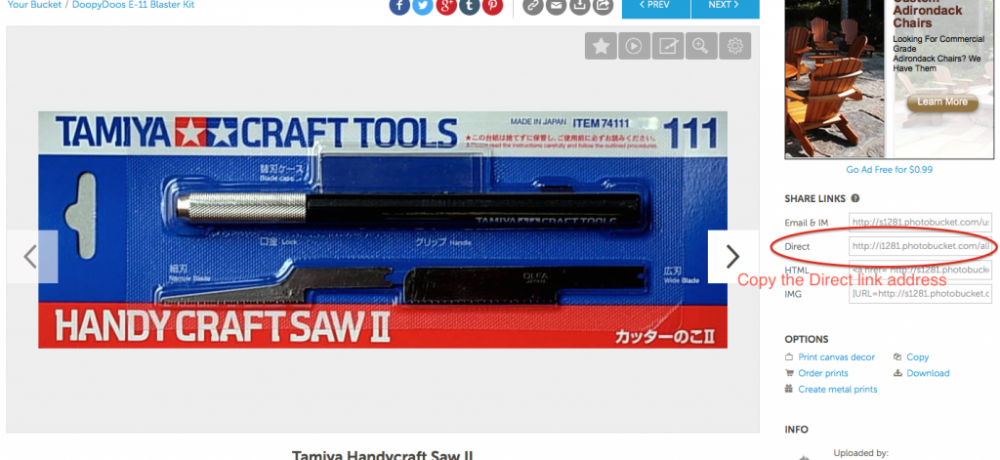
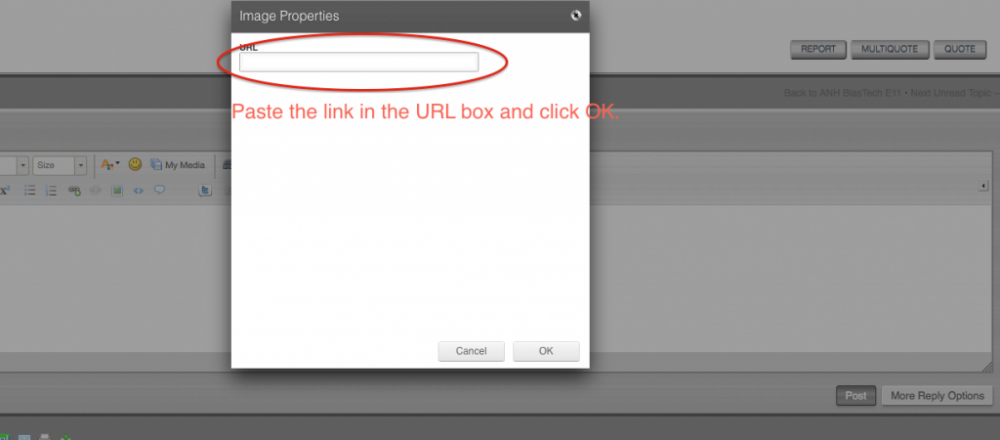
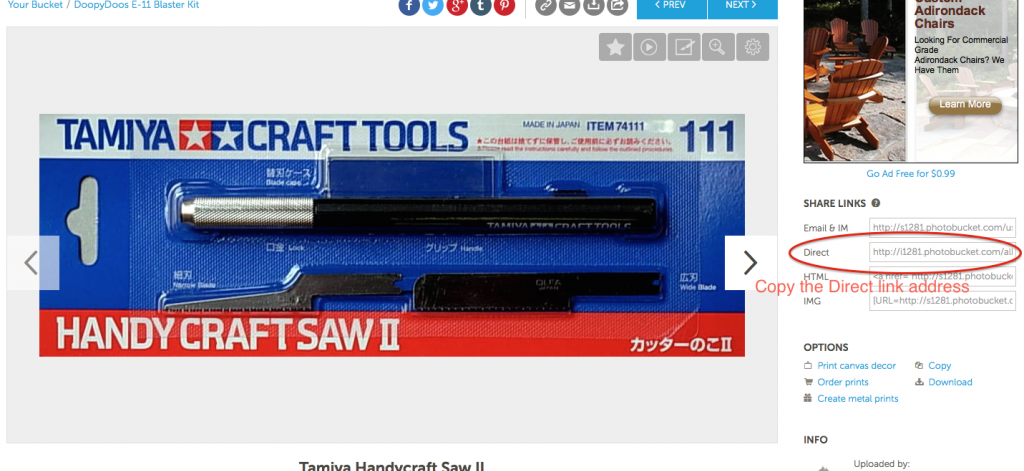
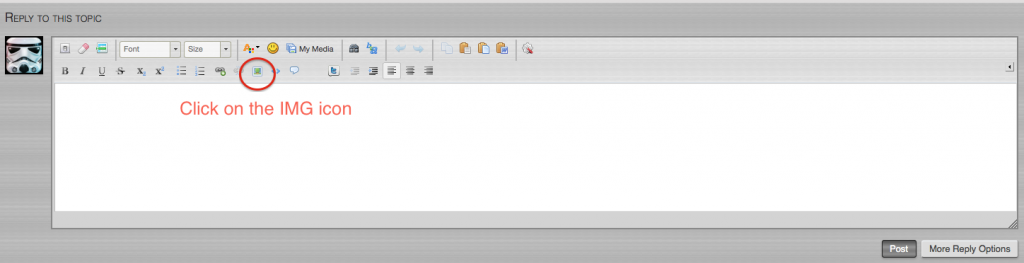
Hi Dustin. This is how I get my photos on this forum. Step 1: In Photobucket open up the image you wish to post. Click or copy the entire DIRECT link address seen in the right-hand menu. Step 2: Next go back to your topic or reply box and look for the IMG icon which I circled in red. Step 3: When the IMG URL box opens up, paste the DIRECT link address you copied from your Photobucket album. Your image should appear in your post. You can cut and move it too if needed in that post. Or add it again. Re-sizing, cropping , editing can be done in photobucket before you link the photo. Best advice to keep your photos from unlinking is to create a specific album in Photobucket for whatever topic you plan on posting, For example, any Doopy E-11 pics I have are put in an album just for that build. If I move the photos out of that album or even re-title the album, the link is broken and your photos will no longer be viewable on this forum. Takes a while to get used to. I might be doing this all wrong but it works for me so I am sticking with this until it fails. Thanks for checking out my E-11 build. Hope you are getting some ideas for your build, but I must warn you, once you start down the dark path of modification, forever you build will remain unfinished...like mine!