

SeanTX
-
Posts
306 -
Joined
-
Last visited
Content Type
Profiles
Forums
Gallery
Articles
Everything posted by SeanTX
-
TK-73268 requesting ANH Stunt EIB status [AM2.0]
SeanTX replied to SeanTX's topic in Request Expert Infantry Status
Thanks. I had no misunderstanding about the blaster. I wouldn't wamt the crl to include them anyways. I'll take an action shot when i get a chance but i may aswell wait on the blaster. Here is the side rivets. http://i236.photobucket.com/albums/ff263/seantheawesome/stormtrooper/8a1413aa-88f8-4597-b81f-783950d00d03_zpshkysckin.jpg Interesting about the drop box alignment. When i riveted them they are flush with the outter edge when the belt is off. But i didn't notice they slide forward like that when worn. I'll try adjusting them. This is the only picture i haveof that right now. http://i236.photobucket.com/albums/ff263/seantheawesome/stormtrooper/tapatalk_1443896523949_zpsjttvsm2n.jpeg That stinks about the buttons. I wonder why the kits guide hole is off. I e6000ed the covers i might be able to just adjust them. Or do as you recommended. Sent from my SAMSUNG-SGH-I257 using Tapatalk -
TK-73268 requesting ANH Stunt EIB status [AM2.0]
SeanTX replied to SeanTX's topic in Request Expert Infantry Status
Cool. I'm not in any rush. -
TK-73268 requesting ANH Stunt EIB status [AM2.0]
SeanTX replied to SeanTX's topic in Request Expert Infantry Status
I do think i should lower my thighs. Whoch should be easy enough. I'll just loosen my belt. Taller shins are interesting. I really don't want to make them again lol. Sent from my SAMSUNG-SGH-I257 using Tapatalk -
TK-73268 requesting ANH Stunt EIB status [AM2.0]
SeanTX replied to SeanTX's topic in Request Expert Infantry Status
Ah shoot. That is cause it fell off the snap on my side shots. -
Thanks
-
TK-73268 requesting ANH Stunt EIB status [AM2.0]
SeanTX replied to SeanTX's topic in Request Expert Infantry Status
I know my lack of adequate blaster disqualifies me. I would just like to receive armor critiques so I can fix them while I wait on more parts. -
Name = Sean Thomas TK ID = 73268 FISD Forum Name = SeanTX Garrison = Star Garrison Armor= AM 2.0 Helmet= AM 2.0 Blaster= Rubies (PP pipe build in work) Height = 6'2" Weight = 160 lbs Boots = Painted Roamers Canvas Belt = TKittell Hand Plates/Gloves = Sonnenschein Inner Drop Boxes = AM 2.0 Holster = Darman Neck Seal = Darman Front-Arms at side Back - Arms at side (This one makes it pretty clear I need to raise my shins somehow.) Left - Arm raised Right - Arm raised Right Side Detail - Arm raised Left Side Detail - Arm raised Abdomen Details Cod and Butt Plate Attachment Interior Strapping Front Left Right Back Hovi Mic Tip Detail Lens Color Blaster Details (This is just my $15 drop weapon. I have much better blasters in work) Blaster - Right Blaster - Left Accessories Details Neck Seal Thermal Detonator - Back Holster Attachment
-
LoveMonkey's AM 2.0 Build Thread
SeanTX replied to LoveMonkey's topic in Build Threads Requireing Maintenance
Nice weathering. -
Basic approval complete. TK 73268 Updated chemical glove picture Finished boots just cause I'm proud. And elastic retention bands added at long last.
-
TK-8869 requesting ANH Stunt EIB status [AM2.0] [537]
SeanTX replied to Navajo Bro's topic in Request Expert Infantry Status
Be careful though. When you trim the butt point. You will need to extend the crotch strap or it will be to tight and cause diaper butt. -
Request access http://www.501st.com/members/displaymemberdetails.php?userID=19630
-
Resin cast Sterling barrel and bolt spring cup
SeanTX replied to usaeatt2's topic in ANH BlasTech E11
Now for the inner spring -
6'2" I tried to get it to ride a little higher to eliminate the gap. But plastic just naturally snaps into that spot. It didn't need glue or anything to keep from falling. I think I may have my thighs to high. Which could be half the issue.
-
So general questions on fit and wear. 1. My belt doesn't like to stay snapped. The right side that the snap is under the ammo box so it has no constant pressure on it like the left side. And once it is off it is a bear getting my finger between the fabric and plastic parts of the belt to shove it back on. 2. My shins are clearly too low. how can i motivate them to ride higher without popping over my boots? Also with the shins the elastic hooks don't pull enough to keep them completely closed. I've already tightened the elastic once. I think I can gently put them to the heat gun to alter their natural position. But that scares me.
-
Blaster Details (This is just my $15 drop weapon. I have much better blasters in work) Blaster - Right Blaster - Left Accessories Details Neck Seal Thermal Detonator - Back Holster Attachment
-
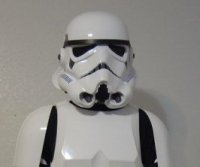
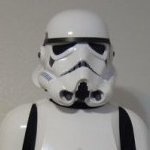
Helmet Details Front Left Right Back Hovi Mic Tip Detail Lens Color S-Trim
-
Armor Details Cont Thigh Pack Attachment Knee Plate Drop Box Back Cod and Butt Plate Attachment Interior Strapping Kidney Plate Notch Wrist side of forearms
-
Armor Details. Ab/Kidney Attachment - Button Orientation Butt/Kidney - Fixed: No Hand Plates I have the chemical ones but just not at this moment Shoulder Bridge Back I have thin elastic too just not with me for the pictures. Shoulder Bridge Front Back/Chest Connection
-
Submission photo time Front-Arms at side Back - Arms at side (This one makes it pretty clear I need to raise my shins somehow.) Left - Arm raised Right - Arm raised Right Side Detail - Arm raised Left Side Detail - Arm raised
-
I know I'm not the first to experience this but I haven't stumbled on and info on the topic. But alas my brother has a fat head. And his head barely fits through the bottom of his helmet without the rubber edge seal. So with it he will never fit. My initial thoughts were to widen the hole a 1/4" all the way around. But I feel this might get to close to the screw holes on the lower ears. Is it better to widen only certain areas of the helmet hole?
-
Centurion level boots elastic?
SeanTX replied to Professor Why's topic in Boots, Soft Parts, and other Accessories
nope. seam down the front is no good. -
Absolutely. I should have said that. Definitly only use thicker less runny CA glue. Hobbytown or hobby lobby or any hobby shop should have a wide selection to help choose. In no way get the 4 for $1 black tubes from walmart. Which are awesome for modeling by the way. But I won't hyjack your thread about glue anymore. One research tip. When it comes to strapping don't buy anything until you have a plan or you will buy to much. I was a dolt and bought anything anyone mentioned and now I have a pile of worthless straps and such. Every tutorial/thread you read will use different techniques/strapping sizes. But the best resource the community has come up with is the strapping list in the replica section. http://www.whitearmor.net/forum/topic/26477-what-we-know-about-strapping-snaps-rivets-etc/ Sure you may not be going 100% replica but there is no reason not to use the canon strap sizes. some people use 3/4" elastic. But guess what that's not used in there. So don't go out and preemptively buy a lot of 3/4". On that same note decide if you want to do snaps on the body or make wire brackets. Before you spend a day finding the right size piano wire only to decide you don't want to use that. But you still might as well use 2" black elastic there since it is canon, adds a little durability, and ultimately cost 50 cents more than going a cheaper route. Don't buy a 20 ft role of white velcro to do 4' worth of shins if you might decide to do the bra hooks. I think you get the point. Just do your research first but make sure what you are referencing is the most current. There are a lot of good tutorials in this forum that while still active are terribly obsolete and will lead you down a rabbit hole away from centurion if that is a goal.
-
LoveMonkey's AM 2.0 Build Thread
SeanTX replied to LoveMonkey's topic in Build Threads Requireing Maintenance
Strapping took me a few days but the limiting factor was magnets and clamps. If I had unlimited of each two working days could be achieved by glueing one side of each connection a day and being fully dry on the third. -
Some initial fit test pictures. I'll take a full set soon when both sets are ready. My Brothers. His butt doesn't pop out like mine. (Don't know what that means) Ive seen some people have a strap that pulls it forward so I'm just waiting before I add anything. On the snap side it opens at the bottom I believe that is to be expected and my go away once we put belts on. My first full fit test. Of course the most awkward part (shins) aren't visible for input but the rest seems to fit well. I think I will raise the shoulder to bicep connection to raise the arms 1/2 to 1" since the bottom of the bicep is in the crotch of my elbow until I bend my arm. And the shoulder bell elastics are a little to loose. But I'll play a bit more before adjusting. Oh and boots are still black.
-
Painted on the tube stripes the usual pencil distance away. I was kinda dissapointed with the other trooperbay stencils. They make a point to ask what helmet they are for but I don't think they have one for the AM 2. Cause they were to big. So they didn't help at all getting the full shape of the grey and black. I don't know what you are supposed to do with the stencil for the solid grey temple piece. Anyways I found if I just dragged a mechanical pencil through the crease the pencil would naturally find the low point. and made a very nice line for me to paint up to. And after the paint dried the lead came up with alchohol and didn't mess up the enamel paint which had to be cleaned with mineral spirits. Once painted I went to tackling the brow trim peoples eyebrow. Yes I know it isn't that important, they were all different, yadda yadda. But If my helmet and my brother have the same silly face we will just look silly standing next to each other. So my first thought was to slowly take away material from the low side with the dremel. But after drawing the straight line I decided that would take off to much and the temple would look funny small. So lowered the high side about a 1/4" and glued it on the inside of the helmet to hold it in place and I think it looks perfect. Should have thought of that first. On the inside. I painted my dowels for the thumb tacks to hold the lense on. And used zip ties to cover the edges of the mouth screen.
