


dm101
-
Posts
138 -
Joined
-
Last visited
Content Type
Profiles
Forums
Gallery
Articles
Everything posted by dm101
-
I just bought the de-milled Sterling L2A3 from Apex. It came as a box of chopped up parts. Can you guys help me confirm that the image below is how the charging handle fits into the bolt? THANKS
-

dm101 Doopys E11 Blaster Build
dm101 replied to dm101's topic in Build Threads Requireing Maintenance
Good timing- I finally had some free time to work on the build. I plan to update the bolt modification soon. I just bought the Sterling parts kit from Apex. The kit has the bolt and a bunch of assorted de-milled parts. I need to triple check this photo…but I think this is how the charging handle fits into the bolt. (the red bit at the bottom is a shop rag I used to prop up the bolt for the photo) Any how… to answer your question. I use the charging handle to stop the bolt from moving forward and the spring keeps it from moving backwards. The spring also pushes the bolt forward. I have bagged the wood block or 2x4 method. I am now going to use a wood dowel which I sanded down to slide inside the Doopy. I am still using the wood screw and clearance hole in the Doopy charging handle. I did not add the internal barrel. I think it’s a nice feature. -
Helping a little girl that was bullied for liking Star Wars
dm101 replied to RogueTrooper's topic in Announcements
PP on the way -
TK-6794 Requesting ANH Hero EIB Status[AP][266]
dm101 replied to dm101's topic in Request Expert Infantry Status
THANKS -
TK-6794 Requesting ANH Hero EIB Status[AP][266]
dm101 replied to dm101's topic in Request Expert Infantry Status
THANKS for the tips and the APPROVAL -
Question about AP shins and boots?
dm101 replied to kevnaminute's topic in Hard Armor (General Discussion)
I had some issues with my AP shins (greaves). They seemed like they were warped. Even when I take them off today they snap back into the warped position. Double check your measurements. Re: BOOTS http://www.tkboots.com/ http://www.caboots.com/ -
TK-6794 Requesting ANH Hero EIB Status[AP][266]
dm101 replied to dm101's topic in Request Expert Infantry Status
After some careful deliberation I have reached a solution. I have a TROOPERMASTER ANH helmet. Which arrived recently. IMHO it is a work of art. I was going to keep it for another project. My botched AP helmet has been a problem since day #1. I have a large melon to start with and the AP helmet is very small. So I need a larger helmet. Plus at this point, I think it’s a waste of money and time to fix all the AP helmets issues to bring it up to EI hero level. So starting today the AP is going into the closet and the TM helmet will be used exclusively. Here are some photos. Thanks for everyone’s help. -
TK-6794 Requesting ANH Hero EIB Status[AP][266]
dm101 replied to dm101's topic in Request Expert Infantry Status
Thanks for the good suggestion. -
TK-6794 Requesting ANH Hero EIB Status[AP][266]
dm101 replied to dm101's topic in Request Expert Infantry Status
Karin- Thanks for the hand guards and gloves. They are fresh out of the box. -
TK-6794 Requesting ANH Hero EIB Status[AP][266]
dm101 replied to dm101's topic in Request Expert Infantry Status
Humbrol Blue (the darker one) -
TK-6794 Requesting ANH Hero EIB Status[AP][266]
dm101 replied to dm101's topic in Request Expert Infantry Status
THANKS for all the input. Helmet ARGHHHH... My helmet has been a problem since day #1. I had bought some 3 bumb ears from one of the guys in England who posted them on the FISD boards (need to look back thru my stuff for the name).We had nothig but problemswith them. After hours (no joke) we finally made them fit. I took my 501st submition photos and was shot down because of the helmet. It looked like we mounted the left ear at a 45 degree angle. ( I will try to find that photo, it's so obvious, and funny). I will replace mic tips. I will search for someone selling better 3 bump ears Replace rivet with screw and only use 1 screw at the top. The tube stripes. I hand painted these boys 3 times. Practice makes almost perfect. Something is wonky with my helmet. I carefully measured back from the front to start my stripes. So both sides start at the same place but end at different spots (YES I have the same count of stripes on both sides. Regarding Photos- I went to one of the photographers in my garrison. My first intention was just to get a real good photo for making a trading card. I mentioned going for EI status so he took q bunch of qapproval type photos while I was there. -
Name: Craig Staley ID: TK6794 FISD Forum Name: dm101 Garrison: Carida Armor= AP Helmet= AP Blaster= resin, Doopy Doo’s Height = 5’-10†Weight = 175 Boots = CA Boots Canvas belt = TrooperBay Hand Plates = Sonnenschein Flexi-Rubber (w/rubber glove) Electronics= N/A Neck Seal = Chris S. from FISD boards Holster = Vern’s Helmet Close Up HAND and Forearm Close Up BLASTER Close Up BLASTER D-Ring
-
Whoopeee! Armor is here! (AP)
dm101 replied to kevnaminute's topic in Hard Armor (General Discussion)
CONGRATS Bro I finished MY AP armor a few months back The sniper plate is strange. It takes a little work and a lot of trial and error Second tip is do not do what I did. On your ab button plate. DO NOT trim it all the way into the raised part. You are supposed to have that flange. I had a hard time glueing my mistake into place -
how 'bout this... http://www.501st.com/members/displaymember.php?userID=14750&costumeID=125
-
dm101 Doopys E11 Blaster Build
dm101 replied to dm101's topic in Build Threads Requireing Maintenance
My apologies for not updating this thread. Like I said I do this at work and it’s been mega busy. Thanks again to Vern. He described the solution in words pretty darn good. I just need to build the photos to fix this thread. Please standby… -
501st me PLEASE
-
dm101 Doopys E11 Blaster Build
dm101 replied to dm101's topic in Build Threads Requireing Maintenance
MODIFICATIONS NOT INCLUDED IN RESIN KIT- HENGSTLER MOUNTING BRACKET The Doopy’s resin kit does not come with a Hengstler mounting bracket. You can pick any thickness of sheet metal you desire. Be careful not go to thin or your bracket will be wobbly. I used 22gauge or .03†thick sheet metal made of steel. You could use brass or aluminum. Step #1- Measure and cut out the sheet metal to the “T†shape. Step #2- Match your Scope mounting holes and drill holes into your bracket. Step #3- Drill two clearance holes for mounting the Hengstler. I used #6 screws to mount my Hengstler. Step #4- Bend the bracket at the line noted. This will be a 90 degree bend. Step #5- Sand, clean, prime and paint. -
dm101 Doopys E11 Blaster Build
dm101 replied to dm101's topic in Build Threads Requireing Maintenance
CORRECTION- Bayonet Lug My demil'd Sterling was put together with the bayonet Lug in the wrong place. The photos I have seen on the web show the Bayonet Lug should be in the location of the red box shown in the below image. Sorry for the bad intel. -
dm101 Doopys E11 Blaster Build
dm101 replied to dm101's topic in Build Threads Requireing Maintenance
CORRECTION- to Bolt Modification Vern- Thanks for noticing those points. Now that I look at my image of the charging handle and the inserted spring it is not a true representation of my final build. When I took this image I had the end cap off the gun and the spring was sticking out the back end of the gun about 2 inches. When you have the end cap in place, the spring does force the bolt and the charging handle all the way forward (like the image of the real Sterling) (just my bad selection of images) Mounting the charging handle to the outside was my mistake based on my demil’d Sterling. My demil’d Sterling has the charging handle welded to the outside of the pipe they used to demil the gun. OPPS on me, sorry to mislead you guys. You are 100% correct I should have put it inside the gun. I still plan to mount it the same way with the screw, so that it will function. It will just require a little more work. THANKS for the input, I really appreciate it. -
dm101 Doopys E11 Blaster Build
dm101 replied to dm101's topic in Build Threads Requireing Maintenance
That stinks that you are missing so many pieces. Your parcel most likely got jammed in the sorting machine or worse. Your parts were probably lost on the floor or in the sorting machines guts. They picked up what they could find and made a half hearted attempt to reseal your package. I worked for a shipping company and you would be horrified of the treatment of your parcel after it leaves your hands. That’s why, when I ship something I pack it so you could run a 60 ton tank over it and the package and it’s contents will survive. Let us know how you make out getting replacement parts from Doopy’s. -
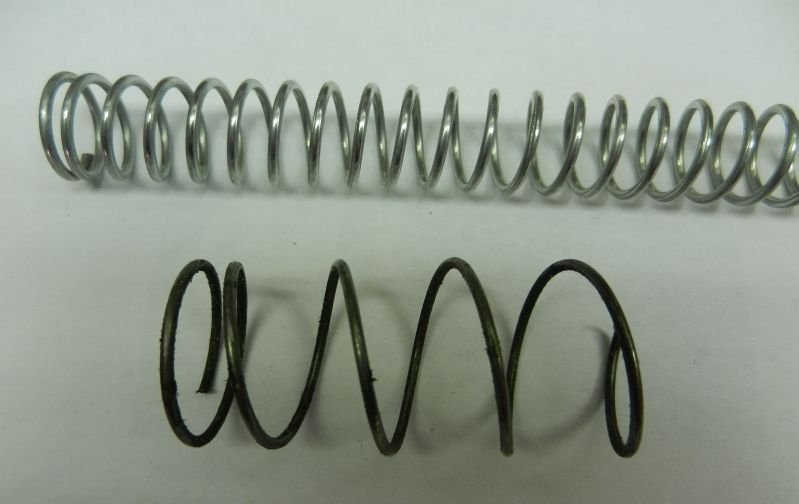
no the real Sterling spring from Apex is to large in diameter to fit inside the Doopy resin kit. The cheapest way to go is the wire hanger route, and wrapping it around a round object like the drum stick or dowel rod etc... I bought a $1.99 spring from my local hardware store. It was coiled or wrapped to tight. I just stretched it out so the space between the coils looked close. In the photo below- The top spring is from the hardware store. The bottom spring is from a Sterling.
-
dm101 Doopys E11 Blaster Build
dm101 replied to dm101's topic in Build Threads Requireing Maintenance
MODIFICATIONS NOT INCLUDED IN RESIN KIT- BOLT The Doopy’s resin kit does not come with a bolt. Technically it does, but it is molded into the receiver section of the barrel. (See the image of a real Sterling) My bolt is made from a standard wood 2x4, a piece of ¼ air hose and a #6 wood screw. Step #1- Take item #17 CHARGING HANDLE and drill a clearance hole for the wood screw to slip into. Step #2- Measure the inside diameter of your gun at the butt end (with End Cap removed) I subtracted about 1/16†from that diameter to give some clearance. Step #3- Use a compass (NOT the north-south-east-west kind). Using your diameter calculated from Step #2. Draw the circle on the wide side of your 2x4. (3-3/8†side) Step #4- I had access to a band saw, so that is what I used to cut the 2x4. A jig saw, scroll saw etc will do the trick. Cut out your circle as close as you can to being round. Step #5- I used a disk and belt sander to sand to a round shape. Step # 6- I lightly coated the entire wood block in bondo. This helped fill in some of the tooling marks and made nice sealer for the wood. I then sanded this smooth. Step #7- Paint the newly bondo coated wood block silver. Step #8- Slide wood block into gun. Position so part of the wood block is forward of the barrel slot. I did NOT glue this in, It is free to move. Step #9- Drill a pilot hole for the wood screw. Screw wood screw into pilot hole. Step #10- Cut off wood screw head. I had to make several cuts until the Charging handle slid down on the wood screw far enough. The charging handle should almost rest against the outside of the barrel. Step #11- I had some 1/4†nylon air line tubing. I cut this to length to go over my cut down wood screw. Step #11- Glue charging handle to cut down wood screw. Make sure of the orientation. The curved portion of the charging handle faces towards the guns muzzle. Step # 13- Insert spring from previous Spring Modification step. Re-place end cap. If your spring is not to springy, you can pull back on the charging handle and your new bolt will move back and forth. (also your end cap needs to fit tight) -
A real sterling spring is to big in the diameter to fit into the Doopy. I found a spring in the hardware store that was close to the inside diameter of the Doopy. I stretched out the spring until it looked close to the spacing between the sterlings spring.