

Brent
-
Posts
196 -
Joined
-
Last visited
Content Type
Profiles
Forums
Gallery
Articles
Everything posted by Brent
-
I attempted more painting this evening. I had discounted using the hammered black finish because in my earlier tests when I tried weathering it away with sandpaper it just made a mess. The paint makes a sort of rubbery surface that doesn't scratch back nicely. Here is my sandpaper weathering test with flat black (metallic, flat black, sanded, clear coat), which up until now has been my best attempt and what I was shooting for: After seeing Solcar23's latest results I was again tempted to give hammered black a try. Especially since there is pronounced glue visible from the e6000 which I am hoping hammered black will cover. (Too late did I heed Darth Aloha's warning) My new plan is this: Metallic Base (2x), Liquid Latex, Flat Black, Liquid Latex, Hammered Black, Clear Coat Here is a piece of scratch pipe that I tried this procedure on (very rushed though since I didn't want to wait the full dry times, and no clear coat either) I like the texture, which I think will hide the glue much better, and I like the ability to have it peeled back to the flat black layer. I think it is somewhat reminiscent of real sterling shots like this (photo blatantly lifted from TK Bondservnt's post in the Best Sterling Ever thread): I applied the latex with a brush, spray painted it with the flat black and now it is left to dry. We'll just have to see how it turns out. In my tests so far the latex has peeled away much easier when under the flat black then the hammered black. I'm thinking it might be wise to leave the latex that is on the barrel now all the way until the hammered black has been applied and dried. I just won't know how the weathering is doing until it is basically done. If I used too much latex I suppose I can go back and touch it up with a brush.
-

Solcar23's Resin DoopyDoo's E-11 Build
Brent replied to Solcar23's topic in Build Threads Requireing Maintenance
Very nice. I had considered using hammered black but didn't like the way it turned out on a scratch sample I did. After seeing yours I'm going to have to practice my spray painting to see if I can make it work because that texture just looks amazing. Great job! -
Childrens stormtrooper suit
Brent replied to troopermaster's topic in The Foundry - Armor and Prop Making
Absolutely amazing. The pictures look like they are all perfectly tailored for him. Do you make them with any room for him to grow? It's pretty safe to say your son has one of the most impressive toys on the planet. Keep up the good work! -
I made a little more progress. The barrel now has another coat of paint and I did a bit more work on the electronics and body. For the scope lens I'm using a scotch tape roll and a magnifying glass from Radio Shack. After grinding down the lens holder and the inner plastic from the scope I get a decent lens. I was going to hollow out the scope rail, but it looked like it would be somewhat flimsy so I cut out a piece of aluminum to make a more sturdy one. The notched end fits in to the rear sight and I cut out a small slot under the scope for the other end to sit in. The electronics is a bit of a pain since the connections are extremely small and not very strong. I cut out a bit of cardboard that will sit inside the scope and glued the watch to it. This makes a bit more sturdy of a target for me to solder on some leads. I then painted the inside of the scope and the cardboard so that when viewed at an off angle the scope lens will be red. Now I need to wait until the barrel is completely painted before I cut off the original barrel and attach it to the body. Once attached I can hook up the remaining electronics, including the leads that go to the muzzle, and close the body up. Then my plan is to mask off the barrel while I attach the other resin parts and paint the body. I think the only real trick there will be extending the folding stock to account for the new barrel.
-
Out of curiosity, is that just E-6000 or is this common with different glues?
-
Great job on the armor and congratulations on getting your TKID!
-
If you use the embed image link make sure to change the select size drop box to something bigger then thumbnail, which is the default.
-
If you want to use Picasa web, make sure the Album is set to public. When you click the album you should see this in the upper right: Click (edit) and make it public: If the album wasn't public when you uploaded this image, this next part may not work. I've had trouble with it and needed to re-upload an image. Click on the image you want to post. There should be a "Link to this photo" link in the lower right. You want to select the "Image only" option and pick an appropriate size. Then you can use these instructions to post the image to the forum using the Embed image link for the image url. I also like to take the Link url and link it to the photo so that clicking the photo will take you to a higher resolution version of the image. After putting the photo in your post, click the photo and click the link icon. Then put in the Link url from Picasa web.
-
Thanks! I figured it would be around somewhere, although I didn't think to look in a topic that didn't show updates since 2010 .
-
I just noticed that the staff list at http://www.whitearmor.net/fisd/Staff appears to be out of date since the recent elections. I was curious about updates, and as a non-member (for now) I think that's the only published list I can see.
-
Just saw this today. Is the Nordic Garrison being activated? Arnie_DK, good thing your new armor is ready for inspection from the boss.
-
I picked up some Duro Super Glue. It says it contains Cyanoacrylate, which I assume is CA? Is that the sort of glue you mean? They also had it in a gel form, maybe that one would be more useful. Thanks! At least the front won't have much Hasbro to it.
-
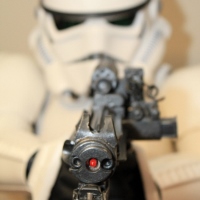
Now that the barrel is more or less complete, my attention is back on the body of the gun. Adding a timepiece I came across a thread discussing having a clock handy for trooping. It was suggested that one could build it in to a blaster, which I think is a great idea. I bought the smallest digital watch I could find and worked on finding a way to integrate it in to the blaster. Two suggestions from that thread were in the counter or in the scope. The size of the numbers on the watch didn't lend themselves to putting in the counter, so I'm opting to build it in to the scope. The biggest problem I have with this is that I'm pretty sure once this is sealed up, I will never want to open it again. This means no changing the battery, and no resetting the time. The battery part is easy to fix. The Hasbro already has an accessible pair of AA batteries for the lights and sounds, and as it turns out the coin sell battery is the same voltage. This does mean that the need to reset the time will be all the more important. To set the time I would need to expose the three buttons out to the exterior of the gun. There isn't enough room to just hide them in the battery compartment so I needed to hide them on the outside. The easiest is to use the trigger as one button. I can hide a button on the grip like in erv's e-11 model "x". The third button can go in the counter module as the reset button. Soldering on to the button pads is a bit of a challenge. I've made some test connections, but it will be tough to get the wires to stay in place. To add a real button to the counter module I cut out a little rectangular piece of plastic and used the engraving tip of the dremel to carefully carve out a channel for it. The button is held in with some J-B weld. I tried using super glue, but it didn't seem to hold the metal to the resin very well. I cut out a channel in the plastic piece that I cut put a nail through. That way when it is all assembled I can glue the nail in place from the outside and the button won't fall out. Before I can connect the counter to the gun I had one more thing to do to it. I want to have numbers on the front. I made a counter image and printed it out, then covered it with a few cut out pieces of plastic from packaging material. I'm holding them all together with spray glue, which fogs up the "window" a little bit, but I think that actually helps. The numbers actually presented a bit of difficulty for me. I want them to be my TK ID, but I do not yet have a TK ID. I guess I'll just need to make it such that I can pry off and replace this part later. The ID I wanted is taken and there aren't really all that many left. As of yesterday there were 569 IDs available, which means the legion has used 94% of available 4 digit IDs. I'd say that's pretty impressive, and if I want a 4 digit number I'd better get my armor made quick . The button on the grip will go where there is an indentation that looks like a button anyhow. I'm not sure what, if any, function that had on the original Sterling. Safety? On the other side the button intersects with the trigger, so I needed to cut back the plastic a little bit. These Hasbros are overengineered and can stand to have lots of random plastic stripped away from them right ? Back to the barrel After the E-6000 was dried on the barrel I applied a bit of Bond to the gaps. I also sanded down a flat space where the bayonet would attach, but I forgot to get pictures. I then decided it was finally time to paint it. I used a staw to cover the LED on the end and I made a little cardboard cover for the internal LEDs. Spray painting is another thing I've never really done before and I'm nervous about getting good results. Based on other threads, and the instructions on the back of the can, this is what I plan on doing. DONE: Lightly apply Rust-oleum Universal Metallic Paint & Primer (Satin Nickel) base coat you can see through portions at this point DONE: 5-10 minutes later: apply Satin Nickel base coat again still not 100% covered, I missed a few angles. The paint looked like it was starting to pool a bit so I got nervous about applying any more TODO: 48 hours later: apply Satin Nickel base coat again I wouldn't do this if there weren't still gaps around the muzzle. The base also needs to be painted a bit further back. TODO: 48 hours later: apply Rust-oleum Painter's Touch Flat black TODO: 1 hour later: weather away black with fine sandpaper TODO: 48 hours later: apply Rust-oleum Painter's touch Matte clear coat I've tried a few variations on these, as well as using Rust-oleum hammered silver and hammered black, on some scrap pipe and I think this combination will be the best. I like the hammered texture as it has a genuine Sterling look to it, but I had difficulty applying it evenly and it made a thicker rubbery surface that was difficult to weather using the sandpaper method. Some additional concerns that I have so far: The Bondo doesn't seem to cover as well as the plastic. Maybe it requires a different primer? WIth a layer of paint all the messiness of the E-6000 is a lot more visible. I should probably have spent more time filing, cutting, rubbing, or doing whatever it takes to clean it up.
-
I found that a heat gun works even better then the oven for bending the plastic. It seems like the plastic is malleable longer and can be reheated quicker. I reformed my front sight guard a little bit and made a blowback shield using the same technique. The plastic I used is about 3mm, so they are not quite right, but certainly much better then before. So aside from a bayonet lug, I have everything ready for the barrel. (I tried making a bayonet lug today and discovered it is very difficult so it will wait until another time) I sanded down the tube with a couple of grades of sandpaper and cleaned it in preparation for gluing and painting. For the muzzle, I readied the electronics by getting the wires soldered on. I used a cut up ethernet cable for wiring. I couldn't think of agreat way to mount the lights in the tube, so I decided to attach them to the back of the muzzle with a liberal dose of Bondo. Then I attached everything together and applied E-6000 I haven't used E-6000 aside from in this project. Every time I've seen people use it they always have it clamped down. The blow back shield in the picture isn't being held by anything except the tackiness of the E6000. It seems stable, but I'm worried it will slide down over night. The rubber bands are really hard to hold it in place with since they tend to push the shape one way or the other, so I'm thinking if it will hold this will be best. Should I be concerned? Also, I made a royal mess of things trying to get the E6000 on there. The stuff is a bit goopy and hard to target in a small space. When trying to rubber band on the parts it was smearing all over the place. I assume I can scrape off the excess easily when it dries, but I don't know how that will go yet. Does anyone have tips for applying E6000 to small parts? I'm glad I'm learning this now, so I won't be trying it for the first time on my armor build
-
Great job! I can't wait to see the final pics.
-
I didn't have a whole lot of time tonight, but I was able to make a try at making a better front sight. I cut out a piece of 2mm thick plastic to see if I could bend it to the proper shape. I had pasta tonight and I got the idea that it would be easiest to just boil the plastic to make it bend. After all it works with my t-track material, I thought. This was a mistake. boiling was not hot enough to make it flexible. I didn't know exactly how flexible it should be, so I forced it. If you try this, do not force the plastic to bend! The plastic snapped. I cut out another piece (I'm going to be real good at this by the time I'm done). Lucas showed using an oven in his scratch build thread, so I gave that a try. I went to about 350 degrees Fahrenheit for a couple of minutes and the plastic came out like putty. It is really hard to form this shape though. I tried using my metal sight as a guide, but it didn't work out too well. I tried wrapping the plastic around the metal. It's pretty hard to press the plastic hard enough from all angles to form straight lines and not to deform the metal guide. The plastic hardens up in a matter of seconds, so there isn't a lot of time to get everything even. The sight on the right in the previous picture was my best attempt at getting it lined up, but the base isn't parallel and it leans a bit to the side. Also, something's not quite right with my metal sight. I'm using ZeroRoom's sterling template, which assumes a 2mm substrate. I'm not sure if the cutting guide represents the outside curve of the sight guard, or if it is the midpoint of the material or what exactly. When I use a thin sheet of metal, It doesn't quite align with the bending guide. It seems that even if I bend around the outside edge of the bending guide my material is just too long. At first I thought the bending guide might just be for reference, and not to scale, but I'm pretty sure I'm doing something wrong. If I can get the metal properly shaped to the outside curve of the sight guard, I can probably cram the hot plastic in there and get it to be pretty close to the right shape. Maybe Lucas can explain how the sizes are related?
-
I got a pair from them and they are great. Can't wait to wear them with a set of armor. Their website is http://tkboots.com/. They have contact information on the website.
-
When looking for some good reference pictures of the muzzle and front sight of the sterling I just realized that I stupidly set the front sight on backwards in my mockup. Good thing no glue has been applied yet. My front sight and blowback shield are made from very thin sheet aluminum. The only 2mm sheets they had at the hardware store were steel, which I'm not sure that I can cut and bend. I don't even think I could bend 2mm aluminum. Does anyone think I should thicken it up with some padding or something? I might be able to use plastic, but I'm not sure how to make those bends.
-
Some more progress today. A little bit of work making a blowback shield and readying the muzzle. One new lesson learned. Don't use good cutting bits on J-B stick! The stuff will fill in the grooves and make the cutting bit pretty useless. So, one more run the the hardware store for replacement bits today. Time to start on the barrel! The plan is to cut off the barrel about where that red mark is in the picture above, right at the molded seam in the Hasbro. I cut off a length of pipe long enough to make the barrel and recess in to the Hasbro body up to the speaker. I need to find a better method of cutting this stuff. I borrowed a chop saw, but it had a pretty rough blade and chipped up the end. It's ok for this build since it will be hidden in the body, but I'll need to have a better method later. Then comes the tedious part; drilling. This was pretty much an all day activity. Pilot holes, cutting out the circles. Cleaning up the circles. Coming back with the grinding wheel. Filing. So much filing. But in the end it's looking pretty good. I mocked up the parts together, and it at least makes me feel like there's been some progress. I think it looks pretty cool. Almost makes me want to build a transparent E-11 display piece.
-
Another day of working on my blaster. Trigger To get warmed up I started with modding the trigger. When I get this thing closed up there's a good chance it won't open again, so I figure it would be good to finish anything that requires access to the internals. I left it gluing with some E-6000. Barrel Attempt (J-B Stick) Next, I tried closing the barrel yet again. Using Eric's suggestion I tried bridging the gab with something a bit stronger. Thanks Eric for the ideas. I was hoping to seal the top, drill holes, and then cut a seam down the middle. Then disaster hit! The J-B Stick held up better then the Bondo, but it still needed to be handled carefully and some of it cracked off. The bigger problem was that I did not heed the old adage "measure twice, cut once". My row of holes was slightly shifted and ended up off center. Filling this gap was difficult enough as it is, but now it will be near impossible. So, lessons learned: Bondo is best for filling depressions, not gaps J-B Stick can handle small gaps, but still is weak and difficult to drill through I've got a lot of practice with drilling and applying Bondo, so I wouldn't count this as a complete loss. At this point I'm falling back to Plan B; completely replace the barrel. Yay for more learning opportunities! Barrel Replacement Before cutting some pipe, or committing to cutting off the Hasbro barrel, I figured I had best ready some of the pre-requisites. Namely, I would now need a forward sight and some work for the muzzel. Forward Sight WIthout the Hasbro sight I would need to make my own. I printed out some templates from the Best Sterling Templates EVER thread and got to work on a peice of sheet aluminum from my local hardware store. Muzzle I'll still use the Doopy Doos muzzle, but I now need another layer to adapt it to the end of my pipe. I also have wanted to use real bolts on the end, so it's time to connect those too. And that looks like it will be the end for today. I still need the little crecent vent cover for the right side of the barrel and a bayonette lug. I'll be about ready to cut the pipe and start drilling holes again (lots of practice drilling holes). I should be able to assemble and even paint the pipe independently then glue it in to the body of the gun.
-
Thanks for the tip Eric. I picked up some epoxy putty tonight. We'll see how much progress I can make tomorrow. Do you think it is possible to cut a seam in that after it has been sanded and I have the holes drilled in it, or do you think it would be best to just seal it up permanently?
-
Looking at this again today I'm concluding that the Bondo solution is just way too unstable. Even after handling it a bit more pieces chipped off so I went ahead and chipped off all the Bondo on the top. So I have two possible routes that I could try next. 1. Try using fiberglass to bridge the top I picked up some 3M fiberglass resin from the hardware store. I've never used this stuff before, so I have no real idea of how well it will form or hold up to drilling. This would also probably permanently seal the gun up. 2. Cut off the whole barrel and replace it with a pipe I have some 1.5" pipe, which is a bit narrower then the rest of the Hasbro body, but I think it will look ok. After all, a slight jump in diameter will be less noticeable the the Hasbro's more obvious tells. If I go this route I will need to come up with a new front sight, as well as extend the folding stock (since I would want it to be proper Sterling length). Either way I'm certainly getting my education out of this thing. What does everyone think? Do a barrel from scratch, or figure out how to best close up the Hasbro barrel?
-
I took the plastic strips left over from making a piece of t-track and bondo'd them in to place at the top of the barrel. I sanded back or knocked off the existing bondo so that when they were in place they should make a straight seam down the top of the gun. When closed up they weren't quite flush and there were some gaps. I filled that in with another application of Bondo on the outside and sanded it down. Next I re-applied the template and drilled holes. So herein lies another quirky problem with the Hasbro. The Hasbro barrel is dimensionally pretty screwed up. It is shorter then a Sterling, but perhaps more problematic is that it is a wider diameter. The pre-drilled holes however are about the same size and spacing as they are on a Sterling. What makes this awkward is that there is no way of making the holes be evenly spaced. The traditional pattern has each hole about 17.2mm away from each neighbor, both on the same row and the next. This can't be done on the Hasbro, so instead I have an extra space between the top row and the next row on either side. My other option would have been to center a row between the top and the side, but then I wouldn't get the even spacing. I'm not sure which is better or worse. This pattern was mostly convenient because I already had templates with this spacing. Ok, that aside, after doing some more sanding and cutting this is basically what I end up with: For the Bondo to be stable, this has to be pretty thick. I also chipped off some of the plastic and Bondo in the sanding process, so that will somehow need to be replaced or filled in. As I suspected earlier, this isn't going to be very stable. Some of the damage/flaws will be obscured by the t-track, but it will be hard to finish these off well. Even if I get this part looking halfway decent, I'm not sure how I'm going to keep it stable. It would not be great if the slightest bump put a gaping hole in the top of the barrel. More thinking will be required...
-
I think I'm going to try making this thing so I can split it in half when it is done. To do that my plan is to make a seam along the top with two thin strips of plastic that I will form the surface against, then cut out the top row of barrel holes in. Fortunately I have a handy source for that plastic. I'm experimenting with some material I found at the local Home Depot for making t-track. I found it with the trim pieces. It is fairly labor intensive, but a by-product is thin plastic strips. Here is a cross section next to the DoopyDoos t-track: I cut off the top with the dremel, and then scored and cut the edges. It then needed lots of filing and sanding. I could probably just use scissors for the top and sand down the edge. I have lots left to do, so plenty of time to refine my method. Above is the general end results with the DoopyDoos track. Still needs a bit of sanding at that point. The material bends easily with heat. I tried a lighter and boiling water. After trying both I prefer the water method since it won't singe the edges. With the lighter I needed to evenly heat the top and the bottom so the spine had enough bend to flex. The by-product is plastic strips I will try using for the upper seam of the barrel. I just need to make up some more track of the appropriate length and then try it out.
-
Thanks. I've been following your scratch build with a lot of interest. I can't wait for you to release your templates, the barrel template has already been useful, and it is very nice to have a good reference on the dimensions. Today I found a local supplier of transparent 1.5" O.D. acryllic tube, so I picked up a piece. I could see getting some good use out of it soon; I just need to finish the Hasbro and build some armor first.