

FunkyTrigger
-
Posts
961 -
Joined
-
Last visited
Content Type
Profiles
Forums
Gallery
Articles
Everything posted by FunkyTrigger
-

TK3796 Ourphil's TM WIP - ANH Stunt
FunkyTrigger replied to FunkyTrigger's topic in Build Threads Requireing Maintenance
Please have a look at this adjusted thigh ammo pack. It's not to Paul's guidelines, as a complete change of ammo pack would be required to achieve those measurements. It is however within Mathauis's measurements. The cap head is 8.5mm and it is 8mm from the top and a less from the end edge. At least my thread will be a test case, now with accurate measurements that you could use to back up your proposed amendments. I think cap sizes, and approximate measurements from the edges with acceptable tolerances are required in order to backup your proposed thigh pack rivet location. -
TK3796 Ourphil's TM WIP - ANH Stunt
FunkyTrigger replied to FunkyTrigger's topic in Build Threads Requireing Maintenance
Thanks Paul. I'm the kinda guy that needs figures like this. I hate the guess work. Cheers -
TK3796 Ourphil's TM WIP - ANH Stunt
FunkyTrigger replied to FunkyTrigger's topic in Build Threads Requireing Maintenance
Hi Paul / Mathaius The CRL thigh plate images are too small. It's a Shame I can't find Lucas archive footage pics of the side view of the right thigh. I would like to know if a 10mm diameter rivet, split rivet or cap in the top left corner is acceptable for a Centaurion request? The head diameter question needs to be addressed. This is the size of a thumb tack or drawing pin head? Or is 9mm or 8mm the accepted diameter? Thanks -
TK3796 Ourphil's TM WIP - ANH Stunt
FunkyTrigger replied to FunkyTrigger's topic in Build Threads Requireing Maintenance
Hi Mathaius, to avoid an ongoing argument, I will show that I am a man and back down. The proposed voting doesn't come in for another 10 days and I am all for upping the standards. The only reason that I have given my thigh pack the extra mm in height was so that it will not catch the shin front top. I'm not building my Armour just for show. I'm an active UKG trooper and have my Armour for practicality, comfort and close up inspection. I have a spare thigh ammo pack, and I have a few ideas on relocating this rivet without changing the ammo pack which I will show. Other adjustments are made to other troopers Armour to account for their size and build, such as torso shims, larger black areas for taller troopers, different amounts of front ribs attached to the top of the chest plate, I merely saw my thigh ammo pack positioning as an adjustment for my shorter legs. -
TK3796 Ourphil's TM WIP - ANH Stunt
FunkyTrigger replied to FunkyTrigger's topic in Build Threads Requireing Maintenance
Centaurion applicants are encouraged to study and copy the other build threads. I have used recent TM build threads as reference and and now looking for Lucas Film archive pictures to back up my case. I can trim my corner and use a larger cap to achieve the result of "looking" like its more in the corner. However, I don't like being scape goated. If you are not using science to determine where the rivet goes then what on earth are you voting for? May I see your chat topics or voting agenda or documentation please? -
TK-4403 Requesting ANH EIB Status [TM][265]
FunkyTrigger replied to Brigante's topic in Request Expert Infantry Status
Use the photobucket IMG code. That should work for you -
TK3796 Ourphil's TM WIP - ANH Stunt
FunkyTrigger replied to FunkyTrigger's topic in Build Threads Requireing Maintenance
If a vote is going on to reflect the position of the thigh ammo pack rivet, then in support to this, a detailed specification must have been drawn up. Please specify the drill co-ordinate of where you want the rivet to be? For example, is it 6.5mm from the top edged and 5mm from the left rear edge? Could you also specify the diameter please of the rivet head? Can you also describe the shape of the rivet required please, for example are you voting on a standard rivet with a hole in the middle or should it be smooth? Should the rivet be flat or domed? Your expert knowledge would be greatly appreciated in order to clarify this situation and would indeed benefit all TK troopers in the future. I have been reading many EIB and Centurion applications and passes and feel this specification is better than saying "up a bit, or down a bit" I'm happy to change my rivet to whatever the specification is. I happen to have a spare thigh ammo pack, ready and waiting for your instruction. If my current rivet is within 2mm of the co-ordinates then I may be able to trim the left and top edge of my existing ammo pack to bring the rivet up and into the top corner. Once the specification describes the rivet, I may find that my current 6-7mm cap rivet head is a touch small and again a larger head would give the illusion that the rivet is closer the the desired co-ordinates. Also, may I ask for any threads about this discussion please? I've read only recently about recommendations for changes to the centaurion CRL for the backs of shoulder bridges. My fellow UKG brothers are not able to help me on this matter at the moment. So, over to you. I await the specification document that you are voting for to help me proceed with my build. -
Geaux Saints' ANH stunt build (TM)
FunkyTrigger replied to Geaux Saints's topic in Build Threads Requireing Maintenance
Your front and sides are where I cut mine. I'm not sure about your back line though. There should be a natural rear line to follow. I noticed that you haven't posted a pic of the front face mask. The top of the face section has no cut line but definitely needs trimming down. Post that up if your not sure. -
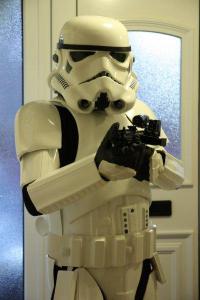
Hi Guys, I thought that I would start getting together my 2mm TM Build pics together. I am starting out aiming for a Centaurian build. Here are the main armour components. Main Torso, This has been strapped and adjusted to fit me. I's using the practicle elastic and poppers strapping method, as I am an active trooper. No return edges forearms Thermal Detonator Assembled Right Top Ab Snap Thigh Ammo Pack No Rivet Sniper Plate 1 No Rivet Sniper Plate 2 Scuffed Boots, Shins & Gloves Flexible Hand Guards over Chemical Gloves TM Handpainted Helmet - Front TM Handpainted Helmet - Right TM Handpainted Helmet - Left TM Handpainted Helmet - Back Helmet Green Lens Holster E11 Blaster D - Ring Scope Muzzle
-
TK-5981 Requesting ANH EIB Status [ATA]
FunkyTrigger replied to dcr5595's topic in Request Expert Infantry Status
Right rear shin overlap? Is that facing out wards rather than inwards? -
E6000 questions
FunkyTrigger replied to DizzyStormtrooper's topic in The Foundry - Armor and Prop Making
I use 40 grit, but anything around 100 grid would also do.. -
The Road to 300 (FISD EIB, that is) Stormtroopers - Achieved!
FunkyTrigger replied to Daetrin's topic in Off Topic
One pot of Humbrol French blue would be all that would be required to hand paint over more than 20 black tube stripe lids. A very cheap and easy fix. -
TK-6794 Requesting ANH Hero EIB Status[AP][266]
FunkyTrigger replied to dm101's topic in Request Expert Infantry Status
What colour are the helmet tube stripes in these pictures? -
Appreciated! Thanks.
-
Why has it been switched off? I thought it was a great access tool.
-
Requesting Denix to do the L2A3
FunkyTrigger replied to moonwalker's topic in Build Threads Requireing Maintenance
Comment also left. -
TK 7944 Requesting ANH stunt EIB status[232][FX]
FunkyTrigger replied to Hunterhwt's topic in Request Expert Infantry Status
Also... As Mogwai said, your main belt needs more trimming. Closer to the boxes would be better. Someone else also mentioned that there is an issue with your right shin at the rear. The overlap is going the wrong way on the rear of your right shin, this leaving the overlap showing to the outside, rather than the inside. -
TK 7944 Requesting ANH stunt EIB status[232][FX]
FunkyTrigger replied to Hunterhwt's topic in Request Expert Infantry Status
Hi there, I've spotted a few easy fixes that look like they need addressing for your EIB. 1. Your main belt is sitting a bit low, the top of the belt should be close to the height bottom ab buttons. 2. The Main belt corners have not been cut at the 45 degree angles to meet up with the belt. 3. Your knee ammo belt has also not been cut with the lower rounded corners. All no cost and simple to address areas to get you started. -
Replica TM Luke Suit Jorney
FunkyTrigger replied to SW1's topic in Build Threads Requireing Maintenance
Looking forward to seeing you in it Steve. -
TK-6817 Requesting ANH Stunt Centurion Status[39][TM*]
FunkyTrigger replied to a topic in Request Centurion Status
Gareth, I'm honestly trying to say something nice. Well done -
TK - 6817 Requesting ANH stunt EIB status [228][TM]
FunkyTrigger replied to a topic in Request Expert Infantry Status
Congratulations Gareth, your a "sharp dressed man" -
Thank you sir.
-
I started my first TK with AM armour, that you know, however it was a terrible fit and shape on me and this armour is a traditional but join suit. Sorry about the sequence number, I thought it was the procedure to follow.
-
LA armour is a UK TE2 derived brand, made by Loading Area, hence LA armour.