


gazmosis
-
Posts
4,043 -
Joined
-
Last visited
-
Days Won
23
Content Type
Profiles
Forums
Gallery
Articles
Everything posted by gazmosis
-
After sanding smooth the eye openings, I began on the teeth. This was a bit of a challenge because the plastic within the teeth was very thick. I pre drilled and detail cut with an exacto knife. Notice how nice the eyes came out.With all face features cut out, I was ready to attach the cap-n-back. I put in a piece of dummy brow trim to make sure the cap fit right against the face. I drilled the cap at the ear, marked it against the face. Ithen drilled the face and snapped a rivet with a washer to secure it all up. I repeated on the other side.Now the ears. This was the only part that lacked mold detail. It was very difficult to see where I needed to mark the curved parts to cut out. Luckily, I had some leftover ears from a previous build and used that as a guide. I gave myself plenty of extra for I know there was a lot of tweeking to be done. First I marked, scored and snapped.
-
I picked up one of Mike's (TK-4510) new ABS helmet kits. First off I would like to say what a pleasure it has ALWAYS been dealing with him. I have purchased numerous decal sheets and now the helmet kit and he is a true professional and a credit to the FISD. As well as his helmet tutorials!!! Anyway, he gave me his blessing to show off my helmet build of his kit. I hope I will make him proud. There was very little trimming to do. For the excpetion of the ears, I had to trim very little to assemble. To begin, he was nice enough to initial the inside.Next a spread of the necessities.The details are great! Both faceplate and cap-n-back are of good thickness. But I can't get over how much it actually looks like a HIPS helmet with all the bumps and nuances we love.The eye sockets of the mold are much deeper than any other helmet I have built. This actuall made it tricky to mark off where to cut. I marked out the eyes and the teeth before cutting. I drilled holes and used a rotary tool with a rotozip bit on it to cut out the main area of the eyes. I then detail sanded with the tiny sanding drums on the rotary tool. One is in the picture next to the scissors.
-
If you dip a brush into paint thinner then pat the brush so it's not dripping, you can "brush" the rough edges and remove the paint from wherever you don't want it. Keep dipping and wiping the brush to keep it clean or else you will just spread the paint around. After you are satisfied with the cleanup, touch up the edges with a fine brush and paint. Your placement looks great, though!!!!
-
I already put all my pics to photobucket before here. I think I will just post the first few and add pics to the same post . Thanks troops!!!!
-
Happy B-day Vern!!!! 48th time, that's it? You got some catchin' up to do, mate!!
-
A "placeholder post"?
-
Hey troopers!!! I am doing a helmet build that has a crap ton of pics but I can only post so many pics per post. I guess what I am saying is that I want to do a several page post without starting a new thread each time. Help!
-

TM 2011 ANH Stunt Kit a.k.a My First TK
gazmosis replied to TKmAx's topic in Build Threads Requireing Maintenance
Dude, the link is to a private album. You can ONLY enter if you have a password. -
TK6726 Requesting ANH EIB Status[177][ATA]
gazmosis replied to JEDISTAR's topic in Request Expert Infantry Status
Man I love it when armor fits that well!!!! I bet you were blown away when you first saw yourself in it. Great work!!!! -
Snap Problem: not staying snapped
gazmosis replied to Jorran's topic in Assembly, Mods, and Painting
UK Ricky's got it!!! The male end of the snap is designed to be grabbed by an expanding ring inside the female snap. The "snap" you hear is the ring collapsing around its male counterpart. If the male cannot get this ring completely around it, it will hold, but very weakly. IS weakly a word????? Anyway, use the head of a strong nail and flatten out everything within the female snap and you'll be golden and strong!!!! -
Microphone vs. fan placement
gazmosis replied to bluehickey's topic in Electronics for Helmets / Blasters
I also had a fan noise issue. To solve this, I molded a piece of ABS over a fan with a the round end of a box wrench on top. When removed, three of the 4 sides of the fan were sealed creating a squirrell fan and directing the air to circulate around the inside. ----------- Get a PTT! Run it down your sleeve to the tip of your finger. I keep it on my finger with a small piece of elastic. Just push it against your blaster to talk. WARNING!! If you are wearing rubber chemical gloves and you sweat a lot like I do, the PTT WILL short out and need to be replaced. The PTT unit must be protected. If anyone has suggestions for this please contribute. I tried a balloon----didn't work. I tried silicone caulk, it broke through. -
You got some incredible armor there, trooper!!! In my opinion (for what it's worth) I would remove the padding in the biceps and cinch those up until they are JUST under the shoulder bells. I wouldn't worry about the black showing it won't make that much difference. What it will help with is the ability to bend the arms at the elbow without the inevitable pinch bruise at the bottom of the bicep. Also, you might want to make some future plans to remove that rivet on the sniper plate if you are going for Centurion at any point. Nice build! I would never guess you are as tall as you say you are.
-
Lost for words except OUT..bleeping...STANDING!!!!! and..um. Centurion?
-
RedSpecial's ANH Stunt AP Build
gazmosis replied to RedSpecial's topic in Build Threads Requireing Maintenance
Whew!!! I know that there are plenty of builds that finished the legs with regular rivets and then looked up the Centurion requirements and said (insert "Tim the tool man grunt) "oh no!!!" Good on ya that you planned ahead!!! Build away! -
Leather for Holster
gazmosis replied to Kevin Myhre's topic in Boots, Soft Parts, and other Accessories
I bought my leather from a guy in south Milwaukee, Wisconsin. It was an old building that they used to make horse saddles. The guy bought it with all the leather, machines ect....It was cool to see all the old machines. But anyway, he cut me a piece of black cowhide for chaps that measured 2mm thick. Although the originals were a bit thicker, I actually doubled up the leather on the main body. Since one side of leather is sort of shiny and the back is almost fuzzy with no shine at all, the fuzzy side will show....a lot....when you fold the leather around to stitch it together. I just cut another piece and had it glued and sewed together so that the whole thing looked sort of shiny. I had this done at a local shoe and luggage repair shop.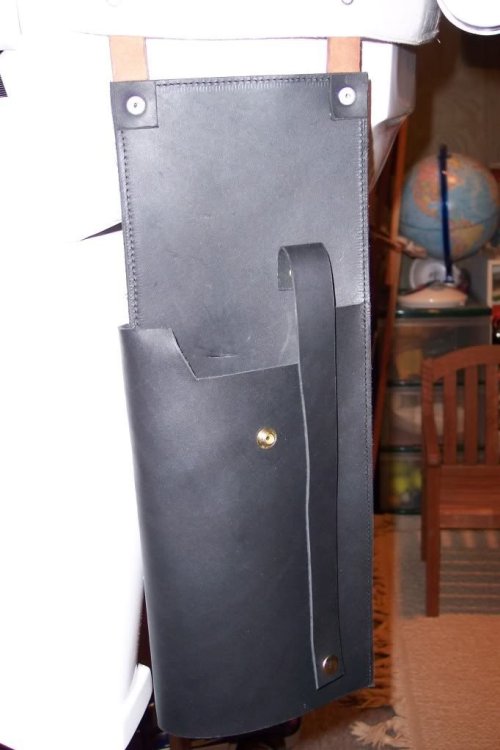
-
My first Stormtrooper - ROTJ Style
gazmosis replied to Masterstumpy's topic in Build Threads Requireing Maintenance
Looks pretty glossy for HIPS. Build away young man!!!!! -
RedSpecial's ANH Stunt AP Build
gazmosis replied to RedSpecial's topic in Build Threads Requireing Maintenance
Have you thought about requesting EIB or Centurion status? You might want to check those requirements out before finishing the legs. I am referring to the way the ammo pack is on the right thigh and the sniper plate is on the left shin and the manner in which you connect them to the legs. I love the AP armor!!!! Keep up the great work and I can't wait to see you suited up!!! -
Armor question - the Right Fit
gazmosis replied to KYTK's topic in Getting Started - Read this First!
What you decide will largely be based on what level of accuracy you want to acheive. AM is better than it used to be, but is still considered to be the least accurate of the types. According to your "stats", you can fit into many different types of armor not ONLY AM or RT. It's been a while since I have built an AM kit(formerly FX), but if I remember correctly, AM is the easiest to assemble because it comes pre-trimmed and the parts inter lock. Truthfully, I dont recall about RT (help me out troops!!!!) if you need joining strips, but all other types of armor do. These strips are seperate strips of plastic you need to cut and trim that cover the seams when two pieces of armor butt together. My suggstion is to take a serious look at the build threads to get an idea of what goes into building the different kinds of armor. Ask a lot of questions and don't gain any weight. Then you should have a better idea as to which direction you want to go towards. -
This doesn't look very....um.......stormtrooper....y. Just my opinion, but I would think it would look more sinister.
-
1mpulseS0D's Build Thread [*AP]
gazmosis replied to 1mpulseS0D's topic in Build Threads Requireing Maintenance
score n snap score n snap!!! -
How did you even see the male snap? Not real clear on that pic of the right side. Do like Michael said!
-
qestions on my first armor
gazmosis replied to SGT Tasty Wheat's topic in Assembly, Mods, and Painting
This all depends on which armor you invest in......are you going ABS or HIPS in which case you will need to primr paint and polish? -
Finally... it begins! Anphrax's ANH ATA Build
gazmosis replied to anphrax's topic in Build Threads Requireing Maintenance
And some were even a rubber-like material.........right Karin? -
You might have something here....painting the details BEFORE assembly. For some reason, I just can't bring myself to do it that way. Change could be a good thing for me. Having ABS helps, too!
-
1mpulseS0D's Build Thread [*AP]
gazmosis replied to 1mpulseS0D's topic in Build Threads Requireing Maintenance
All I can say is...WOW! And we can't wait to see build pics. After 4 months I know you're jumpy to dig in but make sure you have a huge plate full of patience next to you to snack on constantly!!!!
