Leaderboard
.thumb.jpg.d5282f66012c891acf8163f75bfd42c9.jpg)


Popular Content
Showing content with the highest reputation on 11/11/2025 in all areas
-
Updated @BigGunsAreTheBest @Andor_FX. @Eli Fem Trooper you already have status2 points
-
File Name: Levitating Jedi Training Droid Designer: user_2711942270 Last Update: 10/11/2025 File: https://makerworld.com/en/models/1979189-levitating-jedi-training-droid?from=search#profileId-2128845 Description: I wanted a levitating Jedi Training Droid. I did not find one in Bambu and the ones I found in other places were complicated with lots of pieces to glue together, so I decided to make my own super simple version. The profile has both a plain single color version you have to hand paint and a multicolor AMS version. Due to the color bleed with using red (see pic), I actually prefer the hand painted one. Or you will need to increase the purge significantly. The only supports are at the very bottom where it sits on the floating disc. It is sized to just sit on top of the default floating disc that comes with the kit if you order from Bambu Labs. Magnetic Levitation DIY Kit: https://store.bambulab.com/products/magnetic-levitation-diy-kit?id=43043288711304&modelId=1979189 Images:2 points
-
Very nice, have to be happy with that1 point
-
I've been quite busy with work alongside doing this mortar and starting my next costume, so that's why I haven't updated this as I went like I prefer to, but I will go over how I've gotten to this finished version of my mortar I went and made files for the feet of the bipod, though I didn't finish my "tube" print for the bipod, as I quickly realized that the screen used bipod is a lot longer than mine. The bipod used in the show is an extendable one, so is mine, but mine needs to be fully extended to be the length used in the show. If you look at references you'll notice that only the bottom part of the bipod is extended and that the upper part is collapsed. Adding the tubes onto my bipod would look extremely odd with how close it would be to the feet of it. This along with the iron sights being too big, and missing a couple greebles above the iron sights is enough for me to want to come back to this eventually with a version 2, and possibly modify this version 1 to launch stuff (obviously not for conventions and that, just for my own amusement lol). The bipod was also just attached using plenty of CA glue, I could've likely screwed it on or tried using a proper bipod holder, but I didn't think the holder looked very accurate on it, and I couldn't find exactly how it was originally attached for the show, so I just went off the placement seen in references. I will be sharing this bipod end file, as well as the file in my first post in a day or two. To attach it I used the small metal pin found on the bipod. Once you remove the original rubber ends, this pin gets exposed and it's used to hold the spring inside the metal tube, but it's also convenient enough to stick out and slide into my printed bipod ends. I also wanted to note that if you compare the 3 yellow dotted detail on my mortar to the Hot Toys references (these are also the references used for the CRL), mine is placed differently, I used this reference image below of the actual mortar for my placement of it Oh and as a fun little detail that I don't have pictures of yet, the cylinder piece on the side of the mortar matches the handle on the side of the munitions pack and can be attached to the pack. Though I haven't tried wearing it myself like this just yet because my munitions pack is already heavy enough as it is and I don't need to be adding another 5-10 pounds to it lol1 point
-
Here come a first try with the forearm and guides1 point
-
Hello Andreas, welcome to the FISD for the rear cover strip closure, you may need to warm up the ABS and form it to fit better. A hot water bath is recommended over a heat gun as the ABS will go from mouldable to ruined in a fraction of a second some have succeeded with the heat gun but it is a big risk. With respect to the boot, ideally it should not buckle under the shin armour. You could try inserting something in the boot to make it fit more snug, or slightly enlarging the size of the shin at the bottom.1 point
-
Sure thing! Also added to https://photos.app.goo.gl/6RvoDEakAYWhRp3U61 point
-
Thanks Haribon72 I've been trying to figure out how to resize my thighs for a little while. this gave me a bunch of ideas and a direction to move forward.1 point
-
Has anyone actually personalised there’s by adding a photo? I’ve yet to do mine. Sent from my iPhone using Tapatalk Pro1 point
-
LOL! This was what I came up with for me. The pink is the plastic holder part and border, the rest would be etched...
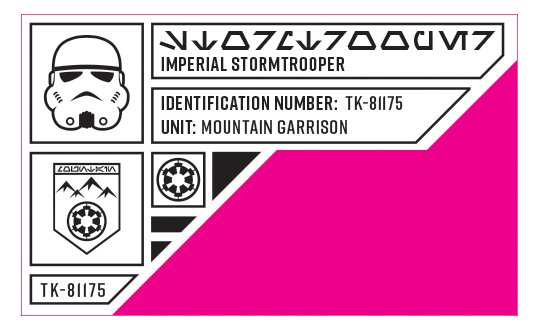 1 point