Leaderboard


Popular Content
Showing content with the highest reputation on 01/08/2025 in Posts
-
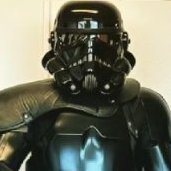
Update #02 - Weathering and detailed photos Weathering was done like on my other blasters: Humbrol 27004 polish paint, then some silver dry-brush effects, dust weathering and real rust in selected spots. The blaster‘s back end was initially planned to be gloss back, but I simply did not find a way to weather a believable bakelite appearance. So I decided to go for a wooden appearance and covered most of the black paint with acrylic brown paint (brushed) and sealed everything under matte clear coat. And here is how it looks: Metal pipes inside have a snug fit and support the blaster over the full length. No bending or so. The handle can be stored inside the magazine cover and everything fits into the improvised transport box. Build facts: Total build time (including research and ordering stuff) lasted over half a year. Total build costs (including kit, new T-tracks, accessories and paint) is about 250 Euros. Total weight is only 1,4 kg (a full resin E-11 is around 1,1 - 1,2 kg) Is it complete now? Yes, I don‘t have plans for any additions like electronics or so. Is it perfect? No, by far not. It‘s just what I was able to get out of this individual kit. Would I do it again? Considering the effort to clean all print lines, I would say no. On the other hand, now knowing how to treat a 3D print would speed up work...3 points
-
Hello there Last summer I bought a kit for a DLT-19 blaster from @Freduster who didn‘t find the time to build it. It was 3D-printed by @Rasagal, using a free online file. While doing some research on the original MG-34 I found many details to be wrong or completely off. Seemed like it was not the most accurate file out there, so I tried to make the best of it. A build thread was not planned so I did not take photos right from the start, but captured some progress later to retrospectively do one now. The front barrel made me worry because cooling holes and T-tracks had the wrong amount and wrong layout. Additionally there were flat areas for gluing the T-tracks, also in the wrong positions. So I decided to rebuild the barrel from scratch and buy accurate T-tracks.2 points
-
Update #01 - Smooth surfaces The problem with 3D prints is to get rid of the print lines. Sanding is most common but blasters have too many small areas where it is hard to get to. So I searched for a method to smoothen the surface by adding something to it. I was recommended to try an acrylic bush-on modeling paste. Bought it, tried it but had to sand the brush strokes. Therefore not suitable. Then I came across XTC-3D. A two-component epoxy resin (ratio 2:1) to brush on with interesting results in many Youtube videos. Instead of this I bought the simplest two-component epoxy resin I could find. It was transparent, cheaper and easier to mix (ratio 1:1). Result: worked good, multiple thin layers recommended, no sanding required. To then remove the last rest of any print lines, I applied some coats of spray primer. And to add structure, I used spray paint with hammered finish… It took several layers of primer and hammered paint to make all parts look like in the next photo. Then I finally added the matte black to everything but was so busy, I forgot to take pictures.2 points
-
2 points
-
Yeah i have those files. I tried to shape lenses but that plastic start to bubble. I just order acrylic sheet so i will try that again1 point
-
Super awesome, thanks everyone, especially Doggydoc (and team?) for the incredibly detailed descriptions on all the various changes to make before Centurion. Excited to be a part of the EI Honor Gallery!1 point
-
I've tried them all and Tony's really is the best. The little helmet speakers just sound *right*. They're a bit quiet for a large outdoor troop, so I reach for the chest mounted TRamp for those, but the @ukswrath set can't be beat for any other environment. https://ukswrathsspeciality.etsy.com/listing/5257182781 point
-
More progress on the Triple D's AM Kit to replace my ATA kit.1 point
-
Self-build kits (helmet & armour) together with recommended strapping kit ordered from RS Prop Masters - now the long wait until BBB day!1 point
-
1 point
-
I use an Icomm with Aker 1506 amp. Can sit behind your chest plate, some prefer to add to the helmet, does make things a little tight Ukswrath has some nice electronics Some build videos https://www.youtube.com/@ukswrath2278/videos TRamp https://www.facebook.com/trooperamp/ Troopertalk http://andrewbrinkhaus.com/troopertalk1 point