Leaderboard


Popular Content
Showing content with the highest reputation on 08/03/2023 in Posts
-
Good news! The one's from Walmart work! They specifically said 5/8" on them which was helpful! Maybe I'll upgrade them in the future if there is an issue but for now this is what I'll use2 points
-
Both Hobby Lobby and Michael’s will definitely have snaps. Just be aware that some snaps are superior to others, which is why many of us use Tandy. I’d you’re able to implement a double snap system it’ll give you added security in case one pops off mid-troop. Sent from my iPhone using Tapatalk2 points
-
Thanks, I can take that off.1 point
-
If you add the "direct link" option your images should show in your post You may want to remove any overhang, it can catch Info here on adding images
 1 point
 -
some references1 point
-
Trimmed out the back of the thighs more and penciled in some marks to trim the bottom back of the thighs to allow for more mobility. Also finished the shoulder straps.1 point
-
Awesome! Thanks!1 point
-
Okay, yeah that’s where they line up.1 point
-
I've had good luck with the snaps in stock at my local Michaels- They are also 5/8". 75+% of the snaps in my kit are their generic brand.1 point
-
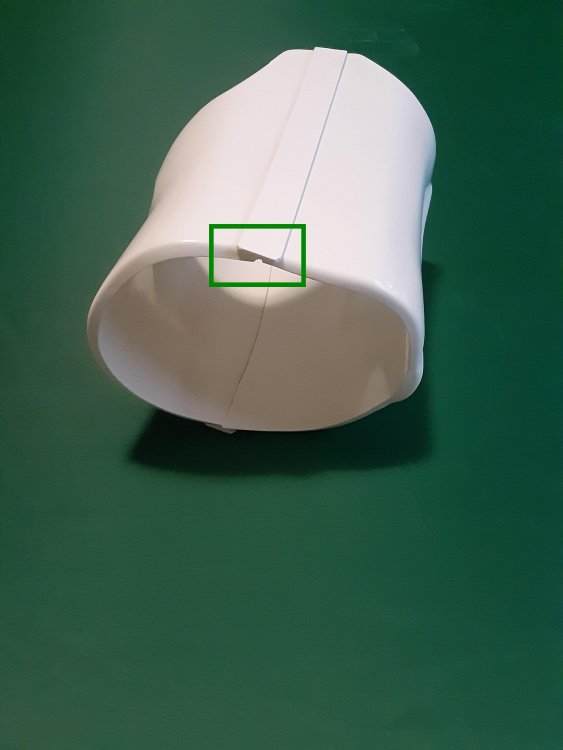
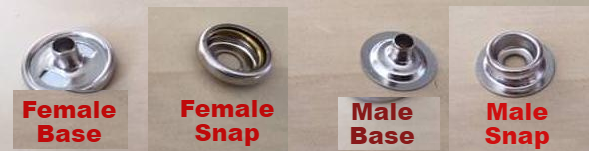
Thank you so much! So I have Male Bases and Male snaps, which makes more sense. That means I need to get Female Bases and Snaps. Also the only snap I have which is branded is the two on the abdomen armor. They say Tandy on them so I imagine they are 5/8" sized which is exactly what I needed to know!1 point
-
Trim marks look fine. Buttons paint just above the base of the plate Ab button paint shall not extend beyond the bottom of the actual raised button.1 point
-
Snaps are not matched, image corrected Tandy Line 24(5/8") snaps are what are normally used BUT there are other brands out there, try to match your brand and not a different as they can be slightly different in size and will either not hold well or are too tight. If you can't find the same brand think about replacing them all as it will save you time in the long run.
 1 point
 -
Just got word that the Pauldron would be in the mail tomorrow. Once I have it in, I will send pictures ofthe pauldron, then apply the decal, and send pictures of that as well for the CRL update1 point
-
Just got word that my Pauldron should be on its way to me soon!1 point
-
Thanks! I re-marked the rivets 10mm from where I trimmed instead. I also did the same thing with the kidney plate and it seems to line up well. Let me know what you I think!1 point
-
Browsing the FO Armors section I found a couple of threads for you, take a read mainly in the first section where they explain the materials and tools needed. Both mention the Epoxy they used.1 point
-
A few approved RS centurion application references for you1 point
-
Of course I’m assuming you’ve marked 10mm for on the return edge. If it’s 10mm from the other edge though than that’s right. It just needs to be 10mm from whatever the hard edge will be. Sent from my iPhone using Tapatalk1 point
-
Trimmed the bottom of the shins and it looks pretty good. Since the RS kit has identical shins I tried to trim them both to have the outer part a the shin a tad longer. Hope this looks alright! The right shin Front: Back: The left shin Front: Back: Still have to do the back cover strip for the left shin as I had to trim more to make it take shape. Thanks!1 point