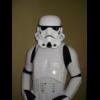
TK5144[TK] Posted July 23, 2009 Report Posted July 23, 2009 put together my first ATA helmet. My first attempt at painting any armor used the painters choice primer, then the rustoleum high gloss x3 coats. so far, I am happy with the result. Thanks to everyone for the tips - I never would have tackled the paint job without it Quote
Dargas[501st] Posted July 23, 2009 Report Posted July 23, 2009 Looks very good man. does that paint has the same colour temperature than the armor or will the armor be painted too? Quote
TK-2126_MD[TK] Posted July 23, 2009 Report Posted July 23, 2009 Nice!!!! looking very good. One question what is the original color of ATA lid? Quote
TK5144[TK] Posted July 23, 2009 Author Report Posted July 23, 2009 Nice!!!! looking very good. One question what is the original color of ATA lid? you can see through the eyes abit - the HIPS is a white, a little more dull than when painted. the photos really don't do it justice - it is REALLY glossy now Quote
TK5144[TK] Posted July 23, 2009 Author Report Posted July 23, 2009 Looks very good man. does that paint has the same colour temperature than the armor or will the armor be painted too? my current armor is FX. this lid is now a little brighter white than my armor. Not sure how much of the luster will wear with time, being handled, etc. I don't have ATA armor (yet). I was not confident on my painting skills, so wanted to try the helmet first. I thought if I mess it up too much, then it could just be converted to a Sandy. I am actually considering making a TD next anyway. If I do get ATA, I will probably go a head and paint it all and then weather it. I still may make the next armor a TK and then weather my FX.... decisions, decisions! If I make this a sandy helmet, I am considering freehand paint for the trapezoids, tears, etc. Otherwise I will get adhesive decals again from tk4150 for the whole helmet if I go TK. Quote
Trooperman Posted July 23, 2009 Report Posted July 23, 2009 Wow that is a sharp pull , love these progress photos Quote
TK5144[TK] Posted August 16, 2009 Author Report Posted August 16, 2009 did some hand painting. Started with the TD approach. This may yet be my TD lid someday. no decals so far. that necktrim was a little tricky to get on. I didn't like the look at first, but now with it on and from the side... I like it. It also gives the neck a more rigid, secure feel. I painted the hovi's black, glued in the screen over the hovi tips. Just need to install them. need to order the tube stripes. need to cut the lenses. Quote
TK5144[TK] Posted September 15, 2009 Author Report Posted September 15, 2009 It is finished. A few more pics to follow. Quote
Darth_Finger Posted September 15, 2009 Report Posted September 15, 2009 That turned out really good. Nice work Quote
TK5144[TK] Posted September 15, 2009 Author Report Posted September 15, 2009 Thanks for the kind words. I am happy with the result. A couple more shots: I used the FIMO blocked glued inside, then screwed the lenses down. someone had a thread on how to do this a couple months ago - I like it! Quote
TK5144[TK] Posted September 23, 2009 Author Report Posted September 23, 2009 How was the timming? I'm not sure what you are asking - the neck and brow trim that came with the kit are fine by me, I know the neck trim is not the screen accurate neck trim - but it works well. if you are asking about the paint trim details - the blue stripes are ordered from one of the sellers here ( I have used them both, both nice products). the traps, ears, frown were all hand painted. Quote
NAZGÛL Posted October 2, 2009 Report Posted October 2, 2009 Looking good there! I think you did the right thing hand painting the details. If I feel brave enough I will handpaint the tube stripes also when I get my lid. Cheers Quote

Recommended Posts
Join the conversation
You can post now and register later. If you have an account, sign in now to post with your account.