AndreasSjodin[TK] Posted April 28, 2025 Report Posted April 28, 2025 Hi, Here is an application to hopefully end up as EIB approved. The Armour and Blaster are commission built by the makers. 1: Andreas Sjödin 2: TK-78024 3: AndreasSjodin 4: Swedish Garrison Sample Costume Information Mandatory Information Armor = Troopermaster Helmet= Troopermaster Blaster= E-11 Troopacoola Link to your approved armor(501st record): https://www.501st.com/members/displaymemberdetails.php?userID=47606 Social media consent (photos): Yes Optional Height = 176 cm Weight = 76 kg Boots = KeepTrooping Canvas belt = Troopermaster Hand Plates = Hard plates on rubber glove Electronics= n/a Neck Seal = Troopermaster Holster = Troopermaster 1 2 Quote
Nairy[Staff] Posted April 28, 2025 Report Posted April 28, 2025 Great to see you applying for the higher ranks, brother! 1 Quote
gmrhodes13[Staff] Posted April 28, 2025 Report Posted April 28, 2025 Lovely contrasting background, well done, good luck with approval 1 Quote
Tall_Trooper[Staff] Posted April 28, 2025 Report Posted April 28, 2025 Looks great, good luck!! 1 Quote
Doggydoc[Staff] Posted May 3, 2025 Report Posted May 3, 2025 @AndreasSjodin We have added your application to the queue. We will get back to you as soon as possible. 1 1 Quote
AndreasSjodin[TK] Posted May 3, 2025 Author Report Posted May 3, 2025 @Doggydoc thank you, looking forward to your assessment 🙏 1 Quote
Doggydoc[Staff] Posted May 9, 2025 Report Posted May 9, 2025 Hi @AndreasSjodin Looks like we are going to need a few more photos for your EIB review. Could you please add the following photos? Left side detail (arms raised showing ab/kidney connection clearly) Right side detail (arms raised showing ab/kidney connection clearly) Abdomen button plates (close-up) Cod and posterior plate connections showing rivet/snaps (exterior) Wrist openings (close-up) Close-up of ab/kidney rivets "Han" snap Left sniper knee plate close up Right sniper knee plate close up Left thigh ammo pack rivet close up Right thigh ammo pack rivet close up Boots (showing tops and sides) Rubber gloves 1 Quote
AndreasSjodin[TK] Posted May 9, 2025 Author Report Posted May 9, 2025 @Doggydoc thank you for your help, I will take the additional photos as instructed and add here when done 2 Quote
AndreasSjodin[TK] Posted May 10, 2025 Author Report Posted May 10, 2025 (edited) @Doggydoc now I have taken new photos as instructed above for your final assessment, but it seems this topic is maximized with attached files already, it won't let me add new pictures in this reply since it's only 9,9kb file size left. Do you have any idea or suggestion on how to proceed? I guess it's not a good idea to erase my previous pics to free up space? Can I email the additional pics or something? I can't even start a new topic with the additional pictures in and link to this topic since a new topic also say I only have 9,9 kB max total size to attach Edited May 10, 2025 by AndreasSjodin Quote
AndreasSjodin[TK] Posted May 10, 2025 Author Report Posted May 10, 2025 (edited) @Doggydoc did some research - realize this personal 2mb attachment size limit now. Have signed up to Imgur, hope I get the links right below, otherwise please advise me how I can post it in a correct way Gloves: https://imgur.com/iChoiAc Boots: https://imgur.com/EfpcgTu https://imgur.com/2IJG5nq https://imgur.com/1Sx3J7A Thigh ammo pack rivets: https://imgur.com/bgxbtvn https://imgur.com/Qwqxhdz Sniper knee plate: https://imgur.com/lFjusdU https://imgur.com/y5WHPGx https://imgur.com/XVUgj6L https://imgur.com/hYQDafx Ab-Kidney rivets: https://imgur.com/epQmBrk https://imgur.com/ADcJxSK Wrists: https://imgur.com/Y8AHyjc https://imgur.com/bPu0lNE https://imgur.com/1zyG3wh Cod and posterior plate connections: https://imgur.com/yovWoTi Ab button plates: https://imgur.com/e8DhJ8C Han: https://imgur.com/QZ1q8pO https://imgur.com/tymbcQw Side close ups: https://imgur.com/hW0jIfS https://imgur.com/m6NzGUM Edited May 10, 2025 by AndreasSjodin Quote
gmrhodes13[Staff] Posted May 10, 2025 Report Posted May 10, 2025 You need to use the "direct link" or link with file extension, ie: .jpeg, jpg, .png, .gif. OR you can simply right click and copy your image directly into your post. Here is a Imgur how to 1 Quote
AndreasSjodin[TK] Posted May 10, 2025 Author Report Posted May 10, 2025 @gmrhodes13 thank you very much, now I think I finally got it correct, thanks for your help and patience here. Gloves: Boots: Thigh ammo rivets: Sniper knee plate Ab-Kidney rivets Wrists Cod and posterior plate connections Ab button plates Han Right side detail ab-kidney Left side detail ab-kidney 3 Quote
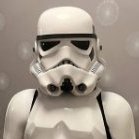
Doggydoc[Staff] Posted May 13, 2025 Report Posted May 13, 2025 Hello @AndreasSjodin Andreas, Thank you for getting all of those extra photos uploaded. We have looked over your costume and there are a few fixes that we are going to request before we can give you the EIB ranking. Lets start at the top and work our way down. Shoulder Straps Your right shoulder strap is slightly raised off the back armour. We would like to see it sitting flat on the armour as your left side is. This should be a fairly easy fix with a hot water bath and carefully bending the strap downwards. References Gloves There is some lettering present on your gloves still, it looks like you were able to remove the portion next to the handgaurd but have not removed the portion farther up the glove. Please remove all logos from the glove so that nothing will be seen if the forearm armour moves up slightly. CRL L1: Black in color, made of either rubber, nomex, leather, or leather-like material, with no visible straps or logos/designs. The fingers are enclosed. References Posterior Armour Your posterior armour is sitting a little far back compared to your kidney armour plate. This is a fairly common issue and can be corrected with clips on the inner side of the armour to hold the posterior armour plate in. References Belt Your belt has some loose threads on it. Please take a few minutes and trim these off to give the belt an overall cleaner look. References Thermal Detonator The control panel on the thermal detonator should face backwards. Yours is facing up slightly. CRL L1: The white control panel raised ribbed pad faces the rear, with the controls/round washer style detail closest to the right end cap. This can be fixed by simply "unrolling the lower portion of the thermal detonator bracket slightly to roll the TD downward a bit. References Lower Leg Armour A bit of trimming on your sniper knee plate will give it a much more screen accurate look. This should be a fairly simple fix and should only take a few minutes. References We would like to see the lower edge of the back part of the lower leg armour evened out so that the lower edge is even across both sides of the armour. This should be a simple trim and sand job and hopefully will only take a few minutes. References Blaster We are going to need you to take a few minutes and a bit of black paint and paint out the silver hardware on the blaster. In addition, although the wires and resistors on the power cylinders look great unpainted, they should also be black for screen accuracy. References 2 Quote
AndreasSjodin[TK] Posted May 13, 2025 Author Report Posted May 13, 2025 @Doggydoc thank you, I’ll do my best according to your great detailed and helpful instructions and post updated photos when I’ve done these improvements 👍 1 Quote
AndreasSjodin[TK] Posted May 13, 2025 Author Report Posted May 13, 2025 (edited) @Doggydoc can I ask two follow up questions please so I don’t misunderstand anything and make wrong adjustments? 1- the line you’ve drawn on the sniper knee, is that very exact as a requirement and blueprint for me so I aim for that line or should I draw a line on my knee with eg a lead pencil, take a photo and iterate here with you so I find the exact line before I start grinding it? How exact is it, or if it just gets more narrow than now and -ish looks like your example it will be good enough? Is it a precision on the millimetre or just getting a more narrow line than now so to speak? If I aim for the upper part being half of its current thickness and follow that in a natural line downwards? 2- on the blaster I shall paint all metal/silver parts black and also paint the red wires and the resistors black, am I understanding correctly? They can still be there, but the blaster shall be totally black everywhere? Edited May 13, 2025 by AndreasSjodin Quote
AndreasSjodin[TK] Posted May 14, 2025 Author Report Posted May 14, 2025 @Doggydoc just a humble question from me as a newbie here on the blaster while I try to understand, learn and do the correct adjustments - in this application it starts with another blaster in the beginning but ends up with her buying a TC instead with unpainted rivets and screws and it gets approved from what I can see? Quote
Doggydoc[Staff] Posted May 14, 2025 Report Posted May 14, 2025 14 hours ago, AndreasSjodin said: 1- the line you’ve drawn on the sniper knee, is that very exact as a requirement and blueprint for me so I aim for that line or should I draw a line on my knee with eg a lead pencil, take a photo and iterate here with you so I find the exact line before I start grinding it? How exact is it, or if it just gets more narrow than now and -ish looks like your example it will be good enough? Is it a precision on the millimetre or just getting a more narrow line than now so to speak? If I aim for the upper part being half of its current thickness and follow that in a natural line downwards? The line drawn on the image is not an exact requirement. the sniper knee plate back edges should be straight angles and not curves. The line image is an approximation of where the cut should be made. For sure it would be a good idea to draw the line in pencil first and check before cutting. We are all here to help you succeed and will provide any and all advice you need. 14 hours ago, AndreasSjodin said: 2- on the blaster I shall paint all metal/silver parts black and also paint the red wires and the resistors black, am I understanding correctly? They can still be there, but the blaster shall be totally black everywhere? Please just paint the parts that I have highlighted in the images. There are a couple of areas that should not be black such as the bolt and a portion of the trigger assembly. The areas that I highlighted on your review should be blacked out as they were in the film. 1 hour ago, AndreasSjodin said: just a humble question from me as a newbie here on the blaster while I try to understand, learn and do the correct adjustments - in this application it starts with another blaster in the beginning but ends up with her buying a TC instead with unpainted rivets and screws and it gets approved from what I can see? I see your point here and understand the confusion as the exact issues were not flagged on a previous application. The simple answer is that we are only human and can at times miss things. In the previous application, the issue was overlooked on our end. We always try and have several sets of eyes on each review but sometimes a detail may slip through the cracks. With several of us working on the reviews and one person in particular taking the lead and doing the deep dive into the review, with the others looking at the review before it is published, we can sometimes have slightly different approaches to the approval process. Please try to understand that we try our best to be consistent with the reviews but once in a while, something may slip through the cracks. 1 Quote
AndreasSjodin[TK] Posted May 14, 2025 Author Report Posted May 14, 2025 @Doggydoc thanks, I'll do my best and do these adjustments and corrections and add updated photos when done 1 Quote

Recommended Posts
Join the conversation
You can post now and register later. If you have an account, sign in now to post with your account.