DarthDadio[TK] Posted November 4, 2014 Author Report Posted November 4, 2014 Day 9: Take your bucket to work day. I brought my bucket to work so I could work on the painting and get a bit further along. QUESTION: The mic tips don't have a flat surface to rest on and seem loose when with the screws tightened. What are some solutions for firming this up a bit? I am thinking about putting some kind of shim behind the mics. Quote
fuumantroop[TK] Posted November 4, 2014 Report Posted November 4, 2014 You can use what they call "poormans fiberglass." Basically, a strip of material from a white shirt, drenched in super glue, and glued to the back of the hovi mic spot on the inside of the helmet. It just reinforces the thin plastic to where it shouldnt crinkle when touched. The mic tips should not sit flush. You can do this poormans fiberglass, then thread the bolt on as tight as it will go, and perhaps use some loctite to keep the nut from coming loose. Mine come loose from time to time, but I have not tried any reinforcement just yet. I keep meaning to but have been simply enjoying time off from building armor with the fam 1 Quote
DarthDadio[TK] Posted November 4, 2014 Author Report Posted November 4, 2014 Lunch painting was successful. All of the black outlines are done and some of the grey interiors. Cleared all the painting cob webs and really got into the grove. I am hand-painting everything without masking for now. I will use a template for the tubes when I get that far. With the rain and humidity I need to allow it to dry before I paint any more. I might just stick to painting at lunch and stick to trimming and gluing at night. Still cannot believe how much fun this is. 1 Quote
fuumantroop[TK] Posted November 4, 2014 Report Posted November 4, 2014 Word of advice, do not push or touch the paint even after it sits for 24 hrs. If you are indeed using testors. You can paint over it, but the smallest amount of foreign pressure can be a little berve racking. That paint really takes a couple or days to completely dry. Quote
DarthDadio[TK] Posted November 4, 2014 Author Report Posted November 4, 2014 Thanks Andrew. I have been around the block with Testors paints before. If you don't take your time then you end up with crap. 1 Quote
fuumantroop[TK] Posted November 4, 2014 Report Posted November 4, 2014 Just making sure! I had to repaint my ab buttons. Hopegully wont have to do that again, it's certainly a pain in the butt plate! Quote
Holnave (evan_loh)[TK] Posted November 4, 2014 Report Posted November 4, 2014 (edited) Nicely done on getting the ears to have minimal gap. You might want to trim the ears further (starting from the circular part at the top) as they're a lot thinner on the original stormtroopers. The helmet's right ear looks fine. It's just the left ear (left from the stormtroopers POV) Edited November 4, 2014 by evan_loh Quote
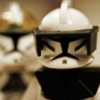
DarthDadio[TK] Posted November 5, 2014 Author Report Posted November 5, 2014 I'm not satisfied with the ears or how the face fits on the bucket. Also have an issue on the left side where the E6000 has broken free between the cap and the back. Couldn't fit by bucket on my head last night but I am attributing this to loosening up the right ear so I could remove the trim for painting. I might need to break it all down and reconstruct it. Not trying to be a perfectionist but it should at least hold up to normal wear and tear. Finished up last night by gluing more internal shims on the forearms (I was doing one side of the forearm at a time). I will be cleaning up the wrists tonight and adding finishing strips. Started to paint a bit more but gave up quickly because I was tired and the lighting was poor. I put everything away, sat down to watch some television with my family, and fell asleep within 10 minutes. Long work day, cub scouts, and lack of sleep.... I should have extra time tonight. Quote
DarthDadio[TK] Posted November 6, 2014 Author Report Posted November 6, 2014 Day 10: Busy evening. Trimmed fronts of calves and thighs. Had to re-glue a shim on the inside of one of the forearms. Spent the evening running around the house wearing my compression pants, imperial socks and my white boots. It was really funny when I had to answer the door. Quote
DarthDadio[TK] Posted November 6, 2014 Author Report Posted November 6, 2014 Day 11: Reworked the left ear a bit this morning and I am planning on playing with the right ear at a later date. Had another lunch time painting session. Laid down all of the grey on the tears and traps. Touched up the painting ears a bit. Next step will be to paint stripes on everything. I love the hand painted look. Quote
Polar Posted November 6, 2014 Report Posted November 6, 2014 looking great! Ive re done my paint as well and it looks much better! Now I will have to do it again when the MTk arrives Quote
Starfox2010 Posted November 7, 2014 Report Posted November 7, 2014 Spent the evening running around the house wearing my compression pants, imperial socks and my white boots. It was really funny when I had to answer the door. Wait untill you have unexpected guests.... You can pretty much tell them you've murdered someone and they'll just do the o'l nod and smile while looking at your boots. Quote
Starfox2010 Posted November 7, 2014 Report Posted November 7, 2014 P.S. From what I was told on my helmet, the frown has to end after that last dimple. Nice job on the paint. Quote
DarthDadio[TK] Posted November 7, 2014 Author Report Posted November 7, 2014 Thanks for the feedback on the frown. I checked the frown reference images and EIB applications and then modified my frown a bit. Quote
DarthDadio[TK] Posted November 7, 2014 Author Report Posted November 7, 2014 Finished painting the bucket. Quote
DarthDadio[TK] Posted November 7, 2014 Author Report Posted November 7, 2014 Finished off the night by gluing strips to the inside of my shins. I have decided to slow down my E6000 work. Haven't been please with all of the results so far and I keep having to rework things. Quote
DarthDadio[TK] Posted November 8, 2014 Author Report Posted November 8, 2014 (edited) Day 12: Friday night lights again. My daughters last home game (she is in the band) and she is a senior. My wife and I have been going to games for eight years now (my oldest son already graduated) and it's our "date" night. When I got home I glued the second half of the shins onto the internal shim I placed on the first half. I like how clean this worked out. When I was working on the forearms I was attaching the shim to both halves at one time and the joints are all messy. I'm re-gluing the forearms today. But first I need to score some more magnets and clamps. Edited November 9, 2014 by DarthDadio Quote
DarthDadio[TK] Posted November 9, 2014 Author Report Posted November 9, 2014 Day 13: Glued a lot of strips today. Touched up the paint on the inside of the bucket. Started making snap tabs. Quote
DarthDadio[TK] Posted November 9, 2014 Author Report Posted November 9, 2014 (edited) Day 14: Working on the legs today while I get the arms put back together. Also going to be working with the torso for the first time. It's all starting to come together. While I am still researching in the forums I wanted to see what ya'll would say. What is the verdict on return edges on the calves and thighs? This is what I have noted so far: Bottom of calf - no return edge Top of calf - minimal (1/8")? Bottom of thigh - no return edge? Top of thigh - minimal return edge? Edited November 10, 2014 by DarthDadio Quote
DarthDadio[TK] Posted November 10, 2014 Author Report Posted November 10, 2014 Trimmed the return edges and sized the shins. Glued more internal strips on the forearms and thighs. Added the male sides snaps to the snap tabs I am making. Finished the detail work on my bucket: added padding, cleaned up paint, installed lens and mesh, and installed hovi screens. I am roughly down to the following things on my todo: - Sizing, trimming and gluing back of thighs - Sizing and trimming torso parts (butt, kidney, ab and chest) - Strapping for torso and arms - Make a garter - Sewing belt - Finish sewing neck seal - Install cover strips on forearms, calves, thighs - Make TD clips and assemble TD I have a pretty busy week ahead of me so I am not sure how far I will get. I'm estimating another two weeks to finish. Quote
DarthDadio[TK] Posted November 11, 2014 Author Report Posted November 11, 2014 Day 15: More gluing of inner shims and cover strips on the shins and thighs. Also moved on to working on the torso. So far the abdominal plate and kidney fit without any trimming. Started setting snap tabs. I will need to trim the cod and butt at the crotch. Quote
Spycee[TK] Posted November 11, 2014 Report Posted November 11, 2014 The helmet is nice. Keep up the good work ! There's so much gluing to do, and the 24h needed by the E6000 doesn't help, it can be discouraging sometimes ... Quote
DarthDadio[TK] Posted November 11, 2014 Author Report Posted November 11, 2014 It's a real exercise in patience. The part that gets me is having to rip things apart to redo them. I've redone the arms about 3 or 4 times trying to get a better seam that's not gaped or split. The good news is I am moving past these issues now. Quote
DarthDadio[TK] Posted November 12, 2014 Author Report Posted November 12, 2014 Day 16: Something new today, strapping! I strapped the kidney to the butt. Also added the remaining snap tabs to kidney and back. Added Velcro to the back of the shins. Added cover strips to the front of the thighs. Glued and closed the forearms. 1 Quote
fuumantroop[TK] Posted November 12, 2014 Report Posted November 12, 2014 Geez you should be done by now! LOL just kidding! Glad to see you trucking along! You'll be trooping in no time! Better get ya a Holiday hat to go with youf bucket 1 Quote

Recommended Posts
Join the conversation
You can post now and register later. If you have an account, sign in now to post with your account.