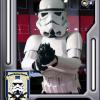
JODOKAST[TK] Posted June 13, 2014 Report Share Posted June 13, 2014 Name: Marcus Dohring TKID: 14057 Forum name: JODOKAST Garrison: MidSouth Armor: NE Helmet: ATA Blaster: Hyperfirm Height: 6’ 2†Weight: 185 pounds Boots: TK Boots Canvas Belt: Trooperbay Hand plates: Flexible rubber (Trooperbay) Neck seal: Trooperbay Holster: Trooperbay FULL BODY Front - Arms at side Back - Arms at side Left - Arm raised Right - Arm raised Right Side Detail - Arm raised Left Side Detail - Arm Raised ARMOR DETAILS Abdomen Details Action Shot Cod and Butt Plate Attachment Interior Strapping HELMET DETAILS Front Side Back Hovi Tip Detail Lens Color BLASTER DETAILS Blaster - Left Blaster - Right Blaster - D-Ring (additional) ACCESSORY DETAILS Neck Seal Thermal Detonator - Back Holster Attachment SUPPORTING PICTURES Full Body - Right Side Detail - Single Male Snap (the snap was not visible prior) Full Body - Right Leg - Back Cover Strip (in the back shot, the cover strip seems to extend on the bottom) Full Body - Right Leg - Back Cover Strip Thank you for your consideration. Quote Link to comment Share on other sites More sharing options...
HawkFan24 Posted June 13, 2014 Report Share Posted June 13, 2014 Looking good, one thing I noticed is the screws on your thermal detonator clips are Phillips. They should be slotted screw heads painted black. Otherwise nice build! Quote Link to comment Share on other sites More sharing options...
Redforce[TK] Posted June 13, 2014 Report Share Posted June 13, 2014 looking good. Good luck! Quote Link to comment Share on other sites More sharing options...
JODOKAST[TK] Posted June 13, 2014 Author Report Share Posted June 13, 2014 Looking good, one thing I noticed is the screws on your thermal detonator clips are Phillips. They should be slotted screw heads painted black. Otherwise nice build! Thanks! If that is the only thing that needs changing, I can live with that. = ) Quote Link to comment Share on other sites More sharing options...
gazmosis[501st] Posted June 13, 2014 Report Share Posted June 13, 2014 OOOPS! You should probably re-take the full body shots with your forearms on the correct arms. The way the NE forearms are constructed, there is a molded, raised ridge on one side and no ridge on the other. The raised ridge should be on the top side of your forearm. You will also notice that what should be the left forearm is very even across the elbow side opening on the half with the square indent ridge. The right one has one side higher than the other on the elbow side opening of the square indent ridge. Quote Link to comment Share on other sites More sharing options...
Vader’s Wingman[501st] Posted June 14, 2014 Report Share Posted June 14, 2014 (edited) Great looking build Marcus! A few things I notice moving forward. Your tube stripes may be too high on the cheeks......WAY too much bronzing on your blaster scope (will not affect EIB or Centurion) but for accuracy sake. Also there may be too much gap on the split rivet side (left side) between the ab and kidney. And your forearms could come down just a scootch to be a bit closer to the wrists to cover the glove bunching. Belt corners may need to be trimmed just a bit more. And hard to tell from the photos if you have the elastic bands that attach the back plate to the shoulder bridges and also a photo showing the inner drop boxes. Overall, well done! Good luck! Edited June 14, 2014 by Zixx Quote Link to comment Share on other sites More sharing options...
JODOKAST[TK] Posted June 14, 2014 Author Report Share Posted June 14, 2014 OOOPS! You should probably re-take the full body shots with your forearms on the correct arms. The way the NE forearms are constructed, there is a molded, raised ridge on one side and no ridge on the other. The raised ridge should be on the top side of your forearm. You will also notice that what should be the left forearm is very even across the elbow side opening on the half with the square indent ridge. The right one has one side higher than the other on the elbow side opening of the square indent ridge. Thank you for catching this, Steve. Please see the below updated pictures reflecting changes and two additional shots of the drop box and hand guards. FULL BODY Front - Arms at side Back - Arms at side Left - Arm raised Right - Arm raised ARMOR DETAILS Action Shot ACCESSORY DETAILS Drop Box Hand Plate Please let me know if you require additional details. Thank you. Quote Link to comment Share on other sites More sharing options...
JODOKAST[TK] Posted June 14, 2014 Author Report Share Posted June 14, 2014 Great looking build Marcus! A few things I notice moving forward. Your tube stripes may be too high on the cheeks......WAY too much bronzing on your blaster scope (will not affect EIB or Centurion) but for accuracy sake. Also there may be too much gap on the split rivet side (left side) between the ab and kidney. And your forearms could come down just a scootch to be a bit closer to the wrists to cover the glove bunching. Belt corners may need to be trimmed just a bit more. And hard to tell from the photos if you have the elastic bands that attach the back plate to the shoulder bridges and also a photo showing the inner drop boxes. Overall, well done! Good luck! Thank you for your feedback, Jason. I will see what Steve says about the tube stripes, gap, and belt corners. Do you have a recommendation regarding how to paint over the bronze? Forearms have been lowered and drop box pic taken...see above. The elastic bands are there, but aren't those for Centurion only? Thank you again. Quote Link to comment Share on other sites More sharing options...
Vader’s Wingman[501st] Posted June 14, 2014 Report Share Posted June 14, 2014 The elastic bands are there, but aren't those for Centurion only? You are correct, they are listed in the CRL for Centurion requirement, I was pointing out that if you choose to go for Centurion (which I'm sure you will be ) that they need to be there. As far as the blaster scope, I recommend dry brushing. http://en.wikipedia.org/wiki/Drybrush Quote Link to comment Share on other sites More sharing options...
JODOKAST[TK] Posted June 14, 2014 Author Report Share Posted June 14, 2014 You are correct, they are listed in the CRL for Centurion requirement, I was pointing out that if you choose to go for Centurion (which I'm sure you will be ) that they need to be there. As far as the blaster scope, I recommend dry brushing. http://en.wikipedia.org/wiki/Drybrush Thanks, Jason! :-) Quote Link to comment Share on other sites More sharing options...
Vader’s Wingman[501st] Posted June 15, 2014 Report Share Posted June 15, 2014 Anytime brother Quote Link to comment Share on other sites More sharing options...
gazmosis[501st] Posted June 15, 2014 Report Share Posted June 15, 2014 MARCUS!!!! Thank you for your application for EIB. It is obvious that a lot of thought and planning went into your armor. Nice build. So let's look at your armor!! CRL and EIB Application Requirements: ​All required photo submissions have been posted and your armor meets all standards set to achieve EIB status. With that, I would like to congratulate and welcome you to EIB!!!!! Other-Armor Fit/Assembly: Here is where we get to pick you apart! MUHAHAHAHAHAH!! Ok.....not really. However, your fellow troopers and I chime in to help make everyone look better. There have been some good suggestions so far. I see nothing that will take any great deal of effort. First off, thanks for reposting the pics with your forearms on correctly. NE has direct ties to the hyper accurate RS props armor in which there is a distinct difference between the left and right forearms.Nice job! A couple things on your helmet, You eye openings seem like they can be opened up some. From the inside, ATA has really distinct mold lines surrounding the eye openings that serve as a great guide to making the them wide enough. They are ok and won;t affect you applications but they should be opened up further. I don't want to jump around too much on this post . I was going to put the next helmet suggestions under Centurion suggestions but since we are on the helmet subject here.....Jason brought up a good point about your tube stripes being too high. Since you used the Trooperbay decals, this is an easy fix. Lay a pencil on the cheek tube right up against the face. that is the proper spacing between the tube stripes and the faceplate. This is an adjustment you will need to make. It was mentioned regarding the gap on your left side. I don;t see any issues here. The gap is neither overwhelming or distracting to me. You are so close that in your Centurion photos( if you apply) Just tighten up your belt and this will go away completely. Your right bicep looks really big to me. In the pic with your arms raised, there seems to be an excessive amount of space, I then went back and looked at your full front shot and the right one looks a lot bigger. It would go along way to the overall look and comfort of your armor to adjust the fit on this. The only other things I see is that your thighs seem to be sitting low. I like the way you built them nice and slender to fit your legs. This extra custom fit looks like it may prevent you from raising them up. Pictures can be deceiving, though. If they can be raised up GREAT, if not don't sweat it too much. Again, we are talking about the overall improved look here. Centurion Suggestions: From the details you have already installed, it looks like you will be shooting for Centurion. I can't definitively see them so make sure we have a pic of the elastic on the rear of the shoulder bridges. I know and appreciate what you were trying to do by matching the corners of your waist belt with the canvas belt. However, more needs to be taken off the corners. Manny's belt is a great example.Don't worry about the plastic belt sides matching the width of the belt. It's the canvas belt that is affecting this. We need to get the belt makers of the FISD to take 1/4 in off their belts and make them no wider than 3 inches. Having them 3 1/4 to 3 3/8 is too wide. Anyway, lop a little off those corners and move along. Next is a detail on your blaster. Hyperfirm has a tendency to be a little enthusiastic with their weathering. The brass color on the scope needs to be knocked down significantly. It's just too distracting. I would use a matte black model paint bur acrylic paint would work as well. Lastly is Matt's suggestion to change out the phillips head screws to slotted screws to improve the accuracy of your thermal detonator. This is a small update that goes a long way toward the overall accuracy of your armor. Centurion is about the details after all! Congratulations again!!!! Quote Link to comment Share on other sites More sharing options...
JODOKAST[TK] Posted June 15, 2014 Author Report Share Posted June 15, 2014 Thank you so much!!! All of your suggestions are noted and will be implemented in due time. Happy to serve the Empire! Sent from my iPhone using Tapatalk Quote Link to comment Share on other sites More sharing options...
Naborjohn[TK] Posted June 15, 2014 Report Share Posted June 15, 2014 Congratulations Marcus great job. Quote Link to comment Share on other sites More sharing options...
JODOKAST[TK] Posted June 15, 2014 Author Report Share Posted June 15, 2014 Congratulations Marcus great job. Thanks, brother. When are you submitting? Quote Link to comment Share on other sites More sharing options...
Naborjohn[TK] Posted June 15, 2014 Report Share Posted June 15, 2014 Thanks, brother. When are you submitting? Soon my friend soon. I may just need your expert eye to double check me before be released to the wolves. Lol Quote Link to comment Share on other sites More sharing options...
gmrhodes13[Staff] Posted June 15, 2014 Report Share Posted June 15, 2014 Congrats and welcome to the ranks Quote Link to comment Share on other sites More sharing options...
Vader’s Wingman[501st] Posted June 16, 2014 Report Share Posted June 16, 2014 Congrats Marcus! Welcome to EIB!!! Quote Link to comment Share on other sites More sharing options...
HawkFan24 Posted June 16, 2014 Report Share Posted June 16, 2014 Congrats!! Quote Link to comment Share on other sites More sharing options...

Recommended Posts
Join the conversation
You can post now and register later. If you have an account, sign in now to post with your account.