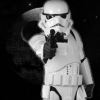
tightlines Posted November 14, 2013 Report Share Posted November 14, 2013 TK88980 Requesting ANH Stunt Centurion status [TM] Tim Landwehr TK 88980 http://www.501st.com...9&costumeID=124 Wisconsin Garrison Armor Maker-TM Helmet Maker-TM Helmet decals-TM Hand Painted look decals (My painting skills are horrible. Sorry!) Blaster-Doopy Doo full resin with mods (I built it) Height-5’10 Weight-150 lbs Boots-TK size 9 Canvas Belt-Rob Kittell Hand Plates-TM Electronics-icomm and Aker MR2506 Neck seal-Lady sew for us Holster-AP Front shot Back shot Buck off front shot (I grew a mustache for the photo. My wife does not approve) Left side arms down Left side arms up Right side arms down Right side arms up Action shot 1 Action shot 2 Bucket front shot Bucket left side (three screw details on ears) Bucket right side Bucket back Hovi mic tips with white rim detail Green lens and mesh in frown S-tubing on bucket opening Bucket inside Strapping system Left side of armor clam shelled Right side of armor clam shelled Chest Plate front Chest Plate inside Back plate inside Chest and back plate closure Close up of chest and back plate closure with free floating straps and elastic detail Elastic shoulder strap with sew on snap to attach shoulder bell Elastic shoulder strap with close up of shoulder bell attachment Bicep with no return edge Forearm with no return edge Six painted split rivets detail Inside split rivet shot (I dislike working with split rivets. Pain in the rear!) Snap detail Greave with sniper plate Close up of sniper plate with no rivets Greaves closed in back Greaves open showing the new CRL showing closing to the inside Thigh with ammo pack Ammo pack detail with corners rounded and painted cap rivet detail. (corrected from my EIB submission) Painted button detail using correct testers colors (Testors No. 1138 gray and Testors No. 2715 French Blue) Cod piece with split rivet detail unpainted Inside cod piece split rivet detail Cod piece and butt plate connection with snap details and snap rivet shot Belt with 45 degree edges cut, rivet covers and drop boxes with correct spacing Elastic loops connecting drop boxes and drop box backs Holster placement with rivets to the bottom of the belt TD back with clips to the ends TD Horizontal shot TD Front TD back with black pan head screws Neck seal Rubber gloves with painted TM flexible hand guards Size 9 TK boots lightly scuffed Right side E-11 Doopy Doo full resin Left side E-11 E-11 Doopy Doo full resin Blaster with accurate spring and working slide E-11 weathered with counter and d-ring detail I am sorry for the long list of pictures! I wanted to make sure I did not forget something but I am sure I did. Thank you again and I appreciate all the help from everyone on the boards. It does make getting ready for these submissions so much easier to understand what they are looking for. Cheers, Tim Landwehr TK88980 Quote Link to comment Share on other sites More sharing options...
Holnave (evan_loh)[TK] Posted November 14, 2013 Report Share Posted November 14, 2013 (edited) Loving the moustache! Wish I could pull off that look! and I wish my build was as clean as yours! You look really good in it! Edited November 14, 2013 by evan_loh Quote Link to comment Share on other sites More sharing options...
tightlines Posted November 14, 2013 Author Report Share Posted November 14, 2013 Thanks Evan. I spent a bunch of time on it for sure. My first build was AP armor that I turned into a TD but the TM armor I took a my time on. I was afraid to mess it up so I followed the forums very closely to be as accurate as I could. Thanks for the kind words. Quote Link to comment Share on other sites More sharing options...
zebrabuse Posted November 15, 2013 Report Share Posted November 15, 2013 Beautiful work! Quote Link to comment Share on other sites More sharing options...
SCTrooper[TK] Posted November 15, 2013 Report Share Posted November 15, 2013 (edited) You look Great! A few things to consider Helmet, the ears could be slimmer. Holster straps should be plain leather not black. Control panal on td is a little off. Side shots the belt is not in correct position. Blaster counter looks too low The biceps could be resized to fit you better I am not sure if these would effect status but are easy fixes. Edited November 15, 2013 by SCTrooper Quote Link to comment Share on other sites More sharing options...
tightlines Posted November 15, 2013 Author Report Share Posted November 15, 2013 I think I forgot to post my EIB application on this submission. Here is the EIB thread link. http://www.whitearmor.net/forum/topic/25687-tk88980-requesting-anh-stunt-eib-status-tm-348/ Thank you for your consideration. Tim Quote Link to comment Share on other sites More sharing options...
Locitus[Admin] Posted November 15, 2013 Report Share Posted November 15, 2013 Holster straps should be plain leather not black. Would you tell that to these guys as well? Or this guy? Quote Link to comment Share on other sites More sharing options...
SCTrooper[TK] Posted November 15, 2013 Report Share Posted November 15, 2013 (edited) Would you tell that to these guys as well? Or this guy? I guess I didn't look at enough screen shots before posting. Could it be the lighting, are they all black straps. Edit : I didn't realize till now that his straps were dark leather like in the movie, not black, sorry about that. Edited November 16, 2013 by SCTrooper Quote Link to comment Share on other sites More sharing options...
zoekoner[TK] Posted November 16, 2013 Report Share Posted November 16, 2013 Thats a serious stash Good luck hope my build looks as clean Sent from my iPhone using Tapatalk Quote Link to comment Share on other sites More sharing options...
tightlines Posted November 18, 2013 Author Report Share Posted November 18, 2013 Does anyone see any photos I may be missing for this submission? Thanks for the help. Tim Quote Link to comment Share on other sites More sharing options...
Darth Aloha[Admin] Posted November 19, 2013 Report Share Posted November 19, 2013 Sorry for delay. Approved. Congrats trooper! -Eric Quote Link to comment Share on other sites More sharing options...
Locitus[Admin] Posted November 19, 2013 Report Share Posted November 19, 2013 Congratulations! If you're feeling bored sometime you should consider sanding down and repaint the ear bumps, because not on a single ANH helmet I've ever seen has the ear bump been painted black in the "front" like yours. They always started at the back. Quote Link to comment Share on other sites More sharing options...
tightlines Posted November 19, 2013 Author Report Share Posted November 19, 2013 Yeeeeeee hawwwwww!!!!!!!! Thank you so much for helping me through the process. You guys do an amazing job spelling out exactly what is needed to be done to achieve centurion. Follow the outline, look at one million screen shots and listen to your fellow troopers even if criticism hurts your feelings. We are all proud of our armor and may take things a little to personally. Take good photos of the armor and include EVERYTHING that is listed. This was a blast from start to finish fellas. Thanks again I'm gonna go have a beer to celebrate. Cheers to all of you, Tim Quote Link to comment Share on other sites More sharing options...
tightlines Posted November 19, 2013 Author Report Share Posted November 19, 2013 Congratulations! If you're feeling bored sometime you should consider sanding down and repaint the ear bumps, because not on a single ANH helmet I've ever seen has the ear bump been painted black in the "front" like yours. They always started at the back. Gonna do it tomorrow! Quote Link to comment Share on other sites More sharing options...
Locitus[Admin] Posted November 19, 2013 Report Share Posted November 19, 2013 Gonna do it tomorrow! Excellent! Quote Link to comment Share on other sites More sharing options...
tightlines Posted November 19, 2013 Author Report Share Posted November 19, 2013 (edited) Cheers! Edited November 19, 2013 by tightlines Quote Link to comment Share on other sites More sharing options...
Clamps[TK] Posted November 19, 2013 Report Share Posted November 19, 2013 Cheers and congrats Centurion! Quote Link to comment Share on other sites More sharing options...
Techne[TK] Posted November 19, 2013 Report Share Posted November 19, 2013 Ha ha, great picture. Congrats. Quote Link to comment Share on other sites More sharing options...
Holnave (evan_loh)[TK] Posted November 19, 2013 Report Share Posted November 19, 2013 Congrats! Quote Link to comment Share on other sites More sharing options...

Recommended Posts
Join the conversation
You can post now and register later. If you have an account, sign in now to post with your account.