irocink33[TK] Posted April 28, 2011 Report Share Posted April 28, 2011 Well, I figured I would start this as I am starting my aquisitions of all the parts that are needed until the I can get the plastic. Should be working on it for about 6 months before approval. But I picked up a pair of flight gloves and the Baclava. It's not much, but it's a start. I will be starting a blaster build based on the blaster builders forums templates, so we shall see how this goes. Looking forward to that. I will post pictures when I get a chance after Saturday. Thanks for following my progress and if you have inputs, please don't hold them to yourselves. LEt me know if I can improve in any way. Quote Link to comment Share on other sites More sharing options...
irocink33[TK] Posted May 10, 2011 Author Report Share Posted May 10, 2011 This is what I have of my build first... ugh. Slowly getting there. Sure makes me wish I had my own personal TK helper as my neighbor to keep me going with the aquisitions of all the supplies I need. Any way, enjoy post by post of my thread. I'm going to be here a while. Quote Link to comment Share on other sites More sharing options...
TrooperTim Posted May 10, 2011 Report Share Posted May 10, 2011 Have you contacted anyone from your Garrison? They should be able to tell you if there are troopers in your area to give you advice or stop by to see your kit. Do you have your armor on order? What kit are you getting? I suggest pick a style of Stormtrooper from ANH, ESR, ROTJ, or a video game. You don't need to do this for basic 501st acceptance, but it will vastly improve the aesthetic look of your gear. If you're the type of person who wants to be really screen-accurate with your kit, then follow the Expert Infantry and Centurion CRLs as you build your armor. Take a look at some of the submission threads for EIB and Centurion. Do your gloves have a leather palm? Just curious. It's not required, but is screen-accurate to get neoprene chemical gloves, although they're not the most comfortable to wear. TK boots are fantastic. You can order your boots while you wait on the plastic too. You could go the other route and buy black Jodhpur boots, then use white NuLife leather paint. I used an underarmor summer balaclava for a troop during the summer months and it didn't help at all so I quit using it. It was great to use for winter though. It is useful to wear if you don't push mesh in your helmet frown so it can hide your skin. Look over the Tips and How To forums Here are a supplies you will need: http://forum.whitearmor.net/index.php?showtopic=11760 Quote Link to comment Share on other sites More sharing options...
irocink33[TK] Posted May 10, 2011 Author Report Share Posted May 10, 2011 I have talked to a bunch of people in the Garrison. And they are all willing to help. It's a great community. The style of armor is ANH and I want to go for screen accurate. At least that's the goal right now. And the armor I am getting is a custom job by one of the members of the guarrison. So it's not a commercially available armor. It saves on price tags and has been concidered by 99% of my garrison to be screen accurate with their facility. So that is where I plan to go through. And since they are local and in the garrison, I can get everything fitted alot easier than getting prefab stuff. I have been reading and ingesting all these how to threads with great excitement. My only issue is weeding through all the info. I am still new to this, so alot of it doesn't make sense until I can get to an armor building party and actually SEE it being done. I am more of a hands on person than I am a book smart person. But those go on at least once a month here in the garrison and I will be hitting those up with regular frequency. The gloves do indeed have a leather on the palm. I guess I will have to look into those other style gloves. Eh, I have time for now. Thank you for all the tips and the quick comment! Quote Link to comment Share on other sites More sharing options...
irocink33[TK] Posted May 15, 2011 Author Report Share Posted May 15, 2011 Well, I picked up a hasbro stormie blaster. I will be modding that with the doopy doos kit once they get it back in stock. I am a bit frustrated that the pipe build didn't work out as the templates from the blaster builders forum didn't pan out and fit the PVC they said it would have. But, at least I have a better base, and if I get this down decently well, I will have a good idea on how to redo the blaster should something happen and thee hasbro ones are readily available. I have my boots on order from TK boots.com, and I have signed up for a TK kit clinic hosted by my garrison. I am getting there folks. Quote Link to comment Share on other sites More sharing options...
irocink33[TK] Posted August 12, 2011 Author Report Share Posted August 12, 2011 Alright, have my TK armor, it's trimmed, and assembly and glueing has started. I also started assembly on the helmet and painting. So far alot of fun! I plan to be done by Halloween. Let's see, got the form fitting shirt from target, neck seal, balaclava, gloves... I have a belt on order. I think I am almost ready. Need the pants and boots, finish strapping the armor, and ready to go! Side note, anyone know a good idea that's approved by the 501st to make the thigh armor wider? I can shim it, but are shims that are almost 5 inches wide acceptable? I'm no barbie legged guy here ha ha. Quote Link to comment Share on other sites More sharing options...
irocink33[TK] Posted August 25, 2011 Author Report Share Posted August 25, 2011 Alright, big update. Now that I have plastic, trimmed and started assembly, here are some pics of how far along I got The frown on my bucket has been THE WORST to do. Still very much a work in progress. BUt tonight I started painting the ear pieces and the mic tips for the front. So I am getting there and I think it's going along great. Tomorrow I will put the finishing touches on the mic tips and the hears and probably friday (after all the paint dries) I will be doing the final assembly on the bucket so I can get back to the rest of the armor. Quote Link to comment Share on other sites More sharing options...
irocink33[TK] Posted August 25, 2011 Author Report Share Posted August 25, 2011 I was on the forums earlier this month, and was asking about thigh pieces. I seem to have lost that thread, dissapointing becuase it had a link to a great referance. But I have thicker thighs, much too thick for this armor, so I was looking for shim ideas, anyone have some good ideas? There was 1 trooper (the link I was looking at) where he had a triangle cut out and pasted over his armor to create more space for his thighs. Too bad I lost that, becuase that was an excellent referance. I even think the thread was in the EIB forum, but darned if I can find it. Anyway, if someone has some great ideas on how to do this, shoot them my way. Thank you. Quote Link to comment Share on other sites More sharing options...
irocink33[TK] Posted August 26, 2011 Author Report Share Posted August 26, 2011 Progress of my current build. Here is what I did tonight I wanted to install the ears of my bucket, but I messed up the paint, so I had to wet sand and wait for them to dry before trying my hand at the paint again. Quote Link to comment Share on other sites More sharing options...
irocink33[TK] Posted August 27, 2011 Author Report Share Posted August 27, 2011 Alright, more progress last night at Johns! THanks again John! I'd be lost right now. So here are pics! More to come later! Working on my ears and mic tips as I type this (Meaning they are drying, so that's technically working...) Quote Link to comment Share on other sites More sharing options...
irocink33[TK] Posted September 5, 2011 Author Report Share Posted September 5, 2011 Got my bucket ALMOST done today. Just need to wait on the mic tips and they should be ready tomorrow for install. But after some nice hand painting by my wife on my ears, I installed them, lined my helmet up the way I want it, and installed the ears and tacked the mesh behind the frown. Additionally, I am posting pics of the stuff I did at Cals on Friday. Got the rivets in the knee plate and also the band on the other leg riveted in. Also put a screw in through the thigh piece to make sure the band doesn't fall below where it's supposed to. SO without further adooooooooo..... Pictures! Quote Link to comment Share on other sites More sharing options...
kaptinkaos Posted September 6, 2011 Report Share Posted September 6, 2011 Lookin' good man! Keep it up, Quote Link to comment Share on other sites More sharing options...
irocink33[TK] Posted September 9, 2011 Author Report Share Posted September 9, 2011 Got my blaster, a modified hasbro from Doopys all primed last night. i will be putting another layer of primer on it tonight before taping off and starting the undercoat of paint. I'll take pics tonight of it primed and then then as I paint it. On another note, I bought a rivit gun and am working that to get my holster to my belt. Sad thing is, the rivits that came with the tool ar all too short. So I have to get some longer ones. Sort of bummed beucase I wanted to get that done. Well, that and the ammo boxes. However, thinking about it now, I might be able to get the ammo boxes on tonight becuase the belt and the white straps aren't as thick as the belt and the leather for the holster... we'll see what I can get done. But work continues. Slow, but continuing. Quote Link to comment Share on other sites More sharing options...
kaptinkaos Posted September 10, 2011 Report Share Posted September 10, 2011 (edited) I went with "medium" length rivets for the knee plate and ammo boxes on the thigh if you're talking about the pop rivets used in a handheld press type riveter like this http://www.canadiant...t.jsp?locale=en. Make sure you pick up some aluminum "backing washers" too so the rivet doesn't pull through the ABS. Medium length should be more than long enough to get through. I haven't riveted my holster to my belt as I'm just in the final stages of finishing a run of 6 I made myself (http://www.badlands....&p=54696#p54696. I'll probably use proper double back type rivets that you hammer on for my holster to belt too just so the match the ones I used on the holster itself. Edit* Make sure you use aluminum pop rivets... not stainless steel, The stainless ones could pull right through the washer and the ABS. Edited September 10, 2011 by kaptinkaos Quote Link to comment Share on other sites More sharing options...
irocink33[TK] Posted September 18, 2011 Author Report Share Posted September 18, 2011 Alright, So fixed some things, and got my holster in the belt. Aluminum pop rivets used... good call. SO here are pics, I hurt my back on Thursday, so I haven't been able to do much. I am starting to work on the thermal detenator tomorrow. Bought all the rivets, the grey PVC, and have everything ready for gluing. So here are the most recent pics. I pulled off the black straps off the ammo boxes and changed them to white. Glad I read a tutorial and learned me some info before just finishing up the belt. Quote Link to comment Share on other sites More sharing options...
irocink33[TK] Posted September 18, 2011 Author Report Share Posted September 18, 2011 Belt is almost done! Just the thermal detonator to do, and pics of that drying below. The ammo boxes are on, snaps are on for the plastic front, everything is coming together. So here is where I stand right now. Getting ready for a huge build day. I am building with Tom Parsons, also going to get a hold of John and Colin to see what we can work out today on my ab plate problem. Alright, so here we go for today, Lots of pictures to come tonight as I get things working. Quote Link to comment Share on other sites More sharing options...
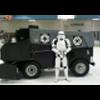
irocink33[TK] Posted November 16, 2011 Author Report Share Posted November 16, 2011 Hi, Finished my kit, here are my submittle pics. Apparently they are too dark ha ha. Need to see if they are still approvable. Quote Link to comment Share on other sites More sharing options...
xaoslord Posted November 16, 2011 Report Share Posted November 16, 2011 Well done! How did it feel to suit up for the first time? Quote Link to comment Share on other sites More sharing options...
darksideemt Posted November 16, 2011 Report Share Posted November 16, 2011 Looks great! The shins look a little high but otherwise looks fine to this newb. Quote Link to comment Share on other sites More sharing options...
irocink33[TK] Posted November 16, 2011 Author Report Share Posted November 16, 2011 Xaoslord, I gotta say, it felt great. I have trooped with this kit a couple of times before I took the pics, just to get a feel for it, and see what I can do to work on the armor pinches and thing of that nature, so technically, this wasn't my first time suiting up. But it was one of the better feelings getting approval pics taken. I'm still awaiting for the final OK from the powers that be, but it's fun to do this, and I am already looking into my next build. I caught the bug. And Darksideemt, Funny you should say that. normally they hang a bit lower. The squad leader in my area adjusted them a bit for me when I was standing there for a better pic, so they normally don't sit up that high when I am actually trooping. But if it gets me approved, I am happy! Quote Link to comment Share on other sites More sharing options...
Spectre Posted November 17, 2011 Report Share Posted November 17, 2011 Looks awesome mate! Well done, and good luck on approval. Quote Link to comment Share on other sites More sharing options...
irocink33[TK] Posted November 18, 2011 Author Report Share Posted November 18, 2011 Thanks Spectre, IT'S OFFICIAL!!!!! TK 9433 Reporting for Duty! Quote Link to comment Share on other sites More sharing options...
Spectre Posted November 19, 2011 Report Share Posted November 19, 2011 Congrats TK9433!! Good work mate. Quote Link to comment Share on other sites More sharing options...

Recommended Posts
Join the conversation
You can post now and register later. If you have an account, sign in now to post with your account.