Search the Community
Showing results for 'cover strips'.
-
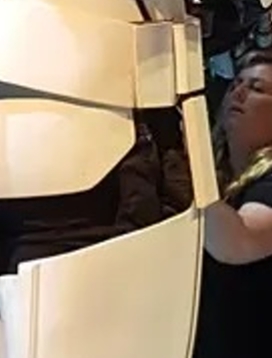
The first Bicep is away! I doubled up the magnets just to be safe but it took me 24 to get the two outer cover strips secured while the glue dries. For pieces like the biceps and forearms is it recommended to double up on magnets or is one on each side good enough?
-
After a few days of setbacks, I'm back to working on my shins. I sized my left shin after I applied the inner cover strips. With this measurement, these are the lines I traced to remove the excess plastic from each side. Also, I went ahead and began the process of trimming down the right shins by drawing the 10 mm lines the front of each piece. As always, any feedback on these trim lines would be greatly appreciated!
-
YES!!!!!!!!!! That double strap thing is something I (am pretty certain I) read and then couldn't remember the exact details. Thank you Glen!! Front offset + side would be great for action, sitting, and not rotating. Excellent. That's what I'll replicate. Cover strips glued on the outside edge - check. I also especially like the relief cuts. Much better than the regular Jimmi thigh cuts. My whole beef with updating the CRL to have the back coverstrips offset is exactly as you mention - how they look offset depending on the wearer. Since many stunt actors wear these costumes, the thighs are different depending on who's inside. I'm sure there's someone who would fit the costume perfectly and have a nicely centered cover strip. Maybe the whole stunt cast that season did their squats and have tree trunks, thus the wide fitment. But that's my beef. Since we make our armor sets specifically for our bodies, and no one else is likely to be in our armor, there should be no requirement to have the rear thigh cover strips offset. Passable? Sure. Just not a requirement to have them offset. Centered is the ideal fit for the ideal trooper, which is everyone here. Stunt actors don't have that luxury. Anyways, didn't mean to soapbox. I understand why they're often offset on screen. I just really hope we don't have to emulate that here. and again, thanks for those photo references!!
-
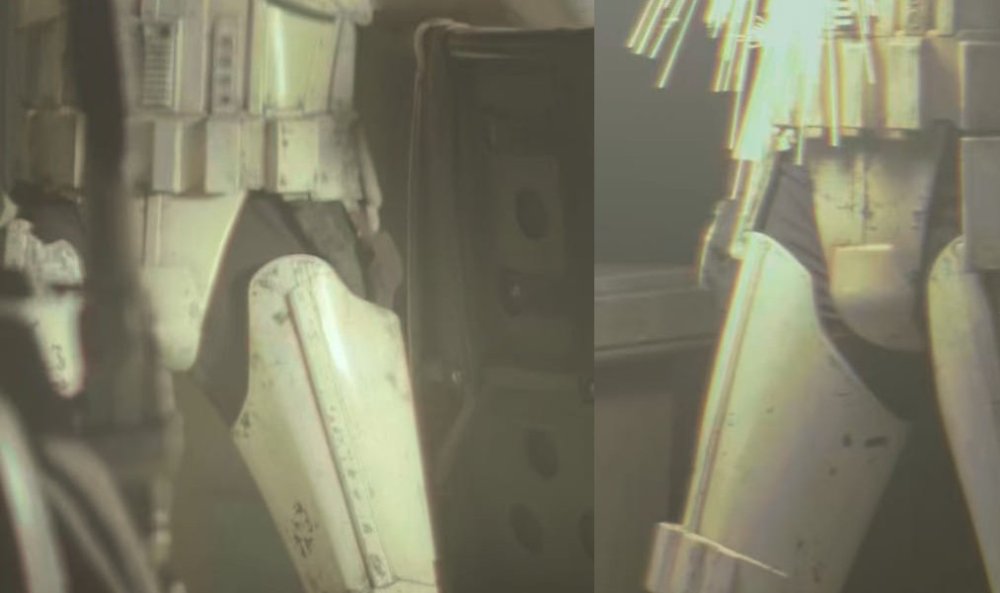
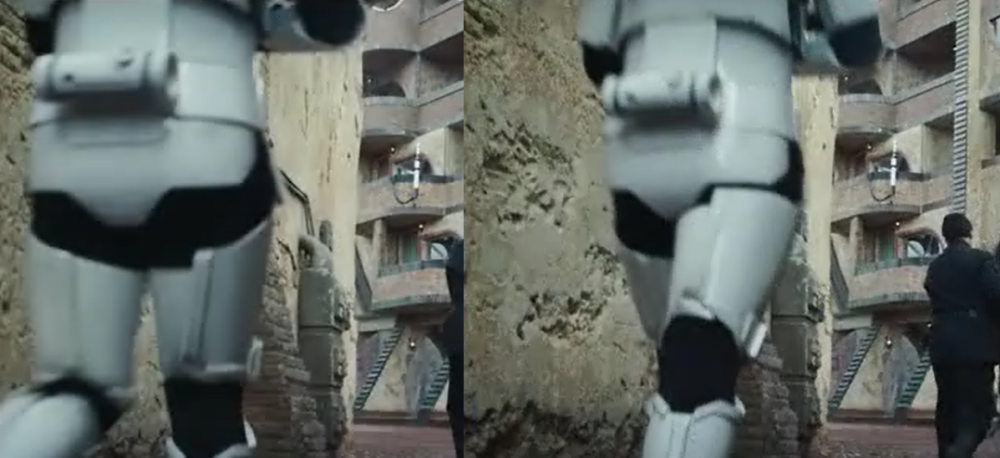
From what I've seen most if not all new era use 2 thigh straps and both are on the side of the thighs, both straps also have fabric covers so the pattern of the straps isn't seen. Was discussed in the Remnant thread and there should be an update made to the RO CRL text Disregard the green box, was used for another reference but shows two straps, both are have covers. You can see 2 in this shot also As for the position of the rear cover strips I did a lot of research on these, they are glued on the outer of shins and thighs and their position does not change, although the thighs can look offset depending on how far open the thighs are, depending on wearer.


-
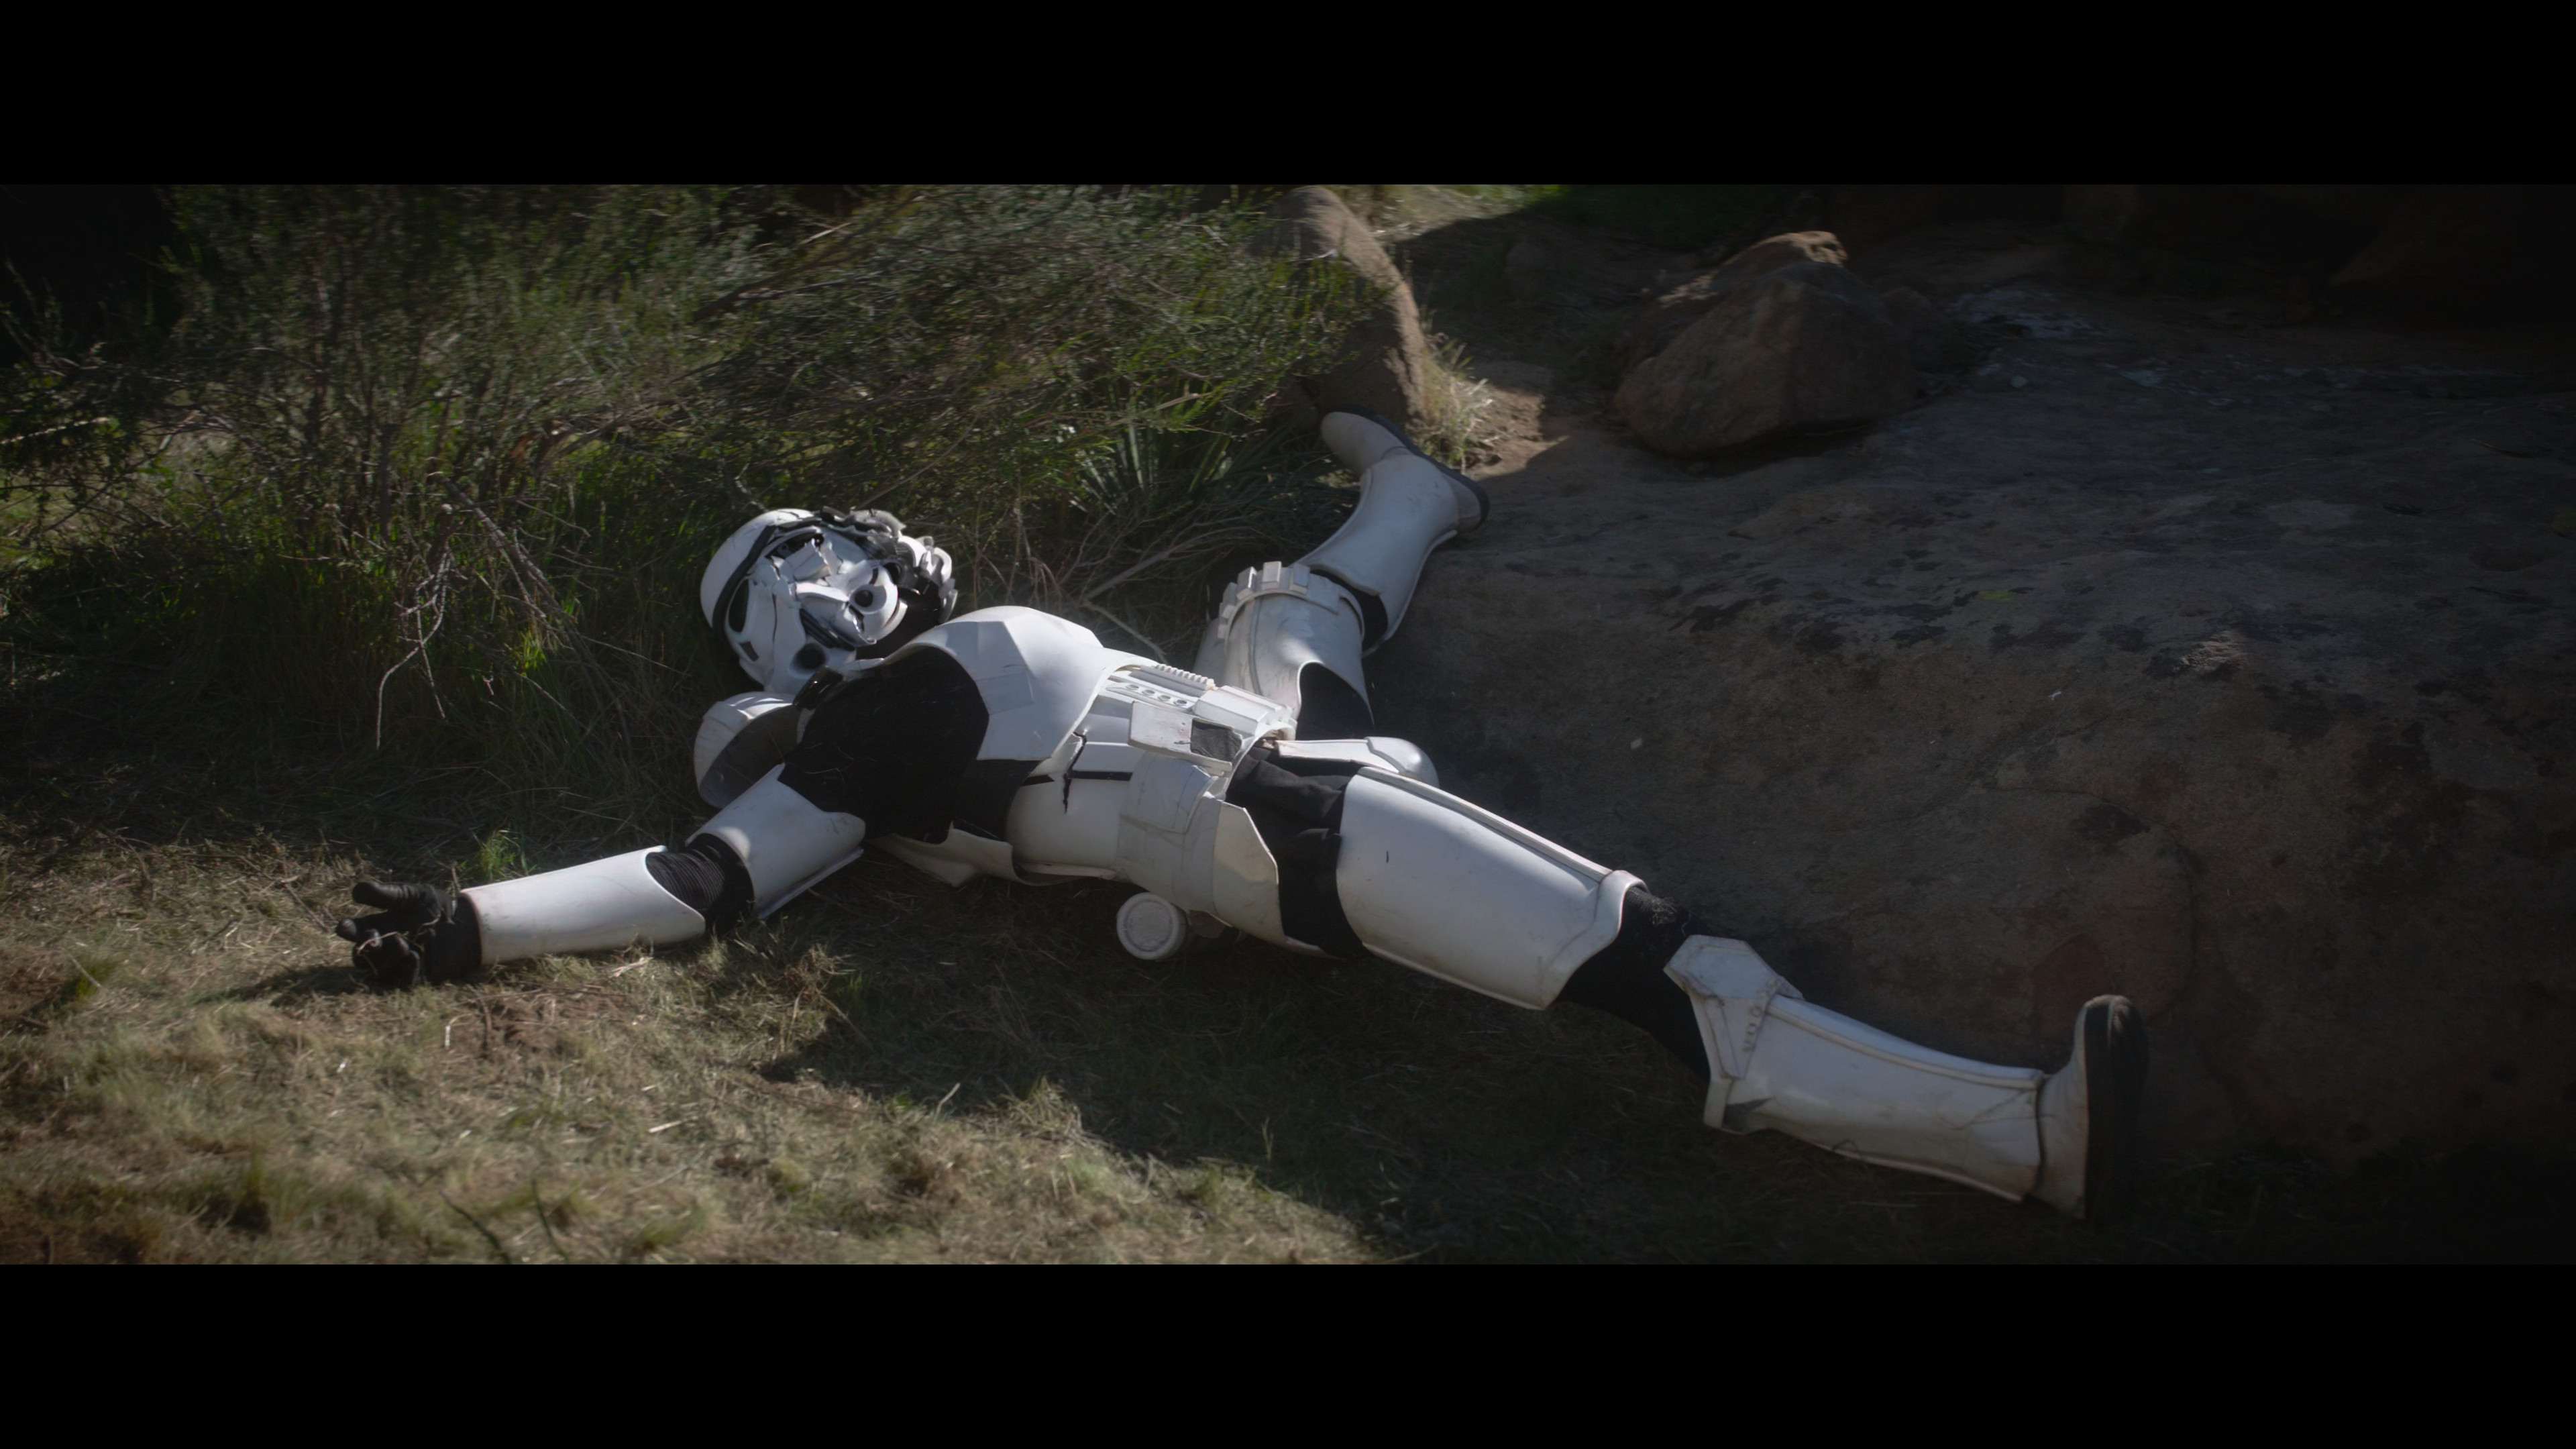
I've been trying to find THE answer for exactly what a Rogue One TK needs for their thigh strap and I'm coming up short. Help a brother out? I'm usually quite good at ferreting this kind of thing out. The CRL - The thigh armor is mirrored for each leg and not interchangeable. The cover strips are bevelled and approximately 1/8" thick that does not extend beyond the thigh and has a smaller cover strip layered thereon. The top edge of the thigh armor is unadorned, and the bottom edge has a raised detail that fallows the bottom edge contour. The small ammo belt consists of 5 evenly spaced rectangle ammunition boxes and is installed on the bottom of the right thigh, there are no visible screws or rivets. OPTIONAL Level two certification (if applicable): Thighs are loosely held closed in the back with elastic, shock cord (bungee cord) or white Velcro and are designed to remain flexible. Cover strips will cover both the front and rear joints. OPTIONAL Level three certification (if applicable): The bottom outside edges of the small ammunition belt are angled at approximately 45 degrees. Thigh armor is suspended by a black strap approximately 1” 25mm in width with a plastic side release buckle that is covered by black webbing or elastic that runs down the side seam of the leg. It seems to call for a single strap with a visible (yet covered) buckle on "the side seam of the leg". But... there's no side seam. The armor is smooth on the side and the pants, I think, should also be unseamed. Also, a single strap on the outside edge of the thigh armor would do a poor job of holding it up well. It would always want to spin. My own ANH thigh strap is just outboard of the front cover strip by about 10 degrees. @11b30b4, our lone R1 centurion, has the strap at about 80 degrees from front. Is okay moving forward? And if so, how far forward can I cheat this? @equuspolo has a beautiful thigh strap system on his FOTK. Two straps, mostly positioned at the front. One at dead front and one about 15 degrees outboard. I love this as I believe it would allow the maximum maneuverability. Easy sitting too. And less rotation. This is from the archive. While I disagree with the thigh cover strip alignment (that's an argument for another time), it shows one strap past 90 degrees on the right side. It's more like 110 degrees from the front. There's gotta be another strap in the front, yes? I don't see one in the front. How would this even stay oriented correctly after walking 5 steps? Seems odd. I've gotta be missing something. And that's why I'm asking for help.
-
Hey, all! I was away for the weekend, so I haven't done any work on my armor since last week. I got the outer cover strips applied to my thigh, so all that should be left for those pieces is the trimming of the top portions and bottom return edges and applying the ammo belt on the right piece. I went ahead and drew some initial lines to start the process of fitting the shins, and I was hoping to get some clarification. The resources I've read indicate that you can distinguish between shin pieces by gauging the curvature on the inner and outer pieces with the inner piece starting its curve closer to the top of the shin. With that in mind, I believe this is the left shin. I just wanted to make sure that I was correct in that assessment. Also, the resources I read recommend removing the entire bottom return edge and the return edge on the back of the top shin piece. I just wanted to make sure that was the recommended method. Lastly, I drew some lines vertically on the front of front of the shin piece. The lines leave 10 mm remaining on each side. I just wanted to make sure these looked good before I made final cuts.
-
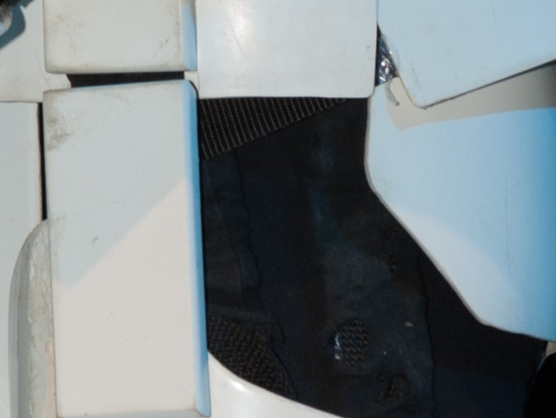
Trimmed the bicep just a little more and test fitted with foam and it’s nice and snug! Cut out one of the cover strips (15mm) and cut the edges. Here are some pics. Once I’m ready to glue, I should sand a little where the strip is supposed to go to add adhesion right? Also I only have 6 rare earth magnets as of now and more will be coming in the mail soon. The ones I have now are 3/4 inch by 1/8 inch. I just have to tape around them and wrap them in cloth. If I use clamps on the sides of the cover strips and 3 magnets in the middle should that be enough to glue (using E6000). Thanks!
-
Awesome! This is the way! It seemed to fit pretty well with foam strips of the size you just mentioned. It also looks like I dont have to trim any more of the armor once the foam is inserted as it fits pretty well. Excited to get both the biceps ready to be glued with cover strips!
-

SublimeBW's Armor Master's (AM) ANH Stunt Kit - Build Thread
SublimeBW replied to SublimeBW's topic in ANH Build Threads
Slow but sure progress on a busy weekend. We sized up the calves and I have the back cover strips going with some e6000. That said, I was curious if anyone has tips for adhering the sniper knee. I attempted to do so but it quickly turned into a mess as when I would clamp the sides it would case the other points to come out of line. Is it easier to cure the front and then the sides or is there a tool or clamping spot that I am missing? -

Coach_MattLewis is requesting pre-approval review
gmrhodes13 replied to Coach_MattLewis's topic in Request TK Pre-Approval
Try the "direct link" or copy paste the image '' Looks like it's popped apart, make sure you rough both surfaces with course sandpaper, if they are too tight you can have slightly bigger cover strips on the rear, the public won't notice them as you are usually seen from the front. -
SublimeBW's Armor Master's (AM) ANH Stunt Kit - Build Thread
SublimeBW replied to SublimeBW's topic in ANH Build Threads
Well, my shins officially have cover strips on them. I plan on moving forward with sizing this weekend (assuming I don't need to make an adjustment on my cover strip positioning). -
After about a week of applying a gluing the outer cover strips, my right thigh piece has been assembled. Overall, I'm pretty happy with how it turned out! I know I have a few finished touches to do to the thighs before they're complete. I plan to fill in the gaps in the back of the thighs using Sugru, per JustJoseph's thread. I also know I'll need to trim the tops of the thighs down in order to make sure that the bottom rests above my knee, but I plan to do that when both thighs, shins, and torso have been assembled to make sure all are in alignment. I also plan to trim some of the return edge off the bottom of the thigh to help with mobility. However, this brings me to the part of the build that I may be the most apprehensive about: the bending of the thigh ammo belt. My ammo belt arrived without being curved, as shown below: Included in the packaging, Dave included a message saying that the thigh ammo back needs to be bent using heat between the individual boxes and fitted to my thigh. I know there are a few different methods of accomplishing this, such as use of a heat gun or boiling the entire piece, but I was hoping to get some input about which method is recommended. In the meantime, I plan to continue assembling the right thigh by trimming the cover strips and applying the inner cover strip using the same dimensions as I did for the right thigh (12 mm remaining from center). As always, any advice is greatly appreciated!
-
Thigh cover strips. Modifying a TFA to TLJ. Filled the gluing strip with plastic Sanding with Bondo spray putty Quick spray with white to see how it looks Should the square indent on top right be filled in TLJ?
-

SublimeBW's Armor Master's (AM) ANH Stunt Kit - Build Thread
FN1313 replied to SublimeBW's topic in ANH Build Threads
Dave’s kits being trimmed means there’s no extreme amount of trimming to do, but definitely good he leaves a lot of material to size with. As mentioned leave some return edge on top of the shins and none on the bottom. Work with the front cover strips first that way you can then later size the rear based on your legs. The front needs to be a 20mm cover strip though, so that’s why you’d do that first. Sent from my iPhone using Tapatalk -
Updates for today (links to sections have been updated in the opening post of my build thread to make it easier to find them. I mounted the holster to the belt. finished the rear cover strips of the shins got the thighs pretty much ready for rigging And as you can see above I got the Thermal Detonator in the works. I’ve also made progress on the abdomen, the button panels are done curing to the abdomen and the Han snap and bottom split rivet are in place. I’ve added the two male snaps to the posterior armor. Busy day, but good work.
-
Hey All, I was encouraged by many on here to start my own build thread so I'm going to just that. I got my armor from Dave's Darkside Depot at the beginning of March and I started building it this past weekend. I'm shooting for Centurion straight away as I am somewhat of a perfectionist. Rest assured I watched the OT the whole time I was building. That being said, here is my build so far! Build Day 1 I started with the forearms as I began by following ukswrath's very detailed build. I first taped the forearms up and put them on to get the fitment I wanted. I then made pencil marks about halfway between the two halves of the forearms on each side where I want to make my cuts so that the halves butt up to each other. Instead of using a ruler or straight edge to draw a line down the whole of the forearms I opted to just use a piece of painters tape to make a straight line between my cut marks on either side. Then I used a pair of snips to make a rough cut down the tape I then did some cutting/sanding to get a little closer to the return edge of the forearms to give myself a little more wiggle room when taking them on/off and to prevent it from biting into my skin when trooping. I did this for both the outer and inner pieces of the forearms Then I double checked my fitment by butting the two halves together, taping them up, and putting them back on my arm to make sure they were exactly how I wanted them. Once I was satisfied with the fitment, I used some of my scraps from cutting to make the inner cover strips. For this step I wasn't really worried about the width of the cover strips as it's on the inside. I just wanted to make sure that they were wide enough to have a good hold on each side of the forearms. I've seen some others do it different ways but for myself, I added the inner cover strips onto the inside forearm piece so that half of the cover strip was hanging over the edge (as shown below). After this picture was taken I added the second inner cover strip on this same piece. When the E6000 is cured I will attach the outside half of the forearm. Probably a weird next step but I moved on to the thermal detonator because it seemed easy and quick to do the little sanding and gluing that I need to do with it. I needed to trim the end caps on the detonator a little to match up better with the measurements on the CRL so I made my measurements and then put a piece of tape around them to give me a straighter guide for trimming them. A pair of curved scissors really helped on some of the trimming. Especially for the end caps on the detonator. After I got my rough trim done. I brought it to the belt sander to touch it up and make it a little flatter and nicer looking. I did not glue the end caps on as I'm planning on making it a little storage area farther along in the build. I'm going to probably glue one side down and add some elastic onto the inside of each cap so that the elastic always keeps the unglued cap in place. At least that's the plan for now. I lined up the control panel of the thermal detonator into the middle, added some E6000 and glued that sucker down. Probably could have used magnets but I opted for tape to hold it down while the glue cured I have the clips for the thermal detonator that are from Ukswrath but I will add those the next build day after the E6000 on the control panel is cured. I moved on to the biceps from there and did the same thing I did with the forearms. Fitted, pencil mark, cut, trim to return edge where needed, butt together, tape and re-test fitment I'm glad I made the extra step to butt together and re-test the fitment on my parts though because I actually had cut a couple times on the biceps to get the fitments just right. I tend to cut a little less than the line I marked because I can always take more off but I can never put it back on. And again, I did the same thing as I did with the forearms and just put both inner cover strips onto one side of the biceps. That is all I got done on my build day this past weekend. Would love to hear any comments, criticism or tips y'all have for me! Excited to get this thing done eventually and join the 501st!
-
Best Approach to Removing E6000 from Armor
gmrhodes13 replied to LightBox's topic in Assembly, Mods, and Painting
I find a wet rag is good, causes a little bit of friction, for really stubborn glue I use automotive compound. For sides of cover strips use sharp pieces of scrap plastic or pop sticks. -
Update: I went ahead and trimmed down the fronts of my right thigh pieces. After additional research, I went ahead and expanded the lines out to 12 mm on each side as an abundance of caution. I figured I could always trim the extra 2 mm of in the event that it's necessary. I'd like to start getting the inner cover strips fitted so I can move on to fitting, but I have a feeling that I'll have to trim a bit off the top of the thigh. As somewhat of a vertically challenged trooper (5'9"), the thigh as it is sits just around the middle of my knee. I was just wondering what the guidance was on this. Where in relation to the knee should the thigh be?
-
Questions are good, always worth asking and understanding before trimming and fixing. So with the Thighs and Shins being as both require a 20mm cover strip in the front you will want to measure 10mm on each half’s front from the return edge inward and trim off the excess. I would do that and apply inner cover strips for holding and maintaining that while you then size the rear of the thighs and shins to your body. You should hopefully have enough excess size in the back to to that without shimming anything. (This is an earlier picture I used to emphasize the 10mm cuts ideally you’ll want to not have it look like barrel thighs, but have things wider at top and narrower near knee, more triangular so to say. An adjustment I did later as I sized the rear of the thighs.) Also be sure to note that the two halves of thighs and shins are different. The thighs has one curve that goes lower and more scooped (that’s the inner thigh) and the outer thigh seems to be less scooped and more curved straight up to a higher peak. The shins will have one side that is angled inward a bit more near the bottom (inner) and one that is less (outer) As you can see below this is my left shin Regarding the cover strip on the rear of the thigh, if you are going for higher levels of approval then it needs to be 20mm just like the front strip. Only the shins have a 25mm rear cover strip and that’s to cover for the fact that they are not glued down and cover up the enclosure method. If you have much larger thighs then there are methods to make them even larger and still get a proper cover strip of 20mm in the rear for higher levels of approval. You’ll need to shim them though. You can see this question I posted previously with a good response detailing information on how to shim. How large the rear strips can be to be accepted really comes down to your GML, however I’m sure you’ll also feel much more comfortable with the appearance of your armor if you can manage to achieve the 20mm rear strip appearance. https://www.whitearmor.net/forum/topic/53132-thigh-back-cover-strips/#comment-758624 Sent from my iPad using Tapatalk
-
Hey, everyone! I know I've been quiet the last few weeks. I was in the process of applying inner and outer cover strips to the forearm pieces. They've finally been assembled after a few days letting glue settle. I've included some pictures of the finished forearm pieces as well as the forearm pieces in relation to the biceps: I placed an order for Line 24 snaps to strap the biceps and forearms together (I thought those would be easier to find locally than the ended up being), so in the meantime I'll start the preliminary research for trimming and sizing the shin and thigh pieces. As always, if anyone has any feedback I always appreciate it!
-
Just ordered all the various snaps and items needed to finish the rigging of the armor. Once those arrive I will start breaking out more of the work. I also updated the thigh and shin sections detailing cover strips for thighs and sniper knee for left shin. Sent from my iPad using Tapatalk
-
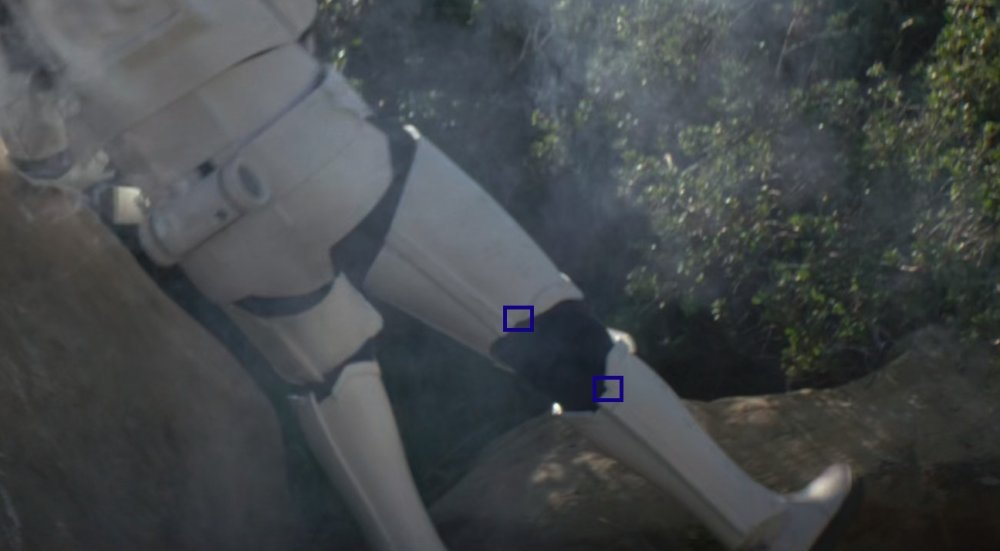
For the sniper knee plate, Do I need to trim anything such as return edges or make the ends vertical? Or would I be good if I attached it as is. I’ve since finished the shins with the rear cover strips. I sized the length of the rear of the strips from under the extruded upper portion and then cut the 25mm width of strips. Then attached with half on the external opening side of each. All that’s left to do at this point is the hook strapping on the inside to hold them closed. My plan here is to reinforce the interior side with a piece of abs plastic and then drill the holes and glue the 3/4 inch wide elastic with the sewn on hook to close them. I will detail that once I get the materials and can use a sewing machine for the straps. I will also most likely add a snap on the inner front part and the boots so I can have them snap and hold the shins more straight forward as I already know they tend to drift. Sent from my iPhone using Tapatalk
-
SHINS Around the same time I started work on the thighs I started trimming the shins. I knew I’d need to do the trimming of return edges and front before I could accurately size them to my shins/calves so I started there. Bottom return edge removed Top return edge marked More detail on the other shin on the processes Trimming the top (this was a PIA) I would have preferred trimming from the inside out, but some angles were hard to get my exacto in place I had to make some additional length adjustment trimming from the bottom up so it wasn’t so large on me. Then I marked the 10mm on each side from the general return edge of the front on each piece Drew my straight line to cut Scored and snapped, then taped to verify. I forgot to document the next steps of the inner cover strip glue and proceed on to the outer strip on the front, but they are similar to all other methods used. Basically an inner strip of 20mm glued for 24 hours. Then a sized, beveled, and nicey nice outer strip on the front glued for 24 hours at least (I will give at least 48 before finding the back trim lines and the sniper plate) Here they are in their current state. Alright, after probably 72 hours of waiting on the curing I went ahead and tackled the rear cuts for the shins. I wore my boots to make sure there was space for them as well as some jogger pants, this was personally a choice so that I could size them just large enough to handle some pants for colder troops here in Utah. I know that they’ll work fine with the under suit and with something only marginally thicker. I first marked where the outer flap lined up with the inner. This way I could tape and find center to make my cut line. Once I made that cut I lined things up again and marked the inner cut line Then score and snap. I knew how to line up the outer cut edge with a line I drew previously on the inner side of the outside flap. Initial fitting after that shows that I had some space near the ankle I could bring in a bit I angled in the bottom keeping the top the same and marked what I needed to remove After removing the extra length from the bottom I now had straight lines down back I can build my cover strip and closure system around later while also having them fit appropriately. Sniper knee on left shin I sliced some of the upper area along the sides so it didn’t stick up oddly (as noted in a comment in my build thread) and attached e6000 to the spaces under each of the clamps. Now we wait. While the knee plate sets I trimmed the 25mm rear cover strip for the right shin and got it clamped down. Now with both cover strips installed here’s the shins I took some 3/4 inch wide white elastic and cut about 4-5 inch lengths which I then folded over at the half inch mark. I sewed down the ends to prevent fraying and the folded over parts to work on the hook enclosure method. I then started hand sewing the hooks onto the elastic in the doubled up areas. Once this is done I will glue them into place on the shins one .5 inches from the top return edge, one .5 inches from the bottom and one right in the middle. I then used e6000 to glue the straps in place. I measured where to glue as 3.5cm from the top edge and bottom edge and then 17cm from the top (for the center) Once dried I will drill the holes for the hooks to connect to. Alright, finished up the shins. I drilled the holes for the hooks to connect to with a 9/64 drill bit. I then cut the mobility cuts in the shins. I had some armor bite going on when testing them so I figured on cutting that.
-
Nah, just kidding, there's always something to improve. And this isn't even for Lvl 4 (whatever the criteria might be, aside from "sitting in armor"), but for the upcoming Troops -- and fixing the two remarks on my Centurion Approval Crack Repair Now, the first remark I got, was that I need to repair my cracks. And I do. Always. Now, a lot of these cracks simply come from one bad movement or continuous stress in some areas. Usually, I fix them with poor man's fiberglass -- a thin fabric soaked in superglue -- putting some light scores over the end of the cracks in the hope of preventing them going any further inwards and maybe going over them with ABS paste and/or Acetone in order to hide them. However there have been a few cracks that appear again, and again, and again... and not even a third layer of poor man's fiberglass is helping anymore. So I needed something stronger. I took some of my leftover coverstrip ABS, cut it to shape and glued it into the armor. This is a lot more sturdy and the fabric and will hopefully ease the stress on my armor. Hand Guard Paint This might as well be a regular feature by now -- for unknown reasons my handguards always yellow and whilst it makes for an excellent marker to recognize me, it doesn't look as good as some white handguards and therefore got a mention in my Centurion Application. Although it takes me several coats of a white paint of my choice (anything works, I've used everything from wall paint to enamel paint), I still prefer this over the admittedly simpler choice of buying myself some nice white latex handguards. Holster Repair During a private troop at the end of February, my Holster Chicago Screw came loose. Although I did manage to find a screw (notably not my screw), I didn't manage to find the small black leather square cover. Luckily I still had some fake leather lying around from a different project, so I simply had to cut a square, punch a hole into said square and I had a new cover. Then, to prevent such a thing from happening again, I put a small drop of E-6000 on all my Holster screws. I do need to order myself some Chicago Screws and properly replace the square, but it's a good solution for now until I can properly rework this. Celebration Prep This is something that I maybe should have done a long time before, but with Celebration coming up I finally had a good enough excuse to go through with it. I wrote my ID into/onto every single piece of Armor that I own. That way, if I loose or misplace something, everyone knows who it belongs to. Whenever possible I tried to put my ID somewhere where there would be no staining should the ink bleed through the armor, such as underneath cover-strips. Luckily, there was no bleed-through anywhere. Phone Thigh Pocket A chest pocket is good, but a place for my phone that I can grab without showing everyone my chest is better. So it was time for a thigh pocket. First I cut a square piece of canvas fabric. The fabric itself does not matter, but white or black are better hidden inside the armor. The fabric was about an inch (3cm) broader on each side than my phone and two centimeters longer on the bottom. I marked the position of the fabric inside my thigh, making sure to keep a slight distance to the top (just far enough to be more hidden, but still reachable), whilst checking that my phone would actually fit in there. I then glued the fabric on the sides and bottom into the armor, leaving the top open. If this works as well in practice as I'm hoping it will, I might add another pocket to my left thigh as well. For more security I intend on adding a few extras, but I need a second phone case for that, so it's only on my to-do list for now. Once I get everything ready, I'll be sure to share the final part of this project with you As always, thanks for reading and I hope I'll see some of you at Celebration