


kwdesigns
-
Posts
461 -
Joined
-
Last visited
Content Type
Profiles
Forums
Gallery
Articles
Everything posted by kwdesigns
-

Ralph McQuarrie's Concept Stormtrooper "Armor"
kwdesigns replied to kwdesigns's topic in Concept Armor
I wanted to make a post to let everyone know I have started a new forum www.rmqconceptcrew.com for all Ralph McQuarrie's Concept Characters that could potentially become 501st approved. The Purpose of RMQ Concept Crew is to have a place for all like-minded who want to carry out the respect and love of Ralph McQuarrie's vision of the Star Wars Universe and bring it to life by making/wearing the costumes in remembrance of him. FISD will always be the birth place for the RMQ Concept Stormtrooper but now RMQCC can be the place for it to grow along with many other RMQ Concept Characters. I look forward to the day that this RMQ armor can be 501st approved with the ID letters as "MQ" to pay tribute to McQuarrie. As I would love to be "MQ-0812" My end goal would be to have RMQCC recognized and become a 501st approved detachment. Kevin W. -
Ralph McQuarrie's Concept Stormtrooper "Armor"
kwdesigns replied to kwdesigns's topic in Concept Armor
I'm sorry it is not my place to critique his work. SGB made the helmet back in 2009. So I'm sure you can find all kinds of info about it. It is also listed up on SW Helmets.com. I am very grateful that he made this helmet and without it we would not have been able to debut the RMQ armor at CE. You can still place an order with him but he is going through some tough personal times and receiving your order might take a bit of time. Other options will be available soon. I spoke with the man in charge at efx. He told me they are planning to release their RMQ helmet in Spring. I will be sculpting the other version that looks similar and also the one with the large oval mouth. I just got word that another person is planning on sculpting one of the RMQ concept design helmets. Kevin W. -
Ralph McQuarrie's Concept Stormtrooper "Armor"
kwdesigns replied to kwdesigns's topic in Concept Armor
Hi Jason. Thank you very much for adding some constructive criticism about the thighs and lower legs. In truth I though long a hard about all the parts while I was sculpting them. I was thinking the same thing you were about the lower legs. But, I watched and read as many interviews of RMQ as possible to get a better understanding of what he wanted these characters to look like. And when I looked at the different sketches of RMQ, I saw the lower legs as having "Cancels" they were as wide as the thighs and looked a lot like boots. They were not narrow like the what ended up on film. I had to realize that it was back in the 1970's when he was coming up with the look. And as for the Thighs we kind of followed the action figure and thought having the back of the thighs carry over the butt plate when walking made the most sense. This was also a theme we see with C3PO. I had a wonderful privilege to meet Paul B. while I was at CE. He worked with RMQ the last 10 years of his life and I would say knows him better than anyone. He told me that the concept Stormtrooper was explained to Ralph by Mr. Lucas as "something scary like a skeleton". I was quite humbled and felt gratitude when Paul then told me I "Nailed it' The armor was amazing and RMQ would have been proud of it. Kevin W. -
Ralph McQuarrie's Concept Stormtrooper "Armor"
kwdesigns replied to kwdesigns's topic in Concept Armor
I am having trouble uploading pics. But if you go to starwars.com you can see some pics. A video should also be on that site soon too. Kevin W. -
Ralph McQuarrie's Concept Stormtrooper "Armor"
kwdesigns replied to kwdesigns's topic in Concept Armor
In about 4 hours (11:00am) we will be debuting the RMQ armor at the UKG Deathstar booth in building 12. If you are here at CE please come by to see. Afterwords we will walk around the con. Kevin W. -
Ralph McQuarrie's Concept Stormtrooper "Armor"
kwdesigns replied to kwdesigns's topic in Concept Armor
---------- Here's the armor.. O Wait, I guess you need X-ray vision to see it in the suitcases. Hang tight just a few more days to be revealed. Kevin W. -
Ralph McQuarrie's Concept Stormtrooper "Armor"
kwdesigns replied to kwdesigns's topic in Concept Armor
I finished assembling and painting my armor kit and also finished a friend's kit. We will be joining up with the UK guys next week to debut the long awaited RMQ Concept TK armor. So far I find this set of armor to be a lot more comfortable than I imagined. Lots of pictures will be coming soon..... Kevin W. -
TK-0812 here, I'll be (38) in just a few weeks on 08-12. Kevin W.
-
Ralph McQuarrie's Concept Stormtrooper "Armor"
kwdesigns replied to kwdesigns's topic in Concept Armor
How to attach the Cod and Butt...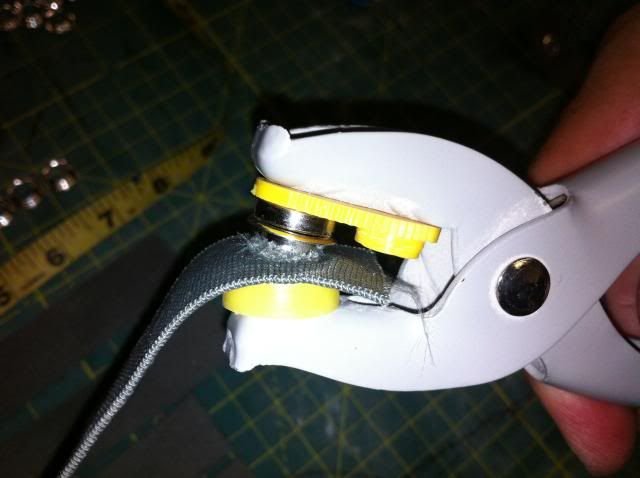
-
Ralph McQuarrie's Concept Stormtrooper "Armor"
kwdesigns replied to kwdesigns's topic in Concept Armor
How to attach the Ab and Kidney. So I wanted to start showing how I am making the straps to hold the parts together. I wanted the Ab and Kidney to assemble similar to the TK's using split rivets and elastic. But For me I decided to hide some snaps so that I can take the ab and kidney apart for better packing into an armor bin for travel purposes. These are the tabs that will go on the inside of the Ab Plate.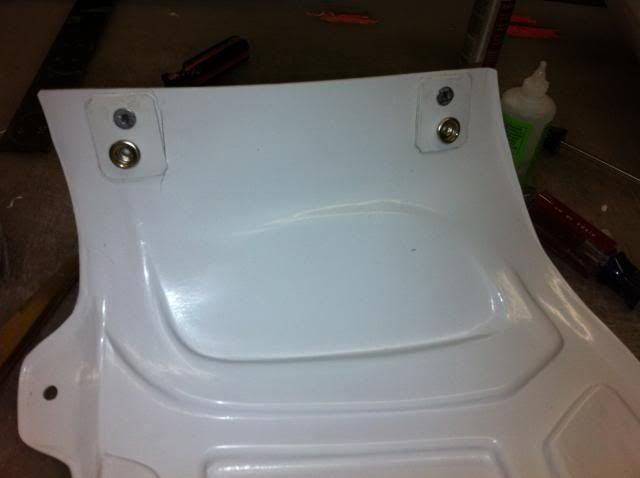
-
Ralph McQuarrie's Concept Stormtrooper "Armor"
kwdesigns replied to kwdesigns's topic in Concept Armor
I was asked by the UK guys not to show pics of the ABS parts so that when we wear the assembled armor at CE it will have a better impact. I think showing the assembly process here and a list of the parts used would be a good idea. Kevin W. -
Ralph McQuarrie's Concept Stormtrooper "Armor"
kwdesigns replied to kwdesigns's topic in Concept Armor
It took a little over 6 months but I can now say all the parts are sculpted. I have done a complete vac-form test pull on all the parts to make a few prototype sets. Kevin W. -
Ralph McQuarrie's Concept Stormtrooper "Armor"
kwdesigns replied to kwdesigns's topic in Concept Armor
I was thinking that the Lazer Sword handle would rest between the raised areas on this side amo belt box. I think adding a hook between to hold it would work great. I don't image the hook being on the belt like Jedi. I think using this amo box for the Laser Sword, visually makes sense to me. Kevin W.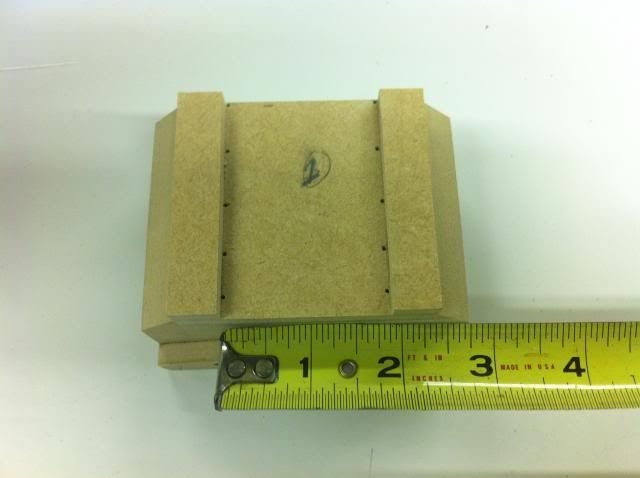
-
Ralph McQuarrie's Concept Stormtrooper "Armor"
kwdesigns replied to kwdesigns's topic in Concept Armor
As for attaching the Belt Boxes I recommended getting some these. Size - Name 10-32 Threaded T-Nuts 10-32 x 1/2 Flat Philip Machine Screws #8 Finish Washer You will need at lest 6 (one for each belt box) This will allow you to remove them for ease of packing the armor in a bin. I think using some velcro will help keep them from turning. I would also get 2 more sets of T-Nuts to use to attach the Thermal Detonator. _________________________________ These are the round adhesive velcro "Dots" I would use behind the belt boxes. Most importantly you should use these on the Yoke in the front center area. You will not want to use a magnet in the front center because the Harness will have a pocket directly behind that area. So if you ever plan to put a Credit Card or Speaker AMP in the pocket the magnet can ruin it. _________________________________________________________ And these are the magnets to use on the other areas on the Yoke. Rare earth Magnets Disc 3/4 diameter x 1/32" thick. Kevin W.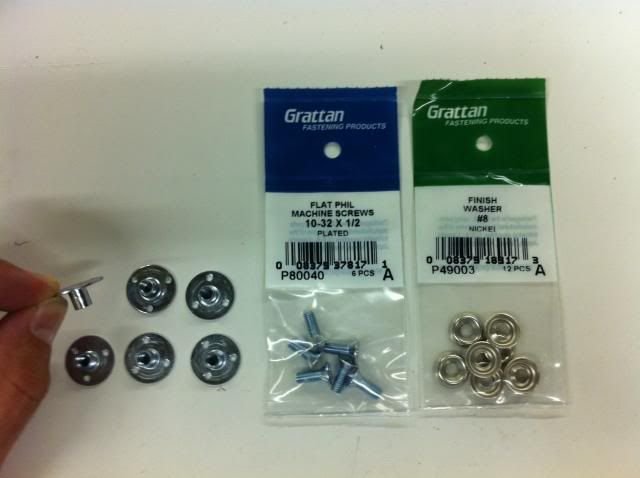
-
Ralph McQuarrie's Concept Stormtrooper "Armor"
kwdesigns replied to kwdesigns's topic in Concept Armor
O'Ya I think the White LED is perfect for the Laser Sword !!!! -
Ralph McQuarrie's Concept Stormtrooper "Armor"
kwdesigns replied to kwdesigns's topic in Concept Armor
@ Stukatrooper- Yes there will be a overlap area for the back neckring/yoke. I need to clean that up a bit. @ TK Bondservnt 2392 - few pages back yes we did talk about that idea. As for now they will be vac-formed and the ability to pop the yoke off with magnets will have to do. The size of the neck ring is not going to be the issue. I did make it slightly larger than to scale with the chest and the back because a Harness system will be available with the soft neckseal sewn to it and that will go higher up and better protect the neck. I made sure that the bottom opening of SGB helmet fits over the armor neckring, even though I plan to make my own helmet soon. These are what the Belt Boxes look like. Kevin W.
-
Ralph McQuarrie's Concept Stormtrooper "Armor"
kwdesigns replied to kwdesigns's topic in Concept Armor
So this shows the recessed areas in the Chest and Back for the Yoke to sit in. The round indent are for magnets to help hold the Yoke down and in place. There will also be velcro at the top of the Harness to help hold all 3 parts in place.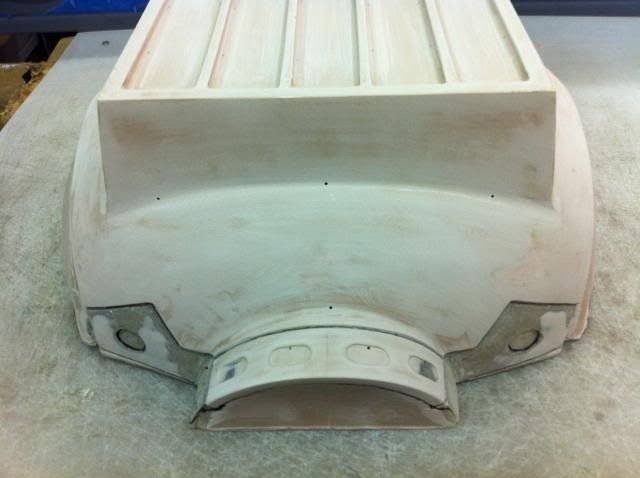
-
Ralph McQuarrie's Concept Stormtrooper "Armor"
kwdesigns replied to kwdesigns's topic in Concept Armor
It's gratafing to me also to be able to list them as Done. I'm thinking about making the Ab plate and Kidney plates assemnle more like the TKs and not making them need to glue on the sides and then made seamless. This will allow for better fitting various sized midsections. Also will make it easier to pack in a smaller bin. Kevin W. -
Ralph McQuarrie's Concept Stormtrooper "Armor"
kwdesigns replied to kwdesigns's topic in Concept Armor
So I thought I would make a list of the parts and how far I am with the progress. Chest (Done) Back (Done) Yoke (Done) Just need to do a test pull to make sure all is good. Chest & Back Side Connectors (0%) (easy after Chest and back are completed) Ab section (Done) Kidney Section (50%) Belt (front-back) (50%) Belt Amo Boxes (20%) Cod (Done) Butt (Done) Thighs (95%) Lower Legs (Done) Shoulder Bells (Done) Biceps (Done) Forearms (Done) Handbacks (0%) After CE, I plan on making my own interpretation of RMQ helmet. I might make both style helmets and then later I might make the Backpack. Kevin W. -
Ralph McQuarrie's Concept Stormtrooper "Armor"
kwdesigns replied to kwdesigns's topic in Concept Armor
Thanks guys.... This is what the Yoke will look like. (The Yoke will bridge the Chest and Back together) The front part of the neck-seal will stay attached to the Yoke. The rear opened end of the Yoke will overlap the Back armor by one oval indention on each side. You will need to keep the rear part of the neck-seal attached to the Back armor. I have not done a vac-fromed test pull of this part yet. I have a little bit more clean up to do first.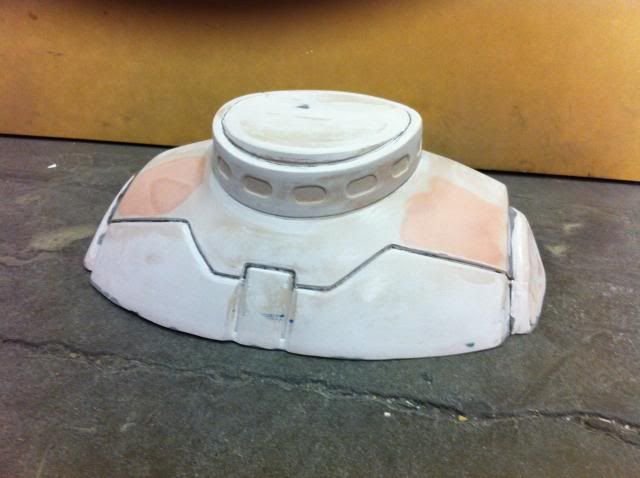
-
Ralph McQuarrie's Concept Stormtrooper "Armor"
kwdesigns replied to kwdesigns's topic in Concept Armor
Just another up-date... I got the detail around the Neck/Yoke done!!! I am really loving the lower legs. I have to make 4 molds because there will be an inner and outer leg parts for the left and right side. The front will be glued to a "support strip" on the inside. The outside leg will over lap the inside leg in the back. The inner legs have the grove line that wraps from the front around to the back. The Outside legs only have the grove in the front and fades away on the side. Kevin W.
-
Ralph McQuarrie's Concept Stormtrooper "Armor"
kwdesigns replied to kwdesigns's topic in Concept Armor
Just wanted to make a note that I only have a few more "DAYS" left to finish the sculpting and mold making of the rest of the parts. The sculpts I have shown, I have done some Vac-forming test pulls and I am happy with the test fittings. So it's down to the wire and I'm going to be putting in a lot of extra hours in to finish it all up!!! Kevin W. -
Ralph McQuarrie's Concept Stormtrooper "Armor"
kwdesigns replied to kwdesigns's topic in Concept Armor
That "Lazer Sword" looks amazing!!! The helmet looks great too. I really like the the aerators and the center thing. I'd love to have those for my helmet. Kevin W. -
Ralph McQuarrie's Concept Stormtrooper "Armor"
kwdesigns replied to kwdesigns's topic in Concept Armor
Timing just works out perfectly. Kevin W. -
Ralph McQuarrie's Concept Stormtrooper "Armor"
kwdesigns replied to kwdesigns's topic in Concept Armor
The plan is to Vac-form over the knob. I do not feel the knob should be so obvious as being a knob that kids might think they should turn it while we are trooping. LOL As I look at the other images and compare, it looks very subtle with only a recessed ring on the Ab Plate. Kevin W.