

kwdesigns
-
Posts
461 -
Joined
-
Last visited
Content Type
Profiles
Forums
Gallery
Articles
Everything posted by kwdesigns
-
Jes Gistang - research thread
kwdesigns replied to Daetrin's topic in Legacy Stormtrooper (Joker Squad)
I might be taking the necessary steps to get this Fem armor and helmet done. At this time I am thinking about making the size range some where around 5'1" - 5'8". This will be a Vac-formed ABS kit. Considering the way it will need to assemble it will need to be painted due to the seamless look on some of the parts, similar to clones. Ladies if you are interested in this please let me know and also let me know how tall you are and your waist size. If you want to send your measurements to me in a PM that is fine. The sooner I can get this info the sooner I can start if there is enough interest. I have also posted an interest thread on the main boards... http://www.501st.com/forum/viewtopic.php?p=979457#979457 Thanks Kevin W. -
Ralph McQuarrie's Concept Stormtrooper "Helmet(s)"
kwdesigns replied to kwdesigns's topic in Concept Armor
Here is the first pull of the new back. Kevin W.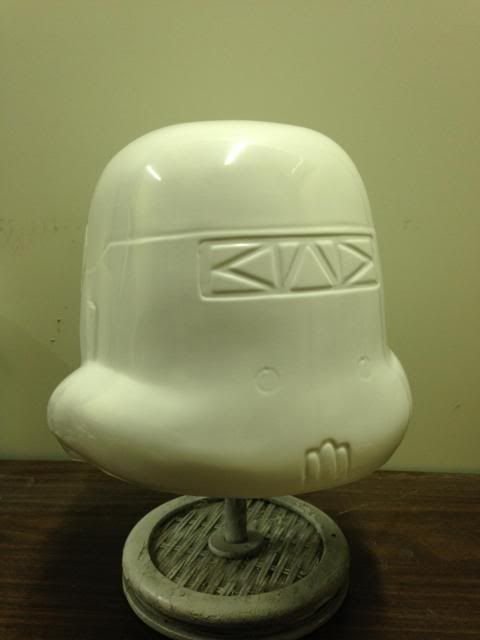
-
Ralph McQuarrie's Concept Stormtrooper "Helmet(s)"
kwdesigns replied to kwdesigns's topic in Concept Armor
This is the 3rd revision. I enlarged the space for the larger aerators and made a slight groove to outline where to paint the inner area black. I also smoothed out the outer edges towards the bottom, giving them a more rounder edge. I also scribed in the mold where to drill the holes for the ear-caps and where to cut it along the outer edges. I think it is almost ready for production... I did some clean up on the dome today also and did a test pull. I will assemble this 3rd version tomorrow!!! Thanks!!!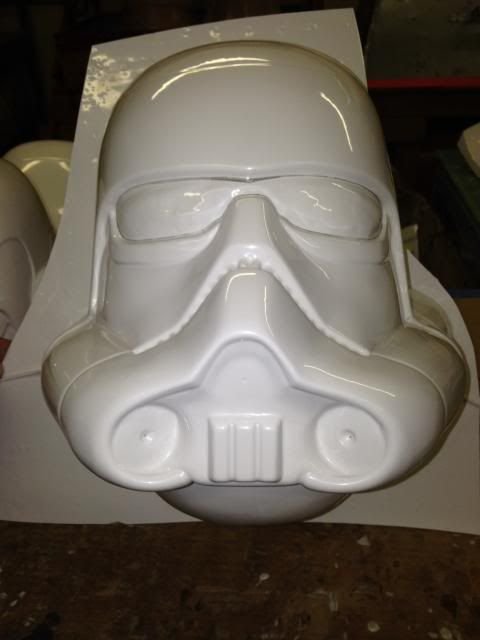
-
Ralph McQuarrie's Concept Stormtrooper "Helmet(s)"
kwdesigns replied to kwdesigns's topic in Concept Armor
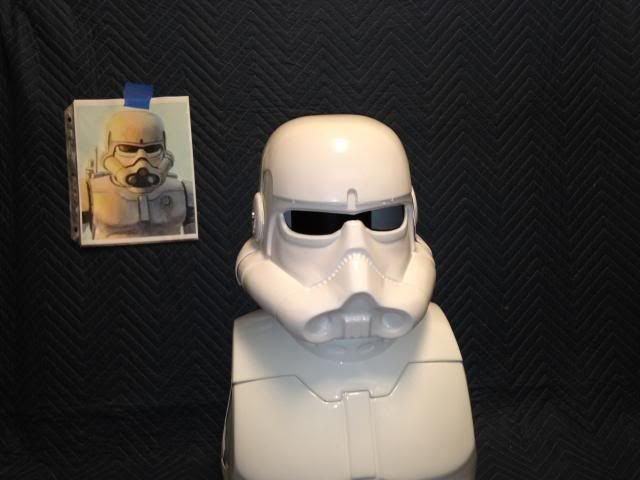
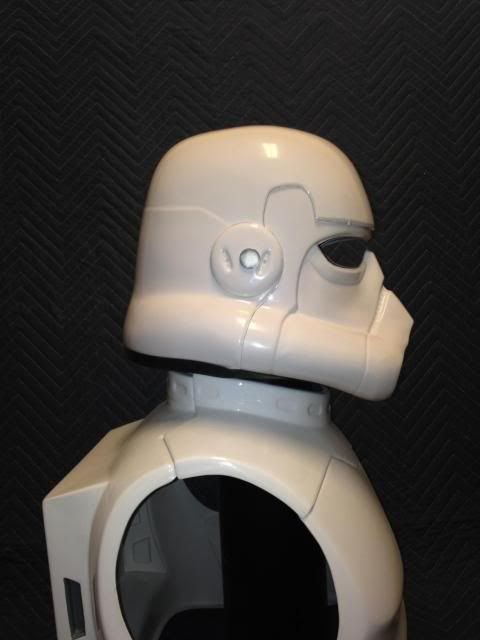
The 5th Horseman... Thank you very much for your input. I have done some corrections and this is still not the final pull yet. It is only held together with magnets in the 2 bottom pics. And here it is on the left (again this is unfinished) with a CAP on the right. I need to remake the aerators to better resemble RMQ helmet designs. This is the improved Proto-Type. The assembly was very easy with just 2 screws on each side holding the ear caps, dome, face and eye lens all together. I have done a test fit with the chest and back armor on and it is very comfortable and fits me great. I took it to a Garrison party and quite a few people tried it on and they said it fit them very well. Kevin W.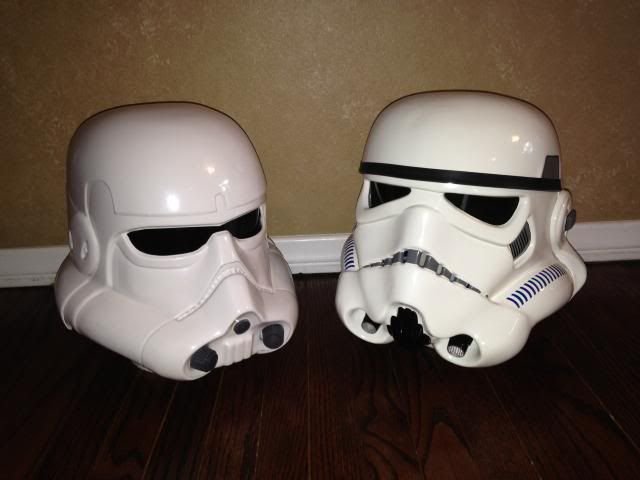
-
Ralph McQuarrie's Concept Stormtrooper "Helmet(s)"
kwdesigns replied to kwdesigns's topic in Concept Armor
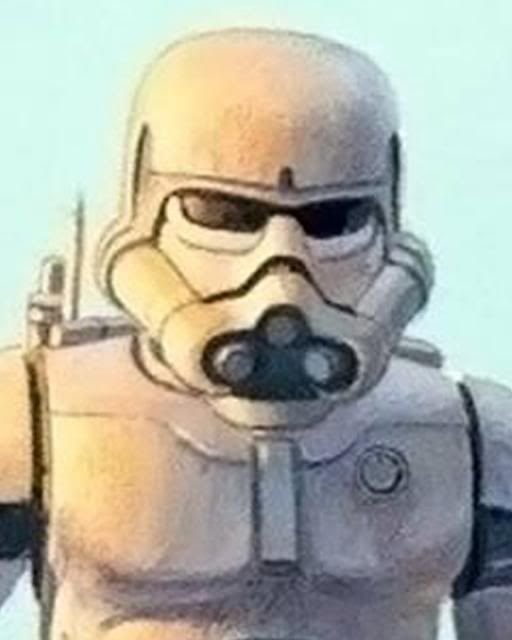
This is the main art work of RMQ's that I am using as reference for this helmet. Kevin W..jpg.c95f9e06c623b30be10f70c595d4771d.jpg)
-
Ralph McQuarrie's Concept Stormtrooper "Helmet(s)"
kwdesigns replied to kwdesigns's topic in Concept Armor
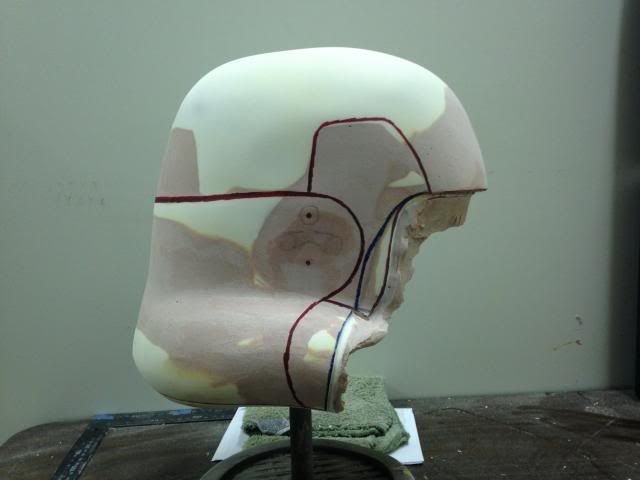
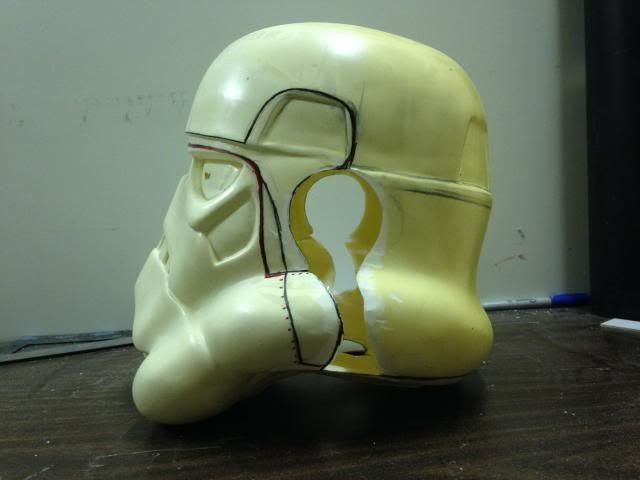
I also did another pull of the face (It's a soft pull, that is why it is lacking detail to the face) and a quick pull of the back even though the back is not done and has no details added yet. But this will help me align the face with the back and determine where the side detail/cut lines will be. The black line drawn here shows what I was first thinking... These line is were the dome would be cut off and the side of the fave part is what would be showing underneath. Then I realized I might need a larger overlapped area to better attach the 2 halves together. So I drew the Red line then the Blue line leaving more area on the side for an ear cap. I am leaning more towards the blue line because it shows more of the top curved detail when looking at it from the front view which is similar to RMQ drawing. The Red and Blue lines will require me to make some kind of ear caps. Some ear caps as some in a few other RMQ drawing. I am liking the Green Line even more now... What do you think??? Kevin W.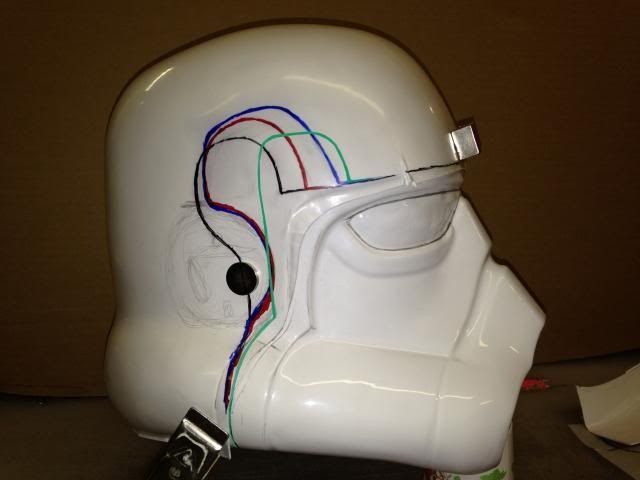
-
Ralph McQuarrie's Concept Stormtrooper "Helmet(s)"
kwdesigns replied to kwdesigns's topic in Concept Armor
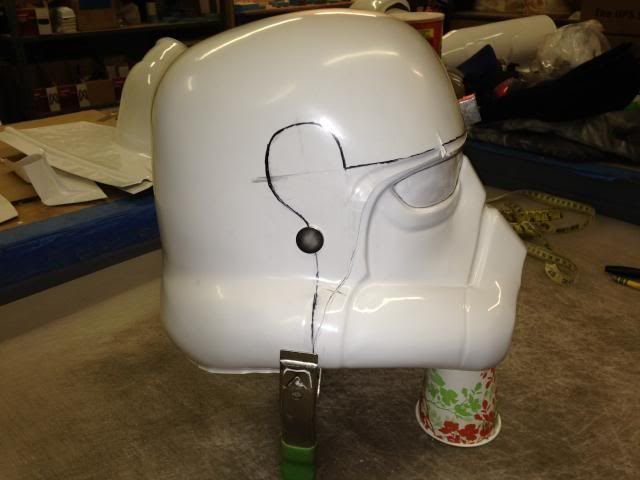
I was able to get a nice test pull of the face today!!! Kevin W.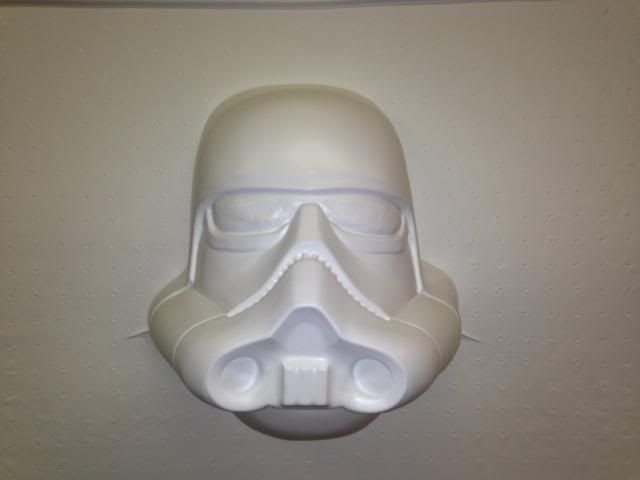
-
Jes Gistang - research thread
kwdesigns replied to Daetrin's topic in Legacy Stormtrooper (Joker Squad)
What kind of height range for an armor kit are we talking about for these women? 5'5" - 5'8"? Kevin W. -
Ralph McQuarrie's Concept Stormtrooper "Helmet(s)"
kwdesigns replied to kwdesigns's topic in Concept Armor
Nice idea. I keep going back and forth on deciding if the area should be smooth and the designs gets a decal/painted on or should I make the shapes raised in the mold and then the shapes would have to be painted. The 2nd option will not make it easy for some people. ??? Kevin W. -
Ralph McQuarrie's Concept Stormtrooper "Helmet(s)"
kwdesigns replied to kwdesigns's topic in Concept Armor
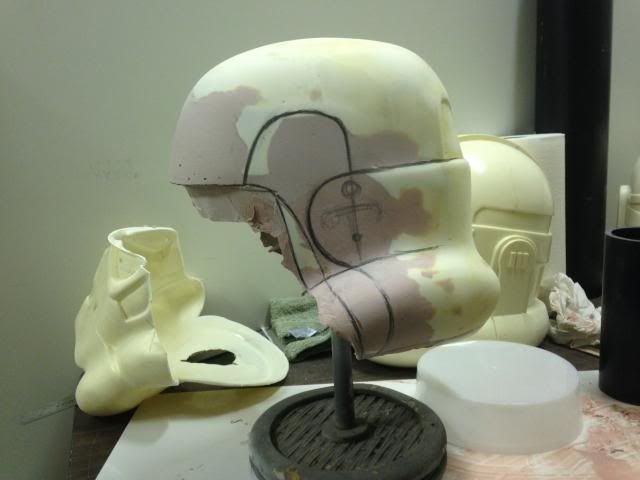
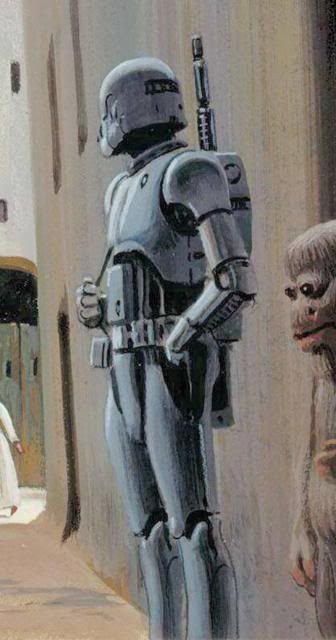
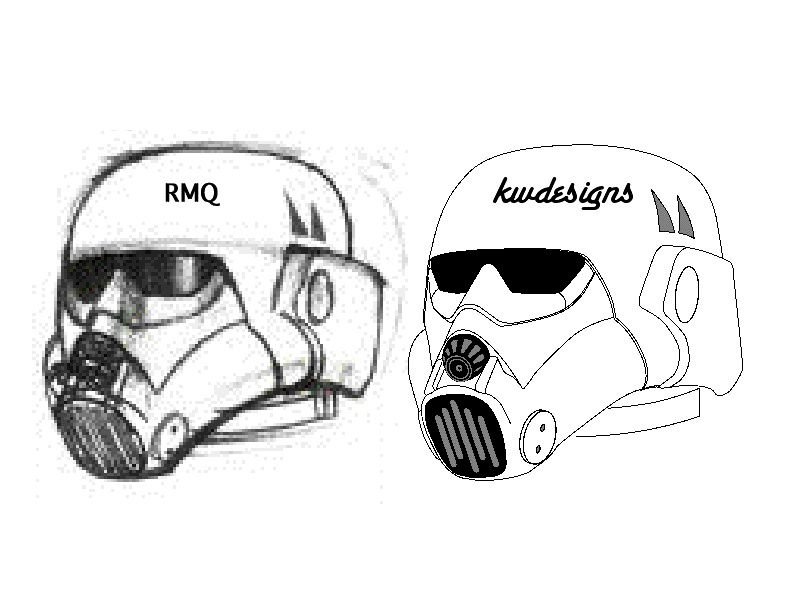
My drawing on the left shows the detail lines that I see when looking at RMQ's illustration on the right of the back-view of one of the concept troopers helmet. If you study RMQ's work, you will find that he incorporated a red triangle in a lot of his work. I started with that as part of the design in the center and made other shapes that are similar to the windows on the Jawa Crawler on the back of the helmet. Kevin W.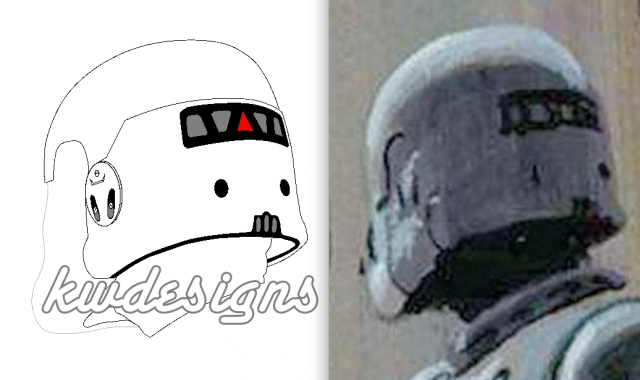
-
Jes Gistang - research thread
kwdesigns replied to Daetrin's topic in Legacy Stormtrooper (Joker Squad)
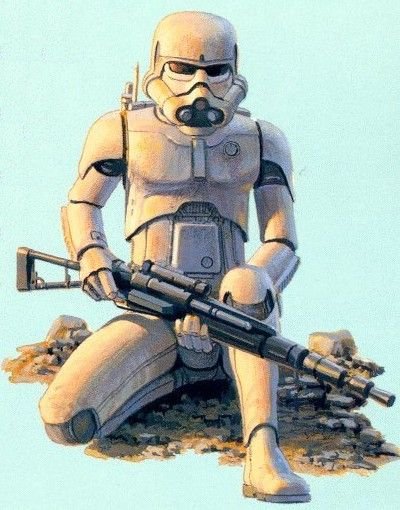
If I was going to sculpt this I would make it look very close to this statue. Kevin W. -
Ralph McQuarrie's Concept Stormtrooper "Helmet(s)"
kwdesigns replied to kwdesigns's topic in Concept Armor
I did a quick clay sculpt of the face to look like the RMQ concept Sandtrooper in about 3.5 hours. It's not done, just a rough layout. Kevin W.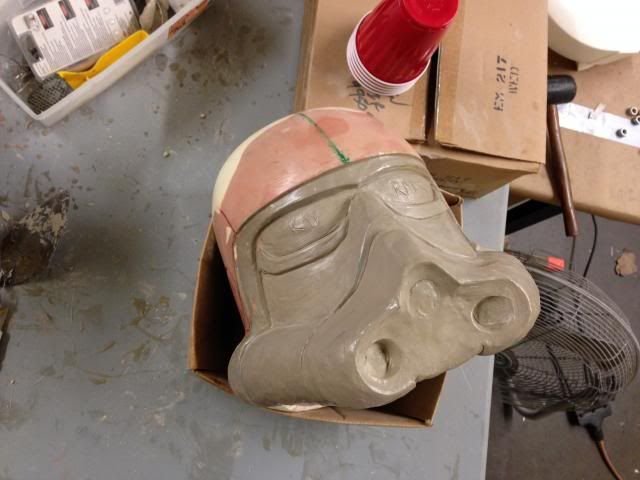
-
Ralph McQuarrie's Concept Stormtrooper "Helmet(s)"
kwdesigns replied to kwdesigns's topic in Concept Armor
I was busy today... After I flattened out the backside this morning, I decided I would make a temporary mold of the dome. This will allow me to make 2 cast from it, to then modify each dome to resemble 2 different RMQ helmets. Kevin W.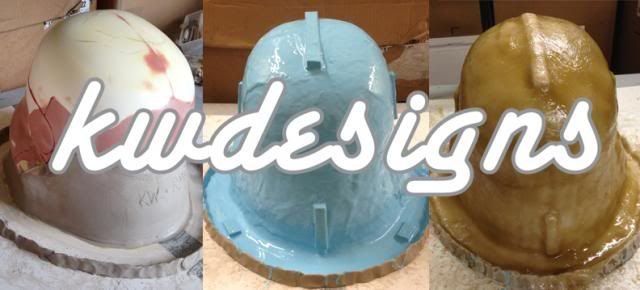
-
Ralph McQuarrie's Concept Stormtrooper "Helmet(s)"
kwdesigns replied to kwdesigns's topic in Concept Armor
R5SB (Andy) Thank you very much!! Any and all images are always welcome. Thanks!!! I made the back section flatter rather than having the curved lower bump in the back, like the movie TK helmets have. The Blue Line shows where the lid would be trimmed for the RMQ "Big Mouth" Trooper and the Red lines are for the RMQ SandTropper. Kevin W.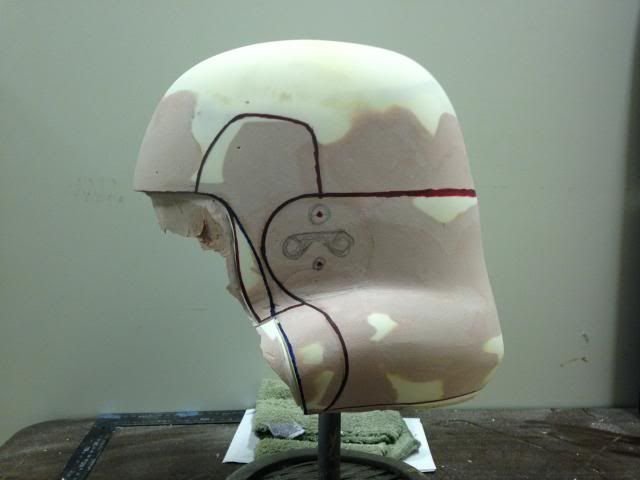
-
Ralph McQuarrie's Concept Stormtrooper "Helmet(s)"
kwdesigns replied to kwdesigns's topic in Concept Armor
I had one of my old A.N.H. v 2.5 helmets on hand. It was a bad cast I did about 3 years ago, so I decided to cut it up and see if I can use some of it for the RMQ helmet. My thought is to try to make a dome/back section that I can use to make other molds from and modify them to become 2 different RMQ style helmets. One will be for the "Big Mouth" and the other the Sandertooper seen outside. NOT the Cantina Trooper. This Sandtrooper style... The aerators on this helmet are pointed inward. It also doesn't have the high check small rectangles and the distance from the nose grill and the edge of the center aerator is grater than what EFX is making. I promised Bryan O. (owner of EFX) that I would not make the same helmet that they have in the works. The back of this helmet is also very different. So these are the two different styles I will be working on simultaneously. In the end I hope these can be Vac-formed helmet kits and not roto-cast. Thanks Kevin W.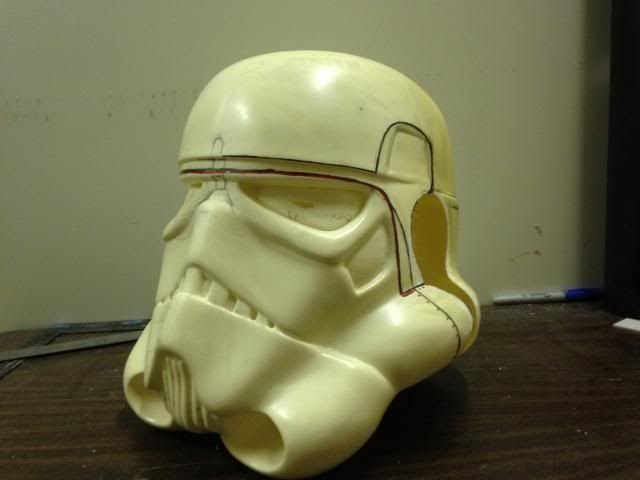
-
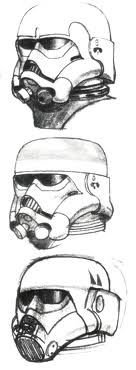
I thought it would be a good idea to start a new thread to focus on the different helmets that RMQ has provided for us that go along with the Concept Stormtrooper armor. Here are 3 different sketches that can be use for both the Clean Stormtrooper armor and the Dirty Sandtrooper like armor. This one is next on my list to do... http://i149.photobucket.com/albums/s58/kwdesigns2/RMQ%20Concept%20Stormtrooper/RMQHelmet1DrawLines_zps8fc7bf8c.gif I'll be posting up my WIP of the making of this helmet. Kevin W.
-
Ralph McQuarrie's Concept Stormtrooper "Armor"
kwdesigns replied to kwdesigns's topic in Concept Armor
I plan to sculpt this version of RMQ's helmet. "The big Mouth!" My first attempt will be to try to see if I can do a vac-formed version. Kevin W.
-
Ralph McQuarrie's Concept Stormtrooper "Armor"
kwdesigns replied to kwdesigns's topic in Concept Armor
I just read the FISD News Letter and I guess with the MQ armor now being a 501st approved costume we need to move this thread out of the non 501st approved section. Thanks you to all involved on the news letter and continuous support. Kevin W. -
I like it!!! Looks a little bit like the old Robo-Cop too. But making the black ribbed under armor looks a little difficult. I have saved this image to my "maybe" to do later folder. LOL Kevin W.
-
Ralph McQuarrie's Concept Stormtrooper "Armor"
kwdesigns replied to kwdesigns's topic in Concept Armor
Not much of the wording has been worked on. Only a few pictures have been added over a normal TK layout. It takes time to photoshop out the parts and it will take more time to get the wording just right. Kevin W. -
So is there any interest in the "Animated Stormtrooper" from the new up-coming Star Wars REBELS TV show???? The armor and helmets are very much different than any of the movies or video games. O'ya and it looks like we will see some with orange pauldron too. Kevin W.
-
Ralph McQuarrie's Concept Stormtrooper "Armor"
kwdesigns replied to kwdesigns's topic in Concept Armor
I just got word today that my McQuarrie Armor has been 501st Approved. Some of the pictures of each individual parts have also started to make there way to the CRL page. Kevin W. -
Ralph McQuarrie's Concept Stormtrooper "Armor"
kwdesigns replied to kwdesigns's topic in Concept Armor
So I took some pics of my RMQ Armor parts in hopes they can help with the CRL. You can see more of my pics here... http://s149.photobucket.com/user/kwdesigns2/library/RMQ%20Concept%20501st%20Sub%20Pics?sort=2&page=1 HELMET: I forgot to take a pics of the helmet. Painted Glossy White (Rust-Oleum Painter's Touch Ultra Cover 2X Gloss White) with correct making panted or decals. Also the Frown and Teeth painted Gray. (Humor #5) Eye Lens Dark Green or Gray/Black. Aerators White. Can add a Screen for improving the look. Can add a rubber 'U' channel Rubber trim to the bottom neck opening. White or Black NECK SEAL: Ribbed, Smooth or Balaclava: Color- Gray to match under armor or Black UNDER SUIT: Must be Gray (Charcoal- Heather Gray) (Nike Pro Under Armor) NO SHOULDER STRAPS! YOKE: It bridges the Back and Chest together and also has a hard neck ring connected. Painted Glossy White to match the Armor and Helmet. Should lay down flat to match the Back and Chest. SHOULDER BELLS: Painted Glossy White (Rust-Oleum Painter's Touch Ultra Cover 2X Gloss White) with correct making panted or decals. BICEPS: Assembled with a seamless joints on all sides. Painted Glossy White (Rust-Oleum Painter's Touch Ultra Cover 2X Gloss White) FOREARMS: Assembled with a seamless joints on all sides. Painted Glossy White (Rust-Oleum Painter's Touch Ultra Cover 2X Gloss White) Hand Plates: Painted Glossy White (Rust-Oleum Painter's Touch Ultra Cover 2X Gloss White) GLOVES: Gray in color to match the Under Armor. Form fitting gloves CHEST: Painted Glossy White (Rust-Oleum Painter's Touch Ultra Cover 2X Gloss White) It is best to have the Yoke glued to the upper section of the Chest. BACK: Back half of hard neck ring connected. Painted Glossy White (Rust-Oleum Painter's Touch Ultra Cover 2X Gloss White) Glue on Side Connecting Plates and paint the gap Gray (Humor #5). Leave the Raised Rectangle White. Glue on both sides of the 2 Trapezoid shapes with them recessed towards the inside. Paint the inside of the Trapezoid Gray (Humor #5). You can add a Red small Triangle to the upper center on back side. ABDOMEN PLATE: Painted Glossy White (Rust-Oleum Painter's Touch Ultra Cover 2X Gloss White) Inner section of Round button painted Gray (Humor #5). Connects to Kidney Plate with Gray elastic. Glue in a piece of ABS with a snap connected to it. A false Split Rivets is use on the sides though the glued on ABS Tab with snap. One near the top and one near the bottom on each side. KIDNEY PLATE: Painted Glossy White (Rust-Oleum Painter's Touch Ultra Cover 2X Gloss White) Connects to Ab Plate with Gray elastic. Split Rivets use on the sides to hold the elastic end. One near the top and one near the bottom on each side. The elastic strap has a snap on the other end to snap to the Ab Plate. BUTT PLATE: Painted Glossy White (Rust-Oleum Painter's Touch Ultra Cover 2X Gloss White) Connects to the Kidney with 4 Gray elastic straps. Has 2 Snaps at the underneath for the Cod to snap to. COD PLATE: Painted Glossy White (Rust-Oleum Painter's Touch Ultra Cover 2X Gloss White) Connects to the inside of the Belt with 2 Gray elastic straps. Has 1 Split Rivet underneath to hold the Gray elastic strap that connects to the Butt Plate. BELT: Painted Glossy White (Rust-Oleum Painter's Touch Ultra Cover 2X Gloss White) Has a total of 6 AMO boxes and Thermal Detonator attached. Bolts on to Ab & Kidney when AMO Boxes and TD is attached. Front: Back: AMO BOXES: Painted Glossy White (Rust-Oleum Painter's Touch Ultra Cover 2X Gloss White) 6 Different Styles AMO Boxes. T-Nuts are added before assemble to be able to attach to the Belt. Assembled Seamless on edges of front and back parts. Painted Glossy White (Rust-Oleum Painter's Touch Ultra Cover 2X Gloss White) An Elbowed Zerk Fitting can be added to the top of the Right side AMO box to hang your Lazer Sward Hilt. The Front Right AMO Box should have small indented rectangles cut out of the overlapping box before assembly. The inner portion of that area should be painted Gray (Humor #5). THERMAL DETONATOR: Round Tube 4" long and Large Ribbed End caps Painted Glossy White (Rust-Oleum Painter's Touch Ultra Cover 2X Gloss White). Inner Dome Caps Painted Gray (Humor #5) Options- Attach Rectangle Plate with 3 round raised dots. You can cut out the small rectangle and glue it on outside of TD or cut out that small size of a rectangle in your TD tube and glue the Rectangle Plate on the inside of the tube. Front: Sides: Back: THIGHS: Assembled with a seamless joints on all sides. Painted Glossy White (Rust-Oleum Painter's Touch Ultra Cover 2X Gloss White) Front: Back: LOWER LEGS: Assembled with a seamless joints on on the front with using the Shin Connector on the inside. Back of legs opens clam shell style with the out side overlapping the inside. The inside legs have the creased detail running from front of shin to the back of calf. The Outside leg has the detail creas only from the front and stop mid way. Painted Glossy White (Rust-Oleum Painter's Touch Ultra Cover 2X Gloss White) BOOTS: White Smooth Leather to match the color or armor. Ankle high with TK style soles low heel or Low profile shoes with flat soles. LASER SWORD: Old Vintage Flashlight modified. Optional- Hilt or with working Light HOLSTER: Optional- Small to hold hand held Pistol. Kevin W.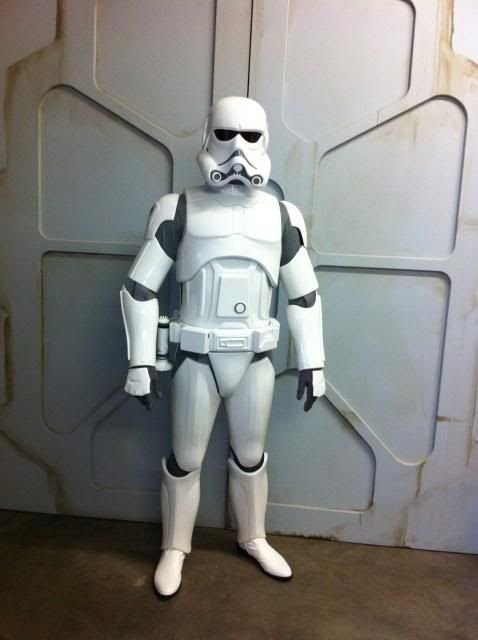
-
Ralph McQuarrie's Concept Stormtrooper "Armor"
kwdesigns replied to kwdesigns's topic in Concept Armor
Where is this at? can you provide a link? Can you confirm if the "MQ" has become the deciding ID letters to use? Kevin W. -
Ralph McQuarrie's Concept Stormtrooper "Armor"
kwdesigns replied to kwdesigns's topic in Concept Armor
I had already started to write up some of the CRL ideas here for both MQ-Stormtroopers and MQ-Sandtroopers. http://www.rmqconceptcrew.com/viewtopic.php?f=3&t=62&p=112#p112 Kevin W.
