

Jaltrooper
-
Posts
374 -
Joined
-
Last visited
Content Type
Profiles
Forums
Gallery
Articles
Everything posted by Jaltrooper
-
 Thank Jeff...you know the most obvious things, right? Once I got the rivet in on the right left side, it shifted into place...My biggest concern was the "room" for the tube stripes. This will solve both issues. Much obliged! Thanks Cal! Should get this thing buttoned up and prepped for "Plasti-Dip" later this evening. Then will start on the shins and work up from there! Thanks all!
 -
Ok, So this is where my issue has been. One way or another...getting it corrected and buttoned up this evening. In order to keep the top traps lined up with the corner of the eyes and the tears, Center the helmet appropriately, This is the gap I get. No way around it. I need to "force" the ear cover on, keep the gap minimal, etc, etc. etc. The left side is fine, and the ear piece will fit just right. I "trimmed" off some of the excess (about 1/4") from the edge of the "cap n back" so the ear piece would fit properly (making sure to keep the shape as best I could)...and then I went ahead and got it riveted. I have not "cleaned up" my black striping yet...so please ignore (too many Mountain Dews when painting). So, this side is spot on. Just need to secure the ear piece by holding it up, drilling the holes and attaching the two (correct) screws. It is the other side I am vexed by. If anyone has any good tips on getting that gap closed...it would be a HUGE help. Thanks, Jon
-
Hey Pat, If I could zap something your way, I would. But I can tell you this...trooper to trooper...no matter how bad today is...in six months...it'll all be worth it. Ask anyone who has ever been there (I have) just around the corner...everything you wanted and more always comes out of bad / tough things. Bigger plan from a bigger place, mon frere! Wishing you the best...Bucket UP! Jon
-
Just a couple of "to be sure" questions:<br><br> 1. Vocoder is the same Humbrol #21 black as on the traps / tears<br> 2. Mic Tips are a "flat black" white on the inside?<br><br> Just want to be accurate. This is what I see...just looking for confirmation.<br><br> Thanks all! Hopefully posting finished helmet and build / paint pics shortly.
-
So I did my Humbrol grey, cut out the frown and am posting for review... Doing everything by hand-painting. If I have seen anything...it's that this is how it was done in ANH. Guess years being around sign-letterers helps. The Humbrol does well on the brush...for anyone nervous about painting...you put your brush down to the inside of where you want the line to end, then let the brush "fall" to the edge. "Turn" the brush off the line towards the inside. Also, with the grey...I am going to have the black "pinstripe edge" so on the grey...it doesn't have to be 100%. Using a fine pinstriping brush for that (all Humbrol brushes...recommend)...so it's just like using a pencil or pen...not super hard. Right side frown: Left side frown Having looked at the ANH frown references...I am trying to decide if I want to paint the last spot on the right frown black...the left is so small...I saw some that were left like that in the screen frowns. So I may leave that one. Any input is appreciated. Here are the traps, etc...doing the black pinstripes and verticals today. Left: Right I'll post the pinstripes later.
-
Thanks K...I think I have it figured out now.<br><br> I'll get my helmet build info started...but...I have to suspend my armor build. I have been battling pneumonia for about a week and a half. I lost over 12-16 pounds. May not seem like an issue for most...but for me...I am just to skinny to "fit" any armor pieces to this frame. When you go from "slim" @ 6'2 / 175-180 to 157 (look it up...not good), it is just too darn skinny. <br><br> I'll get to work getting weight & muscle back on...but I need to do that before fitting anything. Really bothered by it...but nothing I could do.<br><br> Will be back on it later. Sorry for the delay all.
-
AM 2.0 "Cap N Back" Assembly help needed
Jaltrooper replied to Jaltrooper's topic in Build Threads Requireing Maintenance
Thank you very much. Makes perfect sense... -
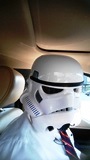
Ok, so for all of my "research"...none of it prepared me for the helmet assembly / "cap n back" of the AM 2.0 helmet. I have looked through as many possible threads as I could, but I cannot find the answers to a couple of questions I need for a final fit. Here, have a look: What I am running into, is having "room" for tube stripes, and to be able to effectively put the "s-gasket" around the bottom. Here is another one: The pencil mark is where the tube stripes (with about 1/8") need to stop, based on what I have seen in the reference pics. The issue is, when I force the helmet to meet that, you can see how un-even the bottom is. Is "trimming" this standard? I have looked everywhere to try to find pics of helmet assemblies in this area...and I never see any looking like this. Here is the other side: So...I am pleased with the thickness of the armor and helmet...but what I am finding, is it will crack very easily when trimming with tin snips (may need to purchase better quality trimmers...rather than the Home Depot HDX cheapies I got). But I am really having to force this thing...and I have no idea how the trimming should look. I don;t want the brow sitting right on top of the eyes, with my "Stunt" build...it looks like the common resting point is about 1/4" between the eyes and the brow trim. Any help, or any pics of this area through assembly if anyone has it, would be very appreciated. Once I figure it out...rest assured I'll include it in my build thread....which is stalled right now till I figure this out. Thanks guys! Jon
-
I'd love to see a pic of the helmet...I can get it close...the issue seems to be no room for the tube stripes. It is a toughy...I feel like I am having to "force" the cap n back in while keeping some gap to have enough room for the tubestripes.
-
Have no idea how much of these sides I am going to have to trim. First issue...I'll try to figure it out.
-
After staring at the kit for a couple hours...thinking "where am I going to start?"...I decided on the Bucket. My thought is if I can get this right, right out of the gate...then the rest should fall evenly into place. Drilled pilot holes, then exacto'd the teeth out. Doing some recon on the sides and how to be sure I get it lined up correctly. looks like I'll have to trim Here to get the look of the trim / trap where it needs to be. So...here we go...waste not want not.
-
Awesome Ryno! I would say "race you to the finish line"...but who needs all that unwanted stress! Haha! I got mine last evening as well. will be great to build together. I also did some fitting, and I think my challenge is going to be taking down what I need to to get it to look right. I was skinny before, but I am just now getting over pneumonia, so I lost a few more lbs. Either way...may start with the mid-section, because I'll still need to order my Tkittell belt...but I am like you, at least I now have the kit to work on! Congrats and have fun!
-
I will say that I am very impressed with the solid nature of the AM armor! It is really sturdy and well-made also! It is all up to me and my skills now!! haha!
-
So...I have been battling pneumonia for about a week...so I get home last night (still working), to this: and...BOOM!!! Having not felt the best...it was still hard to get excited, just because I am a little sick. I was thrilled at how neatly the armor was wrapped and packed in the box. I am looking forward to going ahead and getting to work so I can get the build and the fitting underway. I'm going to do some prelim research and decide how I want to start the build and then...dive in with both feet to get it done. I am really looking forward to the finished product, but I know it is more of a marathon and exercise in patience. With my being so thin, I think the fitting challenge will be to evenly trim areas needed to get a proper fit. So I'll do some work on that tonight. Here we go, folks! Time to get an actual build thread underway!!!
-
I checked with him...he said he was out at the moment and would have some maybe around the 15th or so. So I have a bead on some...just don't have them yet. I can probably make them.
-
Thanks Ksunole! That'll be much appreciated! Just a couple days away from getting my trimming gloves on and starting to get my trim on! Ordered a couple of items from Trooper bay this morning...but still don;t have TD Clips...may have to make my own. Great Idea, Ryno. I don;t think we have many Clone Troopers in the Alabama Garrison...I know we have some HWT and Sandtroopers. Anything I can do to help fill in the gaps...plus, I do like the look of the Clones (just not as much as the classic TK!). We'll see. I am working on learning to solder and do electronics also. Figure if one is going to get into the hobby...dive right in. Have a blessed Sunday everyone!
-
"Hyperfirm" E-11 accuracy and build questions
Jaltrooper replied to Jaltrooper's topic in ANH BlasTech E11
if anyone has been doing "hole drilling" on a Hyperfirm...is there a preferred bit? I have been reading and it looks like in order to deepen the muzzle, scope and holes...I need to "bore" (smaller to bigger)...if anyone has any thoughts, it would be greatly appreciated. I don't want to sacrifice the accuracy or structural integrity...and need a smooth bore. Many Thanks, Jon -
"Hyperfirm" E-11 accuracy and build questions
Jaltrooper replied to Jaltrooper's topic in ANH BlasTech E11
10-4...very much appreciated! -
Holy cow guys! I am sorry to see this kind of stuff. Very unfortunate. I went with a Hyperfirm fro Slavefive on the forums and was very pleased with the quality. Some of these "kits" scared me...and it looks like I dodged a big bullet because this particular one was in my top 3. I hope you somehow get your justice on this.
-
Good stuff! Hey Ryno! Looks like mine is "stuck" in your neck of the woods due to the "winter weather" (Memphis)...Arrrrgh!!! Glad you got on the Academy deal! I also found some 40 gallon "Sterilite" Totes at Wal Mart for $20 (posted in the same threads). Looks like while it isn't as thick as the Huskys or Stanleys...it has plenty of room for a full set of TK gear and the wheels are bigger with steel axles. so I think that'll be the one I go with...just to get started. Anyway...while I've been waiting...I did a "Black Series" mod for a Kylo Ren Helmet...Just thought I would show everyone the finished product. My ultimate goal is to have 2 Trooper costumes (seriously considering the new "Death Trooper" (due to being 6'2") along with my TK...doing the Kylo Ren...and then going to go for a Obi-Wan as well. Want to be able to fill "trooping gaps" where needing for my local garrison. So why not, huh? Here's my helmet...let me know your thoughts! See you on (when it gets here!!!) BBB day!
-
Sterilite 40 Gallon Armor bin - $20
Jaltrooper replied to Jaltrooper's topic in Boots, Soft Parts, and other Accessories
Link: https://www.walmart.com/ip/Sterilite-40-Gallon-Wheeled-Industrial-Tote-Black/48194359'>https://www.walmart.com/ip/Sterilite-40-Gallon-Wheeled-Industrial-Tote-Black/48194359</a> -
Just a heads up for everyone...Wal-Mart now has a 40 gallon handled / wheeled (decent wheels) armor tote for $20. Not the thickness of a Husky or Stanley...but for $20...it is a very serviceable piece.<br><br> Check it out.
-
You may want to consider getting a kit...and having someone build it for you. In any case...how the armor fits you is important for the "look" of the armor. I am 6'2 - 180...& I bought the AM 2.0 Kit and am building it myself. Just thought that may be an Avenue you wanted to examine.
-
Great News today! Armor is SHIPPED - tracking number landed in my inbox just a short while ago. Having bored everyone to tears with my "prep" stuff (hopefully helped someone)...the next post in my thread will be the BBB day! Funny how timing works. I have been working on a Kylo Ren Black series helmet and just did the first coat of primer...so I should be finished with that project right when my armor lands. Really excited about finally getting the armor and getting this build under way. I am confident I have done the right research and asked the right questions, so this is going to be fun. Looks like I have a couple of fellow AM builders on board...so it should be neat to get the builds underway together. See you all on BBB day!!
-
I got my tracking number a few moments ago...I am stoked!
