

fragarock
-
Posts
231 -
Joined
-
Last visited
-
Days Won
3
Content Type
Profiles
Forums
Gallery
Articles
Everything posted by fragarock
-
Hi Aleksi, Martyn got your strapping kit labels correct. Luckily when I got mine, they RS crew labeled everything. Here's the picture for reference. Regarding the biceps, the one with the dimple is the left one. The outer pieces of the biceps have that raised ridge and there is a slight curve which points forwards. That's how you know which one is left vs. right. Here's my left arm assembly. Here you can see the curve (where my finger is pointing). For reference here are where the straps go. White ones with snaps attach the top of the back to the top of the chest. The wire brackets with nuts & bolts are used to hang the ab from the chest and the butt from the kidney from the back. The 3" wide elastic is to hang your thighs from the garter belt. The 1" wide elastic with snaps is to hang the shoulder bells from the white elastic which connects the chest/back. Another piece of 1" elastic (without snaps) is to hang the bicep from the shoulder bell. The 2" wide elastic hangs the forearms from the biceps. Here's a link to my build where I show the bicep pieces in more detail (presuming I can make this link work).
-

Stephen's RS ANH stunt build WIP (for small people)
fragarock replied to Gwithian's topic in ANH Build Threads
You may be able to reshape the part you warped by hitting it again with the heat gun. Use low setting and slowly increase the temp if the lower temps aren't making the plastic soft enough. Do a small area at a time using a wood paint stir stick or another small and flat wood piece that you can get into the crevices. I also had to fix a few heat gun spots and did it using this technique and even using my hands but wearing gardening gloves. It's worth a shot before getting a new part. Sent from my SM-G935V using Tapatalk -
Shiny new armor is very exciting. I'll be following along. Read a few build threads all the way thru. This will get you going in the right direction. Ask questions as you go. There are people from all over the planet on this forum and you can get answers to most questions in about a day or less. Good luck. Sent from my SM-G935V using Tapatalk
-
Stephen's RS ANH stunt build WIP (for small people)
fragarock replied to Gwithian's topic in ANH Build Threads
I would get the circumference worked out first and you have probably already done this. I mean wrap the piece around your leg and make where they shoild align with pencil. I wouldnt trim off any excess yet, rather mark the trim lines on each side of the rears with tape. When yoi do the bath, youll be twisting these pieces into alignment and what you initially thought would be nice vertical joints at the rear coukd get misalignes. Then do the front inner cover strip which will help hold things together when you do the hit water bath. If you've got those steps done then soak away. To do the bath, tape the pieces together in the shape you want, more tape the better as some will come off when wet. Next boil water in the largest and tallest pot you have. The temp of the water will determine how long to submerge the pieces so it's trial and error. Just start of with short dips like 10 seconds. I guess my water wasn't quite hit enough so I was doing 30 second dips. I would use tongs to hold the piece in the water but the top was sticking out so if have to flip it a few times. Wear good rubber gloves, the kind for washing dishes are perfect. Take the piece out and use your hands to squeeze it into the shape you need then run it under cold water. You have to be quick on the last step. About 5 seconds out of the bath and into the cold water. Repeat this as needed until they hold their shape on their own. Prepare to spill water all over the place too. Once the pieces are aligned then recheck your rear trim lines and cut. After that you can adjust the length. Sent from my SM-G935V using Tapatalk -
P0intblankk's - Build Thread - First Build
fragarock replied to P0int Zeroo's topic in Build Threads Requireing Maintenance
Hi Joe, If you have questions, there are a few of us that recently finished our RS builds and will be glad to help out. I'm really interested to see how your PVC kit looks and if you can work it in the same was as the ABS kits. Good luck and welcome aboard! -
Stephen's RS ANH stunt build WIP (for small people)
fragarock replied to Gwithian's topic in ANH Build Threads
-
fragarock's RS Stunt build - Not to scale
fragarock replied to fragarock's topic in ANH Build Threads
Correct, they are the same. I think the RS suit only had one so they just duplicated it. Sent from my SM-G935V using Tapatalk -
fragarock's RS Stunt build - Not to scale
fragarock replied to fragarock's topic in ANH Build Threads
Hi Troopers, I'm back! It's been several weeks away from the boards due to serious deadlines at work, kids soccer, tennis, and tee ball practice and occasional sleep. So last time I had received my TK number and my EIB approval. Along with the EIB approval came some suggestions for my Centurion approval which will be coming some time in the future. I definately plan on making the Centurion application but it will be a little ways off because I'm pretty busy now, especially with the weather getting warmer. Lots of yard work to do! I did take some time to fix a few things that were bothering me and start some of the simpler corrections for Centurion. When I first put on the whole kit for my submission photos I was swimming in my helmet. I had placed padding in the top but because of the way the bottom of the helmet sits directly on the chest piece it was pushing it way up. I could see out of the eye holes fairly well but when I turned my head, the helmet stayed put. I also realized I needed to cut down some of the bolt heads around the neck which were scratching me when I put on the lid. To fix the head turning problem I bought a hard hat liner. In case you don't know what his is, it's a plastic ring that is adjustable to clamp around your head to make a tight fit. I figured this would secure around my head and because of the way it has to mount, it would be down far enough from the top of the helmet to actually reach my head. Here it is. The gray padding piece goes in the front. Here's the top. The (4) metal tabs normally clip into the hard hat. To mount them to my bucket I cut some ABS tabs, glued them to the helmet tabs, then positioned the whole thing inside my bucket and glued it down with E6000 and some magnets. Here's the placement in the bucket. You'll notice I lined much of the bucket with industrial Velcro. This is how I positioned my electronics. I moved some of these pieces around for a better fit. I have a monstrous USB battery that I packed into the left hovi-mic area. I placed my cooling fans up high to blow on my lenses which keeps them from fogging up. I also took several people's advice and ditched the push-to-talk button and went with a wireless USB receiver for my microphone. Another suggestion from EIB was to bring the shoulder bells in a bit closer to the chest. Previously I had already shortened the black elastic that connects to the shoulder bridges so to make further adjustments I trimmed down the return edges at the bottom of the bells. The other tweak was to the ab button panel. This was something I had never read about before. Originally I aligned the raised center edge of the button panel with the centerline of the ab ridge (above the panel). The correct way is to align the ridge of the button panel with the side of the ab ridge. The picture explains it better. I pried this off with a screwdriver and cleaned off the E6000 residue. Then trimmed down the edge around the buttons and glued it back in place. I was going to trim the edges on the smaller button plate but couldn't get it off without cracking it so it's gonna have to be good enough. There are some other fixes I have to make for my Centurion application but the ones above were pretty simple and got me ready for my first troop which was last week. This was with the Great Lakes Garrison and we partnered with the Great Lakes Base of the Rebel Legion. This was a three day event but I was only there for the first day which I'm told was a good idea as it was the calmest day. Saturday was supposed to have 20,000 people in attendance. Yikes! I'll post a Tour of Duty thread but here are a few pics of that day. All around I had a blast and met super nice people in the Great Lakes Garrison and other fans at the Comicon. -
fragarock's RS Stunt build - Not to scale
fragarock replied to fragarock's topic in ANH Build Threads
Off to my first troop today with the Great Lakes Garrison at the Motor City Comicon. I'm so excited! Luckily the giant armor bin I bought just fits in the back of the car.....whoooh. Sent from my SM-G935V using Tapatalk -
Stephen's RS ANH stunt build WIP (for small people)
fragarock replied to Gwithian's topic in ANH Build Threads
Don't sweat the mistakes. Everyone has something they botched and at least yours is in a mostly concealed spot. When I started off, I used the heat gun a lot but looking back, I would recommend using a sealing iron if you have one. After just a couple tries at making return edges I really got the hang of it and found it easier to control. The heat gun will help on larger pieces or those with weird shapes like the chest piece or belt or ammo knee ammo pack where you just can't get the sealing iron into the crevices. Sent from my SM-G935V using Tapatalk -
Let the build begin.. Stormtrooper RS ANH WIP
fragarock replied to Steftroop's topic in ANH Build Threads
Another RS kit. Yay! Sent from my SM-G935V using Tapatalk -
fragarock's RS Stunt build - Not to scale
fragarock replied to fragarock's topic in ANH Build Threads
Hi Matt, I didn't use the ABS sheets from RS to do my inner cover strips. You won't have enough if you try this. I ordered some extra ABS sheets from Amazon. They were white, 12"x24" 0.60" thick from "Sibe Automation". One side is smooth, the other textured which is OK since they're hidden plus the textured side was good for gripping the glue. I got (2) sheets for around $16. I got the hockey repair kit from Amazon as well. it was called A&R Sports Helmet Hardware Kit. Cost around $8. Good luck on your build! -
"Hyperfirm" E-11 accuracy and build questions
fragarock replied to Jaltrooper's topic in ANH BlasTech E11
See fragarocks hyperfirm hfx e-11 mod. I'd post the link but I'm nowhere near my computer now. Sent from my SM-G935V using Tapatalk -
"Hyperfirm" E-11 accuracy and build questions
fragarock replied to Jaltrooper's topic in ANH BlasTech E11
Hi Jon, I have a build thread where I bored out the scope. I used boring bits but only on the first few passes. After that they didn't work for me, rather than removing material the were just distorting the scope as they spun. So I used a cylindrical boring bit that was in my dremel bit kit. Make sure to wear eye protection and a mask. Sent from my SM-G935V using Tapatalk -
TK-92111 Requesting ANH stunt EIB Status [RS] [716]
fragarock replied to fragarock's topic in Request Expert Infantry Status
Thanks for the feedback Tony. I really do appreciate it. I was just talking with Christine about a few of these issues and possible solutiins. I'll be making several tweaks in the coming weeks to my kit based on all the Great input I've received. You guys made my day with this approval. I'm so grateful. Sent from my SM-G935V using Tapatalk -
TK-92111 Requesting ANH stunt EIB Status [RS] [716]
fragarock replied to fragarock's topic in Request Expert Infantry Status
Hi Tony, I added one just below the main armor shots. Sorry I missed that one. Thanks again for the review. -
TK-92111 Requesting ANH stunt EIB Status [RS] [716]
fragarock replied to fragarock's topic in Request Expert Infantry Status
You're right on with that right thigh piece being out of alignment. Either it twisted on me or I put it on crooked. Easily fixed though by sliding my loop connection to the garter belt over. Thanks for the review. Sent from my SM-G935V using Tapatalk -
TK-92111 Requesting ANH stunt EIB Status [RS] [716]
fragarock replied to fragarock's topic in Request Expert Infantry Status
After the pics were taken stuck some white industrial Velcro on the back side of the clips, soft side of course. Seems to work so far. Thanks Sent from my SM-G935V using Tapatalk -
Stephen's RS ANH stunt build WIP (for small people)
fragarock replied to Gwithian's topic in ANH Build Threads
Hi Stephen, Nice to see you getting into the armor part of the build. Wise to start with the left forearms as they're relatively simple, small and easy-ish to trim. Your front side ridge where the cover strip goes looks good. This should be about 15mm wide. If you plan on building to the Centurion standards you'll want to cut away the return edges at the wrist on both pieces of the forearm. Looking at the photo where your arm is down at your side, the length of the piece looks a smidge long. I'm just worried at that length you won't be able to bend your arm 90 degrees or more without the wrist end digging into your hand. Now, if you remove the return edges at the wrist that will help. But you'll have to decide what works best for you and how much movement you really have. Maybe try on your gloves and see your range of motion. If everything seems okay, leave the length and if you decide later on to trim a little off the end it will be easy. Also keep in mind you want about 12-13 mm of space between your body (with your undersuit on) and the inside of your armor all around. It looks like you could reduce the diameter of the forearm down at the wrist area a bit. If so, it would help give the piece a nicer taper that follows the shape of your arm and look less boxy. If you do decide to do this, cut the wedge out of the back side of the pieces. See page 1 of my build for reference. Overall nice progress. The right forearm can be a bit trickier. I'm curious to see if your pieces fit together as oddly as mine did. Keep up the good work. -
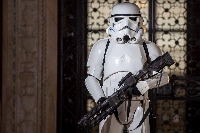
General Information Name: Frank Fraga FISD Name: fragarock 501st I.D.: 92111 Garrison: Great Lakes Garrison http://www.501st.com/members/displaymemberdetails.php?userID=24440 Mandatory Information Armor Maker: RS Prop Masters Helmet Maker: RS Prop Masters Blaster Type: Hyperfirm E-11 Additional Information Height: 5'-5" Weight: 150lbs. Boots: TK Boots Canvas Belt: RS Prop Masters Hand Plates: RS Prop Masters Electronics: Ukswrath hearing assist & cooling fans, ICOMM Neck Seal: Darman Holster: Darman Full Body Armor Photos Armor Detail Photos Helmet Photos Blaster Photos Accessory Photos Thank you for reviewing my application.
-
Cricket's RS Stunt Build (for the Vertically Challenged)
fragarock replied to Cricket's topic in ANH Build Threads
Oh man, that moving walkway looked treacherous. Sent from my SM-G935V using Tapatalk -
Hi, I'm requesting site access. Here's my 501st profile, not even a day old! Thanks http://www.501st.com/members/displaymemberdetails.php?userID=24440
-
Official FISD Events for Celebration Orlando 2017
fragarock replied to tkrestonva's topic in Announcements
Wow, how many troopers were in that photo? Looks like a lot and I bet there's a lot more were not seeing. Sent from my SM-G935V using Tapatalk -
fragarock's RS Stunt build - Not to scale
fragarock replied to fragarock's topic in ANH Build Threads
Good news!! Just got my 501st approval. I am now TK 92111 ready to start my patrol with the Great Lakes Garrison. Sent from my SM-G935V using Tapatalk -
fragarock's RS Stunt build - Not to scale
fragarock replied to fragarock's topic in ANH Build Threads
Definitely going for Centurion. Just waiting for my 501st approval. I was having issues with the ab pulling down too far from the chest but I tightened up the strapping. I know in my front photo it looks like there's a gap but it's just the shadow. I'll check it again. Sent from my SM-G935V using Tapatalk
