

fragarock
-
Posts
231 -
Joined
-
Last visited
-
Days Won
3
Content Type
Profiles
Forums
Gallery
Articles
Everything posted by fragarock
-
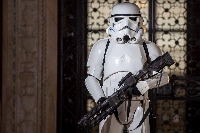
Since I'm collecting tools, boots, and various other components needed to build my TK and haven't yet ordered my armor, I figured I'd go ahead and deal with the blaster. I ordered an E-11 elite model from HFX Productions. I chose this because the threads I reviewed said it's a bit more durable for trooping as it's cast from a solid piece. It arrived and I have to say that it does look really good, has a decent heft to it without being too heavy and is overall very nice looking. But as I was reviewing various E-11 build threads, I was impressed by the clean lines and better detail from Doopy builds. So, throwing caution to the wind and frankly, because I can't stand leaving things alone, I decided to attempt a mod in this blaster. My goal is to add in more detail such as a better scope and real screws and other components and tweak the paint job a bit in certain areas. So I started.... Here are some reference shots of the out-of-the-box blaster. As you can see the paint job is really good but the scope is problematic. The first thing I did was take an xacto and trim off some of the casting joint lines that were left on the blaster. Some were easy to remove, others like at curved areas proved too difficult so I just left them. Next I wanted to make the body of the scope look more metallic. The original looked too plastic like. After reviewing the E11 Blaster Reference thread, I masked off the area around the scope to repaint it in a brass color, being sure to include the mounting lugs. Now I couldn't find brass paint so I settled for gold figuring not much of it would be visible anyways so it should be OK. Next I masked off the scope and grip as I didn't want any aluminum paint getting on those areas. I then painted the trigger and plate area, back end of the barrel, and the scope mounting rail as I wanted a bit more of a scratched metal look in these areas. I also gave the folding stock a dusting of paint. I let this dry for a couple hours while I played with the kids. Next I removed the masking tape from the scope and painted the scope and the metallic aluminum areas with a coat of matte black. I sprayed it in layers trying not to be too heavy handed with the paint. I wanted the finished product to have some variation in the paint finish with some areas looking completely black while others still had the original HFX paint scheme/color. That night I went to work distressing the new black paint job. The goal was to scratch/remove parts of the black paint coat to expose the metallic color and at the scope, some of the gold color. It took some experimenting to find the right technique. First I tried 220 grit sand paper. This was too rough and plowed thru that thin coat of black that I had just put on. So I tried a Brillo pad next. To my surprise it worked perfectly. Only problem was, I had the kind with blue soap already in the pad so that made kind of a mess as I wore off that soap layer during the sanding process. It cleaned up easy enough but you can see blue soap flakes in the photos. I highly recommend getting plain steel wool. The trick is to start off with light pressure and just keep rubbing the area you want to effect. 10-15 light pressure passes over an area are better than a couple heavy ones. You just have more control over how much paint you remove & how fast. So here's the first pass on the scope rail. The effect was nice and eventually I took off most of the black leaving a metallic looking piece. Here you can see distressing of the folding stock armature. I also distressed the scope, wearing off the black to reveal just a bit of the gold below and in some areas taking it all the way down to the original HFX paint. This produced a nice mottled look with a bit of metal showing thru. I did the same process down the slide bolt and various other areas such as the barrel tip and other wear areas. Of course I did the white crayon trick on the scope lettering. I also did a gloss black wash over the handle to replicate the plastic look of the original Sterling. Well that's it for tonight. Tomorrow I'll post the pictures of the scope modifications showing how much fun you can have with a Dremel.
-

Cricket's RS Stunt Build (for the Vertically Challenged)
fragarock replied to Cricket's topic in ANH Build Threads
Way to persevere. Gives all of us hope...perhaps a new hope...that almost anything can be fixed with patience and creativity. Can you show a pic of that top of the return edge too? Does the ABS paste build up seem like it's gonna stick forever? Sent from my SM-G935V using Tapatalk -
fragarock's RS Stunt build - Not to scale
fragarock replied to fragarock's topic in ANH Build Threads
Did you drill all the way thru the scope, front-to-back, or just route out enough material on each end to insert the front and rear lenses? Sent from my SM-G935V using Tapatalk -
fragarock's RS Stunt build - Not to scale
fragarock replied to fragarock's topic in ANH Build Threads
Looking at the monocular that justjosep63 was referencing it appears the large end is 20mm and the small end is 12 mm which is 2mm bigger then it's supposed to be. Although I'm not entirely sure if the measurement is the lens or the outer ring of the lens that would have to be inserted into the scope. Sent from my SM-G935V using Tapatalk -
!!EDIT!! Hi, I decided I should make this build thread a bit easier to navigate for those of you who need to trim down your kit to fit your smaller size. So below you'll find links to sections within this thread dealing with specific parts of the kit and how I modified them to fit me. Here are a few links that you should also reference when modifying armor for smaller frames. Christine's Build (Cricket) Diana's Build (AsBlondeAsLuke) 1. BBB day. Parts layout. 2. Left forearm trimming. 3. Left forearm assembly and scoop. 4. Right forearm trimming. 5. Right forearm assembly. 6. Left bicep trimming and assembly. 7. Right bicep trimming and assembly. 8. Shoulder bell trimming. 9. Ab trimming. 10. Butt trimming, kidney trimming, and chest trimming/reshaping. 11. Chest bottom trimming and new return edge. 12. Shoulder bridge trimming and bracket troubles. 13. Ab-to-chest bracket installation. 14. Ab top trimming, sewing elastic loops, back-to-chest connection, and kidney trimming. 15. Thermal detonator trimming and assembly. 16. Kidney notch re-forming, cod rivet install, ab-to-chest left-side connection, and thermal detonator adjustment. 17. Belt ammo pack trimming and assembly, drop box assembly, and holster attachment. 18. Fixing ab-to-kidney alignment, right ab snap and stabilizer, shoulder strapping, bicep hooks, shin trimming. 19. Ab control panel button painting. 20. Sniper plate trimming. 21. Sniper plate assembly. 22. Shin assembly and magnetic closures. 23. Ab control panel button assembly and cod trimming. 24. Thigh trimming and assembly. 25. Rubber vs. Nomex gloves. 26. Making the ANH thigh notch and thigh ammo pack trimming and assembly. 27. Garter belt and thigh support straps. 28. Additional thigh and butt trimming. 29. Helmet trimming, brow trim install, front-to-back riveting, and ear trimming. 30. Helmet painting. 31. Helmet lens installation and electronics. 32. Fully completed TK. 33. EIB Submission. 34. Helmet, shoulder, and ab control button modifications for Centurion. 35. Centurion additional modifications. 36. Centurion Application. Well this is the beginning of my RS stunt build thread for 5'-5" tall boys and girls. No, that's not right, it's more like the warm up. I'm collecting tools, parts, and pouring over a few really good builds such as Diana's and Cricket's hoping to get myself ready once armor arrives. For the past two weeks boxes have been arriving on my front porch while my wife wonders exactly how big a nerd she's married. Wait until she sees the BBB. So, while getting various parts delivered has me excited to really dive into this project, let's face it, you can't get too psyched over cut resistant gloves and new dremel bits....although the dremel bits are pretty sweet. So, what did I do? I ordered my elite E-11 from HFX. After a bunch of email glitches, all the gears in the universe finally aligned and I was able to talk with Lewis over there and he got to work crafting this beauty. I compulsively checked the tracking of the package as it made its way across the country to my front door. The day it arrived I was so excited to see what was in the box...."what's in the box?" The joy I had unwrapping that blaster and holding it was really surprising. Took me back to being a kid. My 5-year old son loved it too. First thing we did was have a light saber vs. blaster fight in the play room. Even my wife thought it was pretty cool which I hope will continue once the real build process starts. I'm wondering if anyone has experience modifying these? I'd like to drill out the scope and insert real lenses or replace that part entirely. That's the one modification that would really improve what is already a very nice product. Here are a couple shots of it for reference (assuming I attached them properly). Side topic....what it the best way to upload pics? Is there a preferred size? Well that's it for now. I look forward to tapping into the incredible amount of knowledge and talent from you all.
-
Cricket's RS Stunt Build (for the Vertically Challenged)
fragarock replied to Cricket's topic in ANH Build Threads
Hi Christine, When getting your shins to the proper length, did you take a little bit off, then adjust the width, then take a little more off the length and so on..? Or did you cut them to the proper length first then deal with the circumfrence around the leg? Just wondering what the best aproach is. -
That's great work and looks like the work was well worth it give that big smile. Was thickness foam did you use?
-
Cricket's RS Stunt Build (for the Vertically Challenged)
fragarock replied to Cricket's topic in ANH Build Threads
Hi Cricket, Thanks for starting this thread, I can't wait to see how it turns out. I'm also short and looking at RS armor so being able to follow your progress will be a great help.
