TheBlooperTrooper
-
Posts
232 -
Joined
-
Last visited
-
Days Won
1
About TheBlooperTrooper

Recent Profile Visitors
3,291 profile views


-
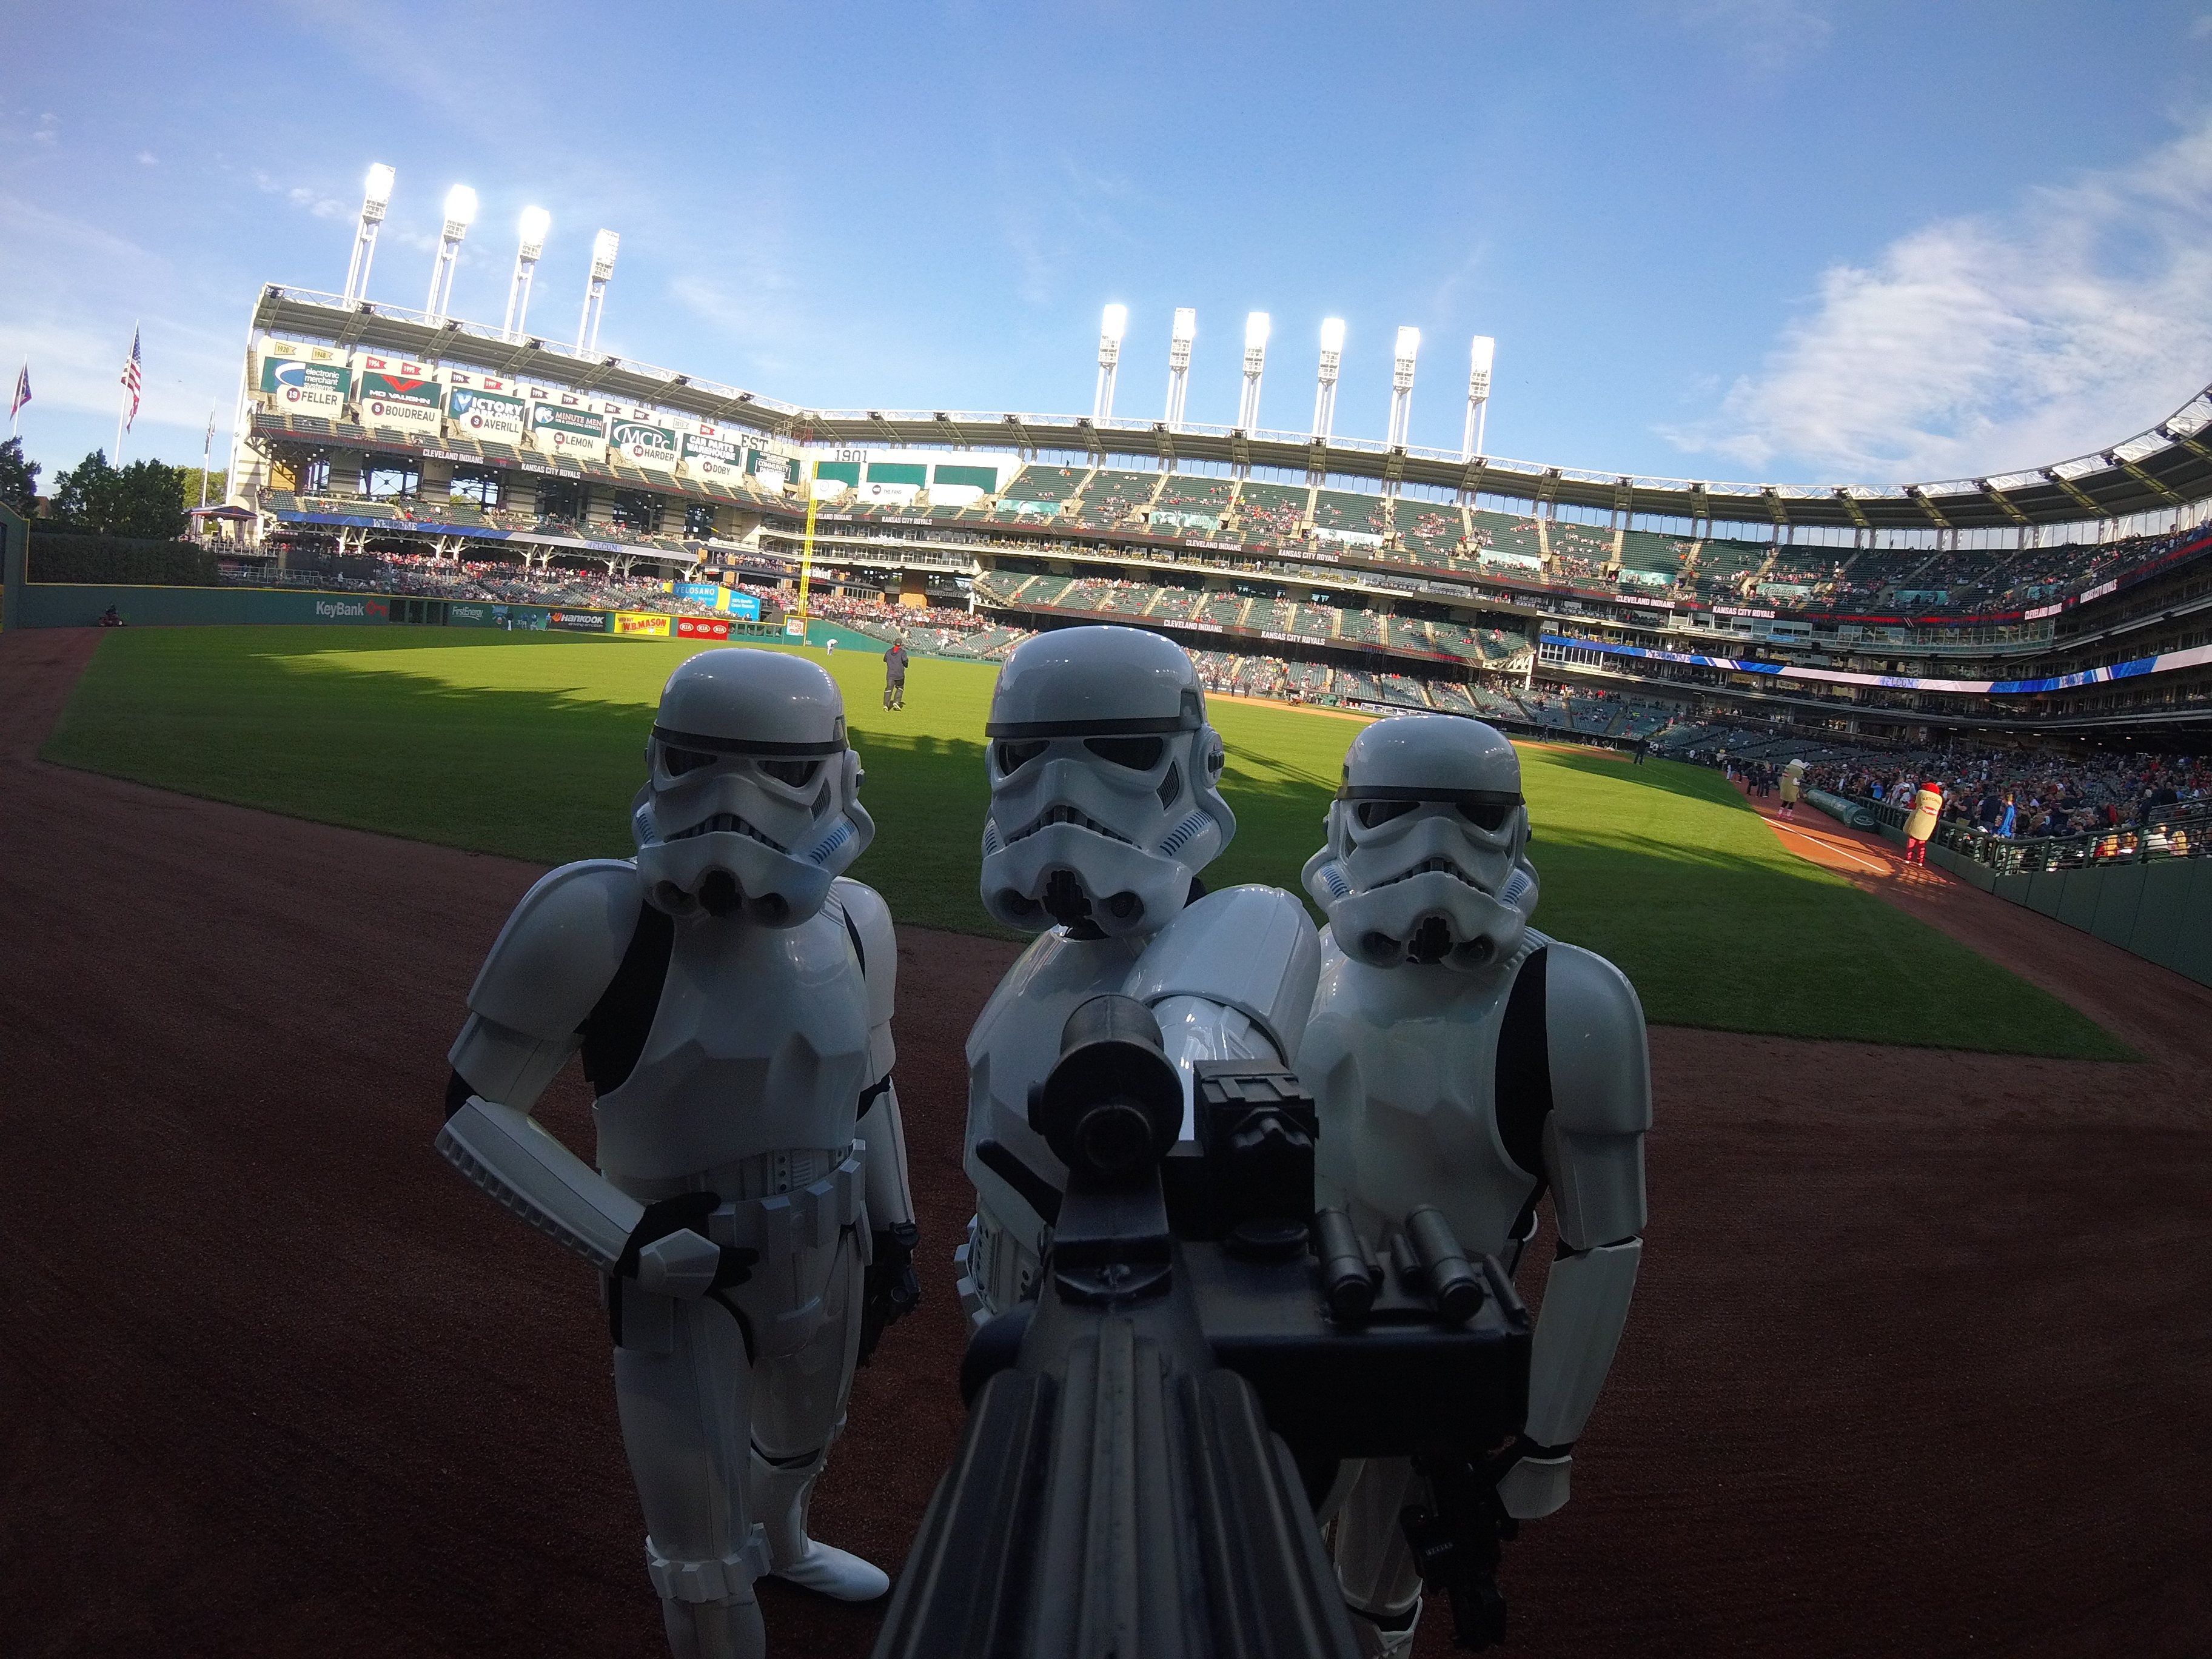
TK-82898 Ohio Garrison Stonewall Pride Parade Troop - Columbus, Ohio - June 18, 2022 Photo Courtesy of the Columbus Dispatch

-
Blooper's Heavy F-11D Build
TheBlooperTrooper replied to TheBlooperTrooper's topic in Weapons of the First Order
Thank you! I'll be sure to fix this soon! -
Blooper's Heavy F-11D Build
TheBlooperTrooper replied to TheBlooperTrooper's topic in Weapons of the First Order
Today's (May 26, 2022) update: Today I finished the build! The grand finale photo is below. There's definitely still some work that could be done along with the structural bracket to attach, but everything essential is in place. Now on to finish the TFA bucket I have and figuring out the actual purchase / build of a TFA kit itself... Final photo: -
Blooper's Heavy F-11D Build
TheBlooperTrooper replied to TheBlooperTrooper's topic in Weapons of the First Order
Today's (May 24, 2022) update: Today was a grand assembly day. I first detached the barrel from the barrel hub to sand the barrel a bit in an attempt to line up the screw hole better with the underbarrel. If I did this project again I'd take time to sand the area where the barrel hub attaches to the barrel more, as there was some excess plastic that could've caused the issue. I reattached these two pieces, then attached the handle and rear folding stock to the rear barrel. I tried to also glue the barrel hub to the rear folding stock, but had to redo this later due to some unforeseen issues. I attached the tactical stock unit as well. Lastly, I glued / plugged the underbarrel segment to the rear folding stock from plug under the barrel / barrel hub. The screw that was supposed to lock it to the barrel was slightly off. To fix this, my dad helped angle / enlarge the screw holes on the underbarrel portion so that it lined up as best as it could. I'm leaving it as it is overnight to let the glue dry before applying finishing touches: Attaching the scope lenses, magazine unit, and hengstler cover. Main receiver portion assembled and stock attached: Final state for the evening: -
Blooper's Heavy F-11D Build
TheBlooperTrooper replied to TheBlooperTrooper's topic in Weapons of the First Order
Today's (May 23, 2022) update: I finished the assembly of the handle by adding the front trigger. I also attached the front barrel to the barrel hub via screws as per the instructions. Lastly, I finished attaching the scope assembly to the barrel hub. I'll attach the second of the scope lenses soon, as one of them wasn't quite ready. The rear barrel unit required some minor sanding to line up parts properly. I painted over the blemishes caused by this and will attach it to the barrel hub next time. I'll also be test fitting the front underbarrel segment with the handle / rear folding stock section to see if everything lines up. If it does, I'll be gluing those together before the final set of gluing of the main assembly down the line. Finished handle / rear folding stock: Attached barrel hub and front barrel: Attach scope and barrel hub: -
Blooper's Heavy F-11D Build
TheBlooperTrooper replied to TheBlooperTrooper's topic in Weapons of the First Order
Today's (May 22, 2022) update: I finished assembling the barrel, handle, and rear folding stock (minus one of the triggers I will finish in my next work session). I thought I'd get the scope done today but unfortunately there was a small set back with that. I tried to get around using the procedures listed with the parts but ultimately had to go with it. Hoping that the 40mm screws I have will work, as I'm not able to find anything longer that will fit the same size. I also did a rough fit of the parts to see how it all looked - I'm toying with the idea of making a pinhole in the hengstler unit so I can use a paperclip to enable / disable that light instead of unscrewing it all the time, though that's something for another day. Barrel: Handle and rear folding stock (This will have the front trigger attached soon and is currently being partially repainted on parts where it wasn't quite as white as I wanted. Full rough fit: -
So while an actual FOTK build is still a ways away, I decided to try and make the blaster, with details below. Given that I started printed this in March and have slowly been working on it since then, I'm hoping to have it done soon, with most parts already painted and somewhat assembled. Build comments: For this project I printed each piece, painted them all with filler primer, with the help of my fiancée sanded them at 400 and then 1000 grit, and then painted them. I realize this not involving Bondo means there will still be some print lines, but I'm honestly alright with this as this gun was one of the reasons I wanted to get into 3D printing in the first place, so it's a nice learning experience (though not my first build, as I printed two DC-17s for a friend). One crucial mistake I'd say I made here was not using good masking tape. I used blue painter tape for everything at first, which worked reasonably well but wasn't quite perfect. On my second attempt, I used Frog Tape (an all green painter tape that I found here in Ohio) which was far better for the painting process. Another mistake was definitely being impatient with printing. With over 50 pieces, I was focused on trying to get them printed as quickly as possible, and in the process neglected the quality on a few pieces. I wouldn't say they would impact the final result, but definitely required a little sanding / dremeling to fit properly. Printer: Ender 3 Pro Material: Inland Tough PLA (I know I could've gone with something tougher, but at this point the gun is meant purely for display. If it needs replacing with tougher parts, I'm prepared to do that down the road. Files: The 5th Horseman Binding Agent / Glue: E6000 - I know that some have said plastic welding was the best option here, but I find that this works reasonably well. Flashlight: Streamlight 73001 Nano Light Miniature Keychain LED Flashlight Ammo counter / magazine lights: 3 LED Headlamp (I saw this on the FOTK facebook page - can't be too specific as I can't tell the brand) Scope lenses: I cut up some of the plastic that the main underbarrel flashlight arrived in and glued these parts to the scope lenses before completing scope assembly. Custom parts: I used a different front trigger made by another FISD member who's name escapes me. I also made a few small parts to go on either side of it to prevent the trigger from moving sideways along the pin (which itself was from a large binder clip). Unpainted printed parts: Rough fit of some of the parts: Main receiver / stock rough fit (I realize these look gray in the photo but they are actually white already - Rustoleum Gloss Protective Enamel White to be specific): (Mostly) Assembled stock: Completed underbarrel portion: (This required additional dremeling compared to the originally intended Aimkon flashlight which I was unable to find) My next step is to finish painting Scope Mount 1 (Which has given me issues due to its small size making painting details a little difficult for me), assembling the handle and rear folding stock units together (This required some dremeling after I thought it was all done so that the rear trigger would be useable), and then move on to hopefully the last bit of glue before final assembly. Bonus rough fit DC-17 pic for reading through a newbie's build thread:
-
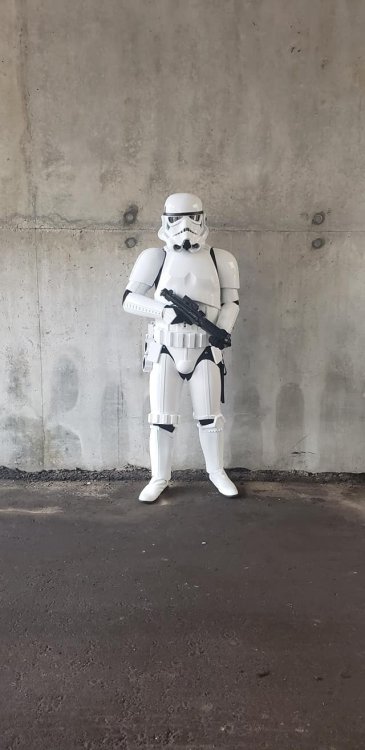
Hi everyone! After recently kitting up for the first time in several months I've discovered that my armor just doesn't quite fit the same. I'm considering modifying my kit (mainly by reducing return edges on the legs and butt plate along with strapping adjustments) to give me some bonus mobility and maybe even the ability to crouch. How do you all deal with mobility or the lack of it? Any tips you can pass along to help get back some mobility and flexibility in mine? Thanks! Edit: After looking around some more I saw a lot of detail about mobility cuts on the backs of the thighs / shins. Beyond keeping whatever trimming to just the raised bits is there any guidelines or recommendations anyone would have for that? Also, has anyone trimmed the height of their thigh pieces? My AM 2.0 kit seems almost tall for me even now and I'm entertaining the idea of working on that down the road to give my ANH Stunt kit the maneuverability of a Rogue one TK. I've attached a photo of my recent kit up for now to try and get the idea across. Please note that I'm not standing perfectly straight so the leg pieces do not appear to be lined up while symmetrically but are still the same size.
-
It just hit me that I never shared the results for this. I'd like to apologize to everyone who was waiting on the data. The results can be found here: https://docs.google.com/spreadsheets/d/1KdQHWYeYgjpYsP4saPqEUot2mdRyfqd5OyigSsNuL9o/edit?usp=sharing
-
I’ll give both!
-
Soo.... the thing about this project is that we're supposed to be dealing with skewed data! I figured this was totally a non-biased set where I'd absolutely not receive skewed data to help with my work and make it even easier. As a side note I hope this doesn't influence any future responses. I've gotten over 30 from here and a few other sources and they all seem to be lining up the way I figured they would, but I don't want to influence the choice of anyone yet to put their response forward.
-
Hi everyone! For one of my college classes I have an assignment that requires me to collect data. I was hoping I could get some help with that here! Below is a link to a one question survey that will be quick, anonymous, and easy to answer! I'd appreciate any and all answers to it. I'll post my results later this week! https://forms.gle/js8qtWf35FwJFFed7
-
Looking for Spray Plastidip Tips
TheBlooperTrooper replied to TheBlooperTrooper's topic in Assembly, Mods, and Painting
Thanks for the tips, I’ll be sure to do this! Is it possible to disassemble an Anovos FOTK more than removing the lens? If so how do I do that? -
Looking for Spray Plastidip Tips
TheBlooperTrooper replied to TheBlooperTrooper's topic in Assembly, Mods, and Painting
If I don't have rubbing alcohol available, would any cleaning wipe work? I've got a sanding sponge I'm going to try to use to rough up the inside like you suggested. I've got a respirator thankfully. Once I'm done, do I leave it out in the garage (no ac / heat) or take it inside to let it cure there, and how long does curing typically take before you'd feel safe installing components? I want to figure out how I'm attaching my visor next. -
Ages and ages ago I got an Anovos TFA FOTK Helmet. I removed the hard hat plastic helmet liner and the visor from the inside with the intent to replace them both. I got a Vaderpaint visor but never got around to installing it. I'd like to try and line the inside with Plastidip, as it seems like a fun quarantine project. Is there anything I should know before I take a go at it? The helmet is all in one piece, so I anticipated a lot of masking and lining the outside with a plastic bag to prevent any errors. I figured I'd wipe the inside down with rubbing alcohol and then go for it, but have zero clue how to go about the actual painting process. Also, if I'm looking to install stuff like velcro for helmet padding and potentially some speakers and fans (like what Ukswrath sells) down the line, what additional preparation do I need to do? Thanks!